Stop...Canopy Time!
Time to design the canopy, which can be both a nightmare and a delight. A well drawn canopy makes the model. But it's the hardest part to get right.
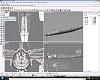
Start of by determining the shape of the canopy. In this case, a simple ellipse.
Select the Ellipse from 2 points tool, and try to outline the canopy.

Next, select the ellipse, and press the project button.
From the top view, click on any sections of fuselage covered by the ellipse, then press enter.

And you get this. We only want the one on top though, so we're gonna kill 2 birds with one stone...

Select all the pieces of the Fuselage, then right click on Layer 1 in the layers window. Select "Change Object Layer"
After that, I usually change the color of the layer to black, for ease of visibility.

Click the lightbulb next to layer one, and the fuselage disappears.

Select the unwanted lines and delete.
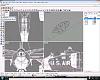
This part is tricky. What I do is use a polyline to trace the outline of the canopy trying to balance accuracy of shape, and number of segments.
Then, draw connecting lines across the footprint
Next, draw a line from the middle of the connecting lines to the outline.
Then using an ellipse from center, click on the ends of the connecting line, and the outline.
Repeat for each segment, and hopefully it'll look like this.

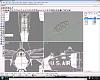
Now, to get rid of the extra bits of the ellipses.
Select the footprint ellipse, and press the Trim button.
Click the sections of ellipses below the footprint.

And it should look like this
Now we need to break up the lines into segments. Start by selecting the footprint ellipse. Then press the Split button. Select the profile curves and press enter.

Now it's split. Do the same for all the rest of the ellipses.

Now to draw the parts. Go to Surface> Sweep 2 rails

Click the top line first. The first line picked HAS to be straight for this to work

Then click the bottom line, and the sides

Then press enter. In the dialogue box, Click OK with out making changes.

Rinse and repeat for the rest of the curves.

Now, to save some work for the other side of the canopy, we're gonna mirror.
Type "Mirror" in the command bar, and select all the canopy sections.
From the front view, click in the middle, and move the mouse. You should now have a mirror of the canopy.

This next step isn't necessary, but I do it to save time later. We're gonna merge both sides of the canopy into one piece.
Go to Surface> Surface edit tools> Merge.

Click on two pieces of the canopy that are next to each other.

Repeat for each section.
And the canopy is done.