Thank you all for you kind words. It is motivation for me to keep at it, despite 12 hour work-days at times.
Now, I'll finish the the fuselage seam. This is not at trivial as it sounds, if you want a tight build. I take my time an proceed in a methodical way, which I'll demonstrate.
Okay, I want to continue from the back to the front to close up the seam. Notice that I left a bit of unspliced area on the rear section of the fuselage. This is so I can place a splice over that section and part of the next section. This produces a good joint of manageable size to easily work with.
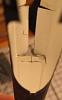
I'll work my way up, a bit at a time so I can keep the seam tight and overlap the joints with splices as I work the different fuselage segments. The sequence is shown in detail:


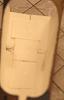
Okay, that's as far as I'll go for now. Notice I left some room for the next splice to join up the forward fuselage part. Here is the underside of the fuselage:

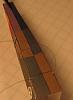
Now is a good time to insert the rigging wire for the langing gear strut bracing. I won't be able to do it once the cockpit is installed. I punch a tiny hole for the rigging with my #12 needle tool and tape it secure.

Next is inserting that spiffy cockpit and adding the front fuselage, which has a bunch of internal parts to figure out.