Before the aches of working on the garden set in, I was able to add the forward fuselage section - so here we go.
First I cut out the part and form it. There are cut-out notches on the underside, and the underside has 90-deg folds at the rear blending to a curve to the front.

I think it is best to glue one flat side first.


Then the other flat side. This way I can register the lower corners precisely. Hard to make up for errors there.

Now with the sides fixed, I start to glue up the front - starting from the outside in. I will glue the center tab last.

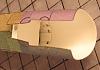
By leaving the center tab last, I can make up for errors that I noticed earlier. The error is either from design flaw at this scale or builder error. I suspect it is more a builder error than a design error. You can see the bulge between the parts.

This is easy to fix. I cut the front fuselage part along the camo line, cut out a tiny wedge of material, then glue it down. Easy-Peezy.


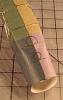
Now that the top is finished, I turn my attention to the bottom. First I need to add a glue tab.

Then I glue down one side at a time, carefully trimming material as needed for a tight fit. When done, I add a splice to join the two parts along the centerline, then add a splice tab to join the next sections.


You'll notice I darken the joint line. If there is a gap, the white paper underneath the gap will not be noticed if it's dark (it's all about contrast). Before I glue up the other side, I add the centerline splice. This is a large part, so it is easier to add it now to one side.

After dry fitting the remaining side, I noticed a small overlap error on the where the two pieces join to the rear. So I'll join the remaining side panel from the front to the back and take out the error last. I start by joining about half of the part. This creates a solid foundation to work from.

It's the rear of the part that has a tiny overlap. I trim a sliver with my small Fiskars sissors, then use an emery board to thin out and taper the thickness of the rear area. Dry fit it and work it until I'm satisfied - then glue it down. DONE!
As you can see, the fuselage is much more involved than the wings, and I like to take it in very small increments to insure the best precision and accuracy possible. I really enjoy the process of the build and trouble shooting. After all, it's a hobby, not a race.