First part of the fuselage: the engine surround and chin cowling. The instructions only show joiner strips for the attachment points for the chin cowling, but I made another joiner strip for the fuselage join. I also used joiner strips for each of the seams in the chin cowling. I suppose some people could edge-glue this, but not me:


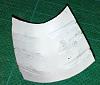
Unfortunately the top edges of the chin cowling didn't come out completely flat. There was no way to fix this without messing up the shark mount. The part itself is slightly off (; to fix it is currently beyond my editing abilities. However, the light gray I put on the joiner strip largely obscures the problem (it's much less visible in the real world than in these pictures, since I'm using flash to take my pictures). The shark mouth is looking good so far, so I'm happy with it:


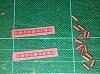
The air filters/inlets that go inside the chin cowling. Note that the model's PDF file has only 3 parts, but it says to make them 3mm thick. Since I copied all the parts that needed to bonded to cardboard onto another page, I made 9 pieces. The stacks came out to 2.9mm, which is close enough for something that's going to be largely obscured anyhow:

Last part of this segment is the exhaust stacks. The individual pipes are rolled and then angles cut at the ends. They looked bad rolled with white insides, so I tried coloring the backs with the pen I was using to mark the edges. But this bled through the paper in spots and looked really awful. So I made a new set with printed backs. These looked much better.
Unfortunately my skills at making and cutting tubes like this is lacking. I'm not that satisfied with the result. The pipes are different diameters, different lengths, and different angles. I may decide to remake these (they don't get inserted until after the nose section is closed off). What I should have done was roll them around a proper-diameter wire, and then made a template from 1mm cardboard to ensure that the lengths and angles are all correct. That's what I'll do if I decide to redo them.


The next step is finishing the nose up. It's a tricky bit of geometry with the need to form the inlet at the bottom that then fits inside the chin cowling. I expect it to take a day or two.