Dear all
continuing on
Next cut out part 2 (x4) but add on 20mm of white card along one long side of each part and glue to the lower part of the ring (see photos below). These replace part 4 (x4) and 5 (x4).


Now cut of part 3 (x4) except do not cut out the v's of the little tabs, but do cut out the v's of the large tabs (see first photo below). Then glue them to the top of the inside of the ring. If I have typed the sizes correctly these parts will sit exactly above parts 2 and the upper tabs will sit above the top of the ring exactly as they should (and the whole ring will be 3 layers thick). See second photo below.


Next make 3 tab strips each as long as part 9. The depth of each strip (not counting tabs) is 14.5 mm (crucial measurement) and the tabs were 8mm long. Glue these strips so the top of the strip runs level with the line at the top of the small tabs from part 3. This means that when the tabs of the strip you are gluing are folded in, they will be a 2mm gap between them and the top of part 2 (see photo below)


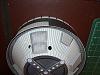
Now cut out a former from 2mm thich grey card of diameter 215.5 mm (this is going to sit just inside the bottom of the base skirt on the last set of tabs you have just glued. Cut out part 31(x2) and glue them to the former as shown below

Now glue into the bottom skirt, printed part face down (the photo below shows the skirt upside down)

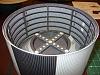
Finally glue the thrust cone onto the former. You need to check that you align the cross beams to match the correct position of the black and white outer of the base skirt. There are some photos below to illustrate this position


And here are some shots in situ with the interstage

Of course all of this was because of the J-2 engine protruding. On the real Saturn V the J-2's were level with the bottom of the interstage

I am soooo pleased with the outcome.
So here is where the 1/48 is now at

(sorry the last picture is on its side, I rotated it to vertical on my computer before uploading so not sure what else to do)
Kevin