Thanks for that link Skyman, there's some great pics in that lot.
Not much to report so far, while I still wait for all the lighting parts to arrive, but in the meantime there's still plenty I can do.
I started putting the internal structure together and I decided to start on the engine area, in particular the jet nozzles, because it fits into the internal structure. Most of the filming models don't have a lot of detail in this area as it is mostly seen in flight with CG effects added. There's a lot of different takes on how it should look depicted in various models of the Falcon too.
I want to display the model in a "landed" pose, which won't require the engine to be lit up, but I'm going to light it up anyway, with a switch to turn the lights on and off. Due to this, I wanted to add extra detail to this area. The filming prop I'm basing this build on just uses a strip of blueish plastic but that's too simple for my liking.
I've seen a few 3D printed parts and model kits showing some detailed engine nozzles and I like the look so that's what I'm trying to emulate, these two pics show what one guy (Mark Warren) did on a build of the DeAgostini kit with added detail.


Mark has added a heap of extra detail to his kit, I love a lot of the ideas he came up with and I'll be emulating a lot of them on my build.
He built these nozzles using plastic rectangle tubing, I used the measurements of his tubing to make my own hand drawn nozzles from 1mm card... 128 of them. I have also built a removable box to contain the engine nozzles/vents and the lighting etc I'll be adding later, this just slots straight in to the rear of the internal structure.

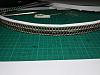


There's still going to be an external grille that fits over this section, similar to the part that comes with the kit, as seen in the last picture.