Now that I have the forward and aft section, there is another part that is to be attached in between them. That is the section housing the cockpit.
I decided to remove the inner framing from the rear fuselage ( recall I did not glue it ) and attach the section housing the cockpit. The reason is that it is much easier to mate all the sections this way as apposed to building it on the frames.
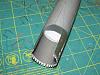
Here it is: Inner and outer skin

glued to the rear :
 Notice the inner frame is removed.
Now that it is dry, insert the frame back in. Again, do not glue it as there is no need for gluing it.


Isaac