View Single Post
 
Old 01-15-2021, 10:27 AM
Isaac's Avatar
Isaac Isaac is offline
Member
 
Join Date: Oct 2010
Location: Florida
Posts: 8,814
Total Downloaded: 679.43 MB
Exclamation Cockpit section

The cockpit section is an integral structural part of the fuselage and must be done at this point.

here is the framed section and the inner wall.
Heinkel He-280 1/33 Marek design-img_3249.jpg

The cockpit itself is simple and unless you plan an open canopy, it will do fine.
Heinkel He-280 1/33 Marek design-img_3251.jpgHeinkel He-280 1/33 Marek design-img_3252.jpgHeinkel He-280 1/33 Marek design-img_3253.jpgHeinkel He-280 1/33 Marek design-img_3255.jpg

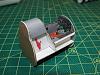
The designer did add a very helpful feature to align the inner wall to the cockpit, by having positioning homes on the frame ( part 8A ) and the inner wall.
Heinkel He-280 1/33 Marek design-img_3256.jpg

insert a straightened paper clip to act as an alignment pin.
Heinkel He-280 1/33 Marek design-img_3257.jpg


slip in the wall
Heinkel He-280 1/33 Marek design-img_3258.jpg


glue in place using the pin alignment. When dry, remove the pin.
Heinkel He-280 1/33 Marek design-img_3259.jpgHeinkel He-280 1/33 Marek design-img_3260.jpgHeinkel He-280 1/33 Marek design-img_3261.jpg


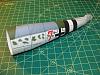
glue the outer skin lightly around the canopy opening.
Heinkel He-280 1/33 Marek design-img_3262.jpg


now the nose section is attached to the center section.
Heinkel He-280 1/33 Marek design-img_3263.jpgHeinkel He-280 1/33 Marek design-img_3265.jpg


Isaac
__________________
My gallery [http://www.papermodelers.com/gallery...v-r-6&cat=500]
Recent buildsMeteor F1, Meteor F8, Mig-Ye8, NA Sabre, A-4E Skyhawk,Mig-15 red, Mig-17 repaint
Reply With Quote