


|
|
|
#91
 02-24-2019, 02:02 AM
|
||||
|
||||
|
Quote:
To me, it looks like he's on the right track and I'm anxious to see the finished model.... 
|
|
#92
02-24-2019, 06:24 AM
|
|||
|
|||
|
Quote:
Yup, the model is a test piece, you'll notice that on some parts their are two or three different types of texture for matching parts. I am just finding out what works and what doesn't. Of course the issue with using darker textures is that any white bits stand out like a sore thumb.
|
|
#93
02-24-2019, 12:19 PM
|
||||
|
||||
|
Quote:
Gotcha! Yes definitely on the right track! Sorry if it felt condescending or something. Looking forward how the story unfolds. I am sure it will be an awesome model in the end 
__________________
website: http://www.papierschnitzel.com - patreon: https://www.patreon.com/papierschnitzel - facebook: https://www.facebook.com/papierschnitzel
|
|
#94
02-24-2019, 02:23 PM
|
|||
|
|||
|
Quote:
No offense taken dude. I noticed pretty early on that white lines were going to be a problem so have been working on the extending the textures past fold lines to make up for some of them, others require a tweak to the part in question and some will plain and simple require a good ole fashioned pencil to hide.
|
|
#95
02-24-2019, 04:10 PM
|
|||
|
|||
|
It's been a while since I have been able to get on here but this is looking like a good build so far. Nicely done. Can't wait to see it finished.
|
| Google Adsense |
|
#96
03-12-2019, 05:47 PM
|
|||
|
|||
|
Just a quick update folks, the project has been through a bit of a rework to put it simply I wasn't as happy as I should have been with how the textured prototype was turning out, or to put it another way the textured prototype gave me enough info to tell me that some things needed redone.
A list of issues. 1). My lack of blender skills meant that a good number of the parts were not symmetrical, this lead to an uneven and more complex build as well as some texturing issues. It also lead to 2). White lines, quite a lot of them 3). Off textures that didn't match from left to right bottom to top 4). Similar parts having to be made different sizes to compensate for mis-matched parts 5). The final engine assembly just wasn't working, it worked on the prototype due to it being a flat white but I really wanted it to be a little more detailed. 6). The number of parts as well as them being built in blender over a few weeks meant their was just too many mismatches, not an issue on an untextured model but as the textures were apply it was obvious parts of it were just not sitting centred or matching left to right top to bottom. 7). Sizing of the overall model was still a bit off. Most of the issues came basically down to having zero experience of Blender and very little in texture when I started. The model design in Blender was done over a number of days, two or so weeks I believe and most of that was me learning how to use the software. I then opted to use this final model as the basis which was not the best idea. The same can be said for my texturing skills in PSP So what have I been up to over the last few weeks. 1). A complete redesign of the model in blender done in two sittings, split clearly in two, first was main body and key main body parts, second was detail and engines parts. This was partly due to being more familiar with Blender and having an actual base model from which to work this helped to speed things up and also ensured consistency through the parts. 2). The redesign has centered the model and made it a little larger. The main central body used to be a rectangle which meant no symmetrical top to bottom which in turn meant their had to be specific top and bottom parts making amore complex and uneven model. The new model is square along the central body and slightly longer 3). A redesign of the engine parts done in one go with a key to making them simpler to build, no left or right bottom or top specific parts, while also maintaining the overall look of the model AND actually adding a little complexity to the engine bell mounts to try and make them flow better in to the model. 4). Base textures have been carried over to the new model but have been reworked to add more detail / grebel. I've tidied up some of the random odd stuff that I had on the first model and tried to make the entire texture set fit and flow together and just make the whole thing look a little more linear and consistent throughout the model and hopefully tidy up the white lines. I've also taken the chance to layer the textures so that fold lines can be removed by anyone with PSP or similar software if they so wish however the lines I have included I believe are fairly unobtrusive and not obvious on the final model 5). Kill the white lines, it's a tough challenge with a model that uses dark textures as ANY white stands out like a sore thumb but hopefully the rework on the model with more precision will help a lot with this. 6). While the actually body is longer, not much just a few cm, I have actually reduced the main body parts from 6 to 5. 7). A total rework of the front of the model. The shoulder pads that were on the original prototype had two issues, they were too complex to build, they would have been a nightmare to texture evenly and honestly I am not really sure they really worked. I've opted for a simpler build that I think actually flows better. The main body on the new version is in the middle of having the final piece set before I move on to assembling the new engines parts. These will be the big teller as they have the most parts and any issues will stand out quickly here. Once the engines are on I'll post some side by sides of the old vs the new hopefully it will be obvious why I chose to rework and tidy the model up at this point. Last edited by Cheesy Wotsit; 03-12-2019 at 06:03 PM.
|
|
#97
03-18-2019, 03:39 AM
|
||||
|
||||
|
Sounds like a good plan! Looking forward once you get through the rework phase. Good luck!
__________________
website: http://www.papierschnitzel.com - patreon: https://www.patreon.com/papierschnitzel - facebook: https://www.facebook.com/papierschnitzel
|
|
#98
04-09-2019, 03:17 PM
|
|||
|
|||
|
It's been a while, wow over a month since I posted any update images, that is quite a while.
So where is the model now? I'll make things easy and start right out by posting the following. 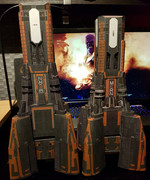     I didn't want to post any images until I had the new model design up to the same build as the old one. I've gotten a wee bit further as this one has the engine bell attached. The new model has been a bit of a trial, specifically the engine nacelles and the engine bells have taken a wee bit of time and quite a few designs to get the design shown here. The old Nacelles were made up of 5 parts, 3 cosmetic and 2 structural with a final wrap piece. Best way to describe it was a single piece designed to be stuck over the entire nacelle like wallpaper. It kind of worked but really suffered from being difficult to get a nice smooth finish on the mid section where the nacelle changes shapes. I ended up going through four different designs. They could be split in to two categories easy to build but made up of loads of parts, making it much harder to hide joins or less parts, less joins but a nightmare to build. The final design has 2 main parts and a single internal structure part, with careful cuts and folds used to make the shape change in the middle of the nacelle. It works really well and you really can't see the cut and fold unless you look real close. The other hold up was the engine bell itself which went through a few designs in an attempt to make it easy to build, while also being the right shape and size. I am not 100% sold on the design shown but they are easy enough to remove if needs be. So where is the model now - The model is now symmetrical across the X and Y axis, apart from the MCRN logo which sits on the top of the model. Other than that every part on the model can be moved around and swapped about. - The model is a little longer than the old version. Part of that is due to making the model symmetrical meant I had to increase the length of the main body and front cowls to help maintain the proportions. - The nacelles are actually a bit longer as well but actually not as tall, making the model a little more streamlined. - I've added some mid body in lay detail - Tweaked the textures to give the ship a more space worn faded look, moved and redone some textures to try and get all the parts to flow together better, tried to remove some of the 'stock' textures that I was using, it also gave me a chance to do separate fold line layers but to be honest you can't see them on the model anyway. - Totally reworked the details on the mid section nacelle lead in parts, - Made the front portion body detail larger, repositoned the rail gun mounts and made them larger, again making their position around the model symmetrical - Totally removed the shoulder pads from the front and reworked them in to the front of the ship hopefully adding to more streamlined look. So what's left. Not a great deal to be honest the redesigned missile launcher and cowl has been textured and printed. I just need to build it, same goes for the rail gun mounts and the 'fins' and detail for the top of the engine nacelles AND the detail parts for the front, the new shoulder pads and reverse thrusters. - The comms array and cowl needs exported and textured. - The Railguns themselves need exported and textured and well I guess I'll get round to the stand and then I can start working on the instructions for the model build. I'll be updating this thread with more regular pictures as the build finally reaches the goal. Their was however one victim during the last month 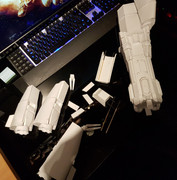 Cat vs prototype. I guess the cat won.
|
|
#100
04-11-2019, 02:23 AM
|
|||
|
|||
|
Superb, I can't wait to build this beauty and set it next to Tachi
|
| Google Adsense |
 |
| Tags |
| donnager, expanse |
| Thread Tools | |
| Display Modes | |
|
|


 Linear Mode

