


|
|
|
#1
 03-11-2019, 10:46 AM
|
||||
|
||||
|
light assault snowmobile
my current project is to make this fictional vehicle, the P75 Mulot Light Assault Snowmobile.
I designed it for an alternate timeline in which Canada faced a Civil War in the 1930s. The vehicle itself is based on the Bombardier B12 snowmobile. If I manage to make it look nice enough, I plan on using the chasis as a basis for variant vehicles (troop transport, mobile artillery, etc...) 
|
| Google Adsense |
|
#2
03-11-2019, 11:24 AM
|
||||
|
||||
|
The Soviet Union had an assault snowmobile during WWII.
https://jalopnik.com/sikorskys-motor...viet-s-5657142
|
|
#3
03-11-2019, 09:44 PM
|
||||
|
||||
|
Quote:
Another vehicle I might eventually design is a smaller type that could serve a similar purpose than motorcyle did in real life (dispatch/reconnaissance). I was thinking of basing it on this 1941 Eliason Motor Toboggan, Model D: 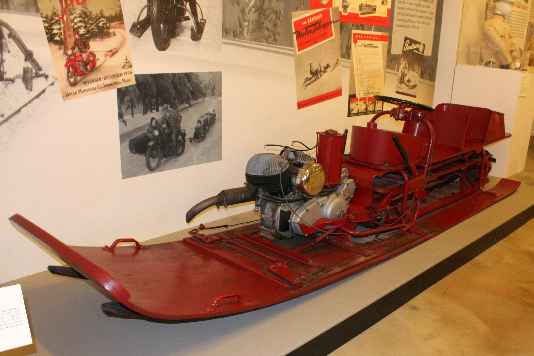 probably will add a side cart somehow or elevated the backseat to allow for a machine gunner.
|
|
#4
03-13-2019, 07:31 PM
|
||||
|
||||
|
nothing earth shattering but I think I'm more likely to finish the project if I try to keep posting update.
The theoretical goal (in the sense that there is no actual contrainst) of this and its related models is to design them so that they would be faily quick and easy to build by anyone downloading them. The target audience are tabletop wargammers and are meant as a free alternative to plastic / wooden / metal models so that someone could quickly build up their forces and scenery. For this particular model, I want to limit the number of pieces so apart from the turret and smaller parts that stick out (doors, windows, access hatch), the main part could in theory be a single folded piece but since you end up with a large empty space in the middle, I want to prevent the main part becoming too "squishable". The 2 idea I can think of (sketch below to illustrate) would be: 1- have the main part made of 3 pieces: the main body, the undercarriage glued underneath and a set of track glued to each side of the undercarriage. 2- have the main body composed of 3 pieces glued together, the middle one extending partly further down to form the undercarriage and the 2 sets of track then glue to the part that extends. the first one is simplest but still results in a large amount of empty space (unless you include some inner scaffolding) while the second version would be hard to align perfectly (unless the seams are to be covered by another piece of paper the width of all 3 pieces combined.)
|
|
#5
03-14-2019, 11:43 AM
|
||||
|
||||
|
I think I would go for the first approach and put some inner scaffolding inside if required. As you say, it might be hard to align with the second approach. Also the texturing will be easier with #1. Or maybe #2 will be inner scaffolding for #1 :-)
__________________
website: http://www.papierschnitzel.com - patreon: https://www.patreon.com/papierschnitzel - facebook: https://www.facebook.com/papierschnitzel
|
| Google Adsense |
|
#6
03-24-2019, 07:16 AM
|
||||
|
||||
|
I finished drawing the sideview and decided that printing that then figuring out the rest might actually be easier. I've done the main body today so all that's left is making the turret, measuring everything then drawing the remaining pieces and texturing the lot.
About the flat figure next to the snowmobile, I printed it in a few different sized to see if vehicles / buildings looked right in a variety of scales. this one is for 28mm figurines.
|
|
#7
03-24-2019, 08:40 AM
|
|||
|
|||
|
That is pretty neat. I really like the simple way you made the tracks.
Mike
|
|
#8
03-24-2019, 02:17 PM
|
||||
|
||||
|
Can I also say, great tracks. Simple, but effective use of corrugated card. It's also good painted up and weathered, as sheets of corrugated iron for buildings.
__________________
"It's all in the reflexes."
|
|
#9
06-09-2019, 06:27 AM
|
||||
|
||||
|
got around to making the turret.
|
|
#10
06-14-2019, 06:47 PM
|
|||
|
|||
|
I Like the look very nice!
here is another fun one The 007 Parahawk https://jamesbond.fandom.com/wiki/Parahawk https://www.flickr.com/photos/alexwa...ns/13364256195
|
| Google Adsense |
 |
|
|


 Linear Mode

