


|
|
|
#1
 12-28-2009, 11:53 AM
|
|||
|
|||
|
[Workshop] Nash-Quad 4017 1:25 (own design)
Hi!
I decided to start building here a relationship with this cool vehicle  It would first report from the series "forgotten structures (apart from my previous galleries guns wz.16) And it looks like:  This model is finally formed in 1917. Originally was built in factories Thomas B. Jeffery Company of Kenosha, Wisconsin, after the death of the founder's son, Charles Jeffery (as a curiosity I add that this was one of the 764 passengers who survived the unfortunate voyage RMS "Lusitania" May 7, 1915) sold the factory in 1916 years Charles W. Nash are those who changed only after the final name of the Jeffery Motor Company, the Nash Motors. Interestingly, the vehicles have been included in the 1917-18 at the end of Rosjii are called "jeffrey'ami" even though they were already "nash'e" (in error could make graffiti on the coolers from the surpluses of previous years) With absolute certainty that 2 types of vehicles were in Poland during the Polish-Bolshevik War as an armored car chassis captured "Jeffery Popławko" (more correctly it would be, "Nash Popławko" but let them be, as has already adopted a  ) ) Gathering documentation and knowledge necessary to build the model learned from Adam Jońca that in fact these vehicles in the country was much more - about 30 pieces. If they were confused with FWD Mod. B due to the almost twin design. For example: FWD Mod.B and Nash Quad 4017 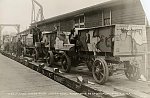 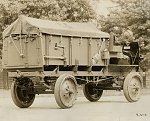 Few differences can be observed outside of the wheels and longer frame FWD ... At the end of the entrance will add only that I was going to build both 2 vehicles of which one will be in the basic version (with a metal crate for the transportation of ammunition) and the second will serve as a chassis for armored car that More updates soon ... Best regards Jaroslav 
|
| Google Adsense |
|
#2
12-28-2009, 01:11 PM
|
|||
|
|||
|
Painting a uniform because I do not know any of these photos documenting the painting cars in WP, on the other hand camouflage as he could, moreover, intended to effectively hide many details and that nobody from the scratch builders do not want to
good to start crate: Having a few good photos if no major problems I was drawing her in Corel Draw 11, the problem was how such a large paper surfaces maintained without deform. After many experiments, I decided to part before the excision of a rare flood cyanoacrylic glue and sand. proved to be the best solution because it secured against distortions in the painting. I came out something like this: 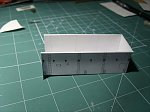 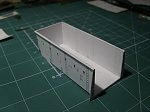 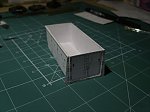 On the occasion of the first time in my life I used on a massive scale rivets stamped with a thin paper with a needle 0.7 mm. rivets and all other details as reinforcements, fittings, hinges, etc. was glued by Capon(nitro primer binding) and at the end of the painted withTestors steel metalizer 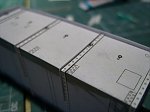  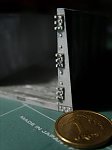 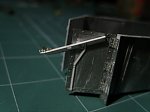 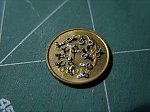 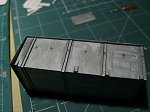 Not too precise, because it is supposed to be only a metallic backing At the end of this stage I was brushed several thin layers of pactra A30, and so it seemed for the moment: 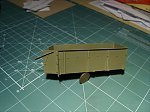 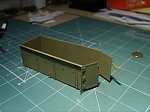 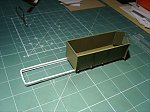 On this occasion a couple of these reinforcements had deformed but fortunately straighten. Then hit the frame of a workshop or ordeal first part Confused...
|
|
#4
12-28-2009, 05:17 PM
|
||||
|
||||
|
Very cool subject! And great looking build! The hinges are incredible... Your "not too precise" would make me feel proud if I produced it!
Great work!
__________________
Chris Currently have way too many hobbies
|
|
#5
01-02-2010, 07:56 AM
|
|||
|
|||
|
Welcome Friends in the new year
This time I'll show you the beginning of the struggle of the frame ... about damn ungrateful for modeller due to size (155x28x4mm) and construction of channel sections. Everything would have been if grat if frame was twisted from the straight sections (like FWD cars for example) and there as if to spite it is at all unfriendly Curved to modeller ... but what I will be talking and see for yourself: 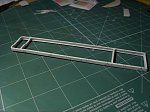 The division has devised a so that the top and bottom as a whole, both sides were soaked with the cyanoacrylic glue and the ground, the sides of the was glued end-to-mid front springs and fittings are only part of the front I was glued with characteristic "indentation" on the crank. On paper dipped BCG curves to soften. junction with the lateral parts of the hardware chosen specifically to make it up to hide and perhaps even succeeded 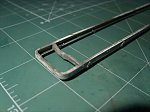 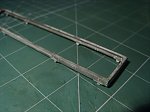 Well, it's time for cruelly twisted forging and strengthening the framework supporting the gearbox Confused 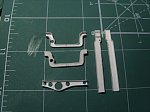 These elements to strengthen the walls was overlaid stripes dipped BCG In order to realistically look at where they should be solidly Sand, but the grind, such as twisted channels that do not destroy them? I printed a few items and glued on cardboard 1.5 mm and then cut the inside contour and the strengthening of the cyanoacrylic and polished order to fit inside the element. With such an instrument can now go ahead and pour the cyanoactylic glue grind 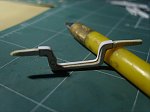 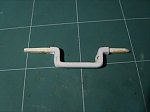 I already have on your site: 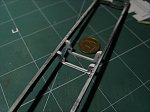 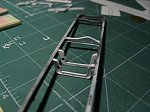 Notice that this damn thing narrows downwards which does me not very optimistic .... but finally came out for 4 decks approach as I wanted. Since that was not solved until the end of the distribution in the frame of all the rod and pipe was at least in this form, of course, armed with all the rivets, screws, springs and fittings. Generally, the frame I made in 3 copies, as it turned out right because 2 is already twisted ..... In the meantime, I built the coolers. 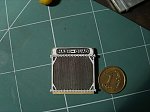 Do not want to dwell here on what: glued laminated, dummy mesh is affixed to a bouquet of flowers with a lacquer, inscription was by vicol (water diluted glue for the wood) highlighted. And today, it will be enough Best regards Jaroslav
|
| Google Adsense |
|
#6
01-02-2010, 10:53 AM
|
||||
|
||||
|
Excellent
. I am always amazed at those who scratch build a subject they choose. I like the subject, the History you included and the execution of the build is just outstanding. Ditto on the hinges, and the radiator looks like it could hold water . I will watch this one, look forward to more of you craftsmanship:D.Rick . I will watch this one, look forward to more of you craftsmanship:D.Rick
|
|
#7
01-02-2010, 02:08 PM
|
||||
|
||||
|
I have some photos of an unrestored 1916 Quad I shot at a Military Vehicle Show last year to maybe do a model of. May also have some of restored Quads but would have to find them. If you're interested in them pm me and I'll get copies to you.
|
|
#9
01-02-2010, 03:30 PM
|
|||
|
|||
|
Thank You Whulsey very much for that pics.
1st of them is very helpful to me If You were found in their collections the documentation/ some pics. of Buda, 4 cyl and 6 cyl.engines it was I would very grateful for the provision Yours sincerely Jaroslav
|
 |
|
|

![[Workshop] Nash-Quad 4017 1:25 (own design)](https://www.papermodelers.com/forum/iconimages/armory/workshop-nash-quad-4017-1-25-own-design_ltr.gif)


 Linear Mode

