


|
|
|
#11
 11-14-2011, 10:08 PM
|
||||
|
||||
|
Hi Leif,
 Have to watch and see when I get there, won't be much longer as I am working on the engine and related parts now. Have to watch and see when I get there, won't be much longer as I am working on the engine and related parts now.I made up the engine block, 12 parts that go into the block proper. The top of this has the placement markings for the six cylinders and the bolt markers that hold them down through the head. The cylinders are rolled up from card, 3 pieces each for them. I clipped them out then used a black marker to edge color the black part before using a small shaping bit shaft and an even smaller diameter drill bit to roll the pieces over an old mouse pad. This imparts a curl to them and makes gluing the parts much easier. You can see one that is assembled and three that are in the process of getting shaped by rolling and two still remaining to be cut out. 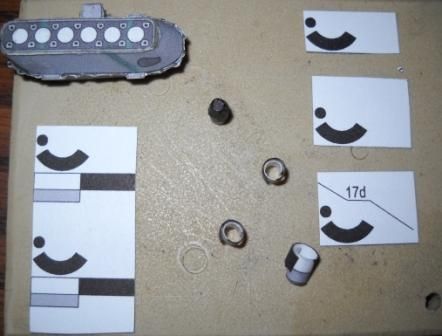 Speaking of cutting out, I cut out the exhaust manifold shapes from the pepper can that I had glued them to. I used a pair of sharp scissors to do the most part of the cutting of the outside of the shape then cut the sides of each runner with the same scissors. A pair of fine needle nosed pliers then gripped the part that was to be removed in between the runners to bend the extra material up and down to remove it. Now I get to start shaping these little goodies.  I also made up the two bladed propeller, a six piece affair, front and rear leaves for the blades with a round back plate and a 2/3's Moon shaped front part with sharp cut outs on the inner side so that you can roll it up to make the cone shape. While most would just cut the parts and glue them together as best that can be done, this leaves the petals of the cut out part visible. I spent a little time adding some extra Aleene's Tacky Glue over the top of the cut outs to smooth them out a bit then painted over it a couple of times to smooth things out even further. Once that was all done, I made up the blades with some cut down inner parts to fatten each one up just a bit and give them a bit more shape. Once all that glue was dry I assembled the blades to the hub using a couple of rotary tool shafts as rests on either side of the hub for the blades to rest on. Establishing the right amount of angle to each blade as I glued it in position and holding it long enough to tack up allowed me to come up with this for a propeller. 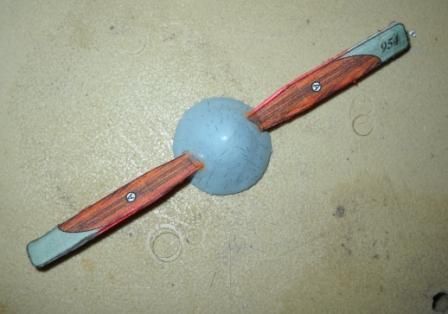 One of our forum members, Kroolo has already built this one from the WAK Model book on another forum over in Poland and was kind enough to point me over there with a link to his thread and excellent build. Right off the bat, I discovered that I had left off a part of the bottom of the floats looking over his photos. He also gave permission for me to post the link here so anyone else interested in building this one can benefit from my humble efforts as well as his. Thanks Kroolo! WWW.KONRADUS.COM - FORUM MODELARZY KARTONOWYCH - [Relacja / Galeria] Albatros W.4 - WAK 11/2006 Enjoy all the great photos as I continue on in my effort here.
__________________
Jay Massey treadhead1952 Las Vegas, NV 
|
|
#12
11-15-2011, 05:33 AM
|
||||
|
||||
|
looking great!! Thanks for the update!
Chris
__________________
Want to buy some models from independent designers? http://www.ecardmodels.com and visit the shop!
|
|
#13
11-29-2011, 08:38 PM
|
||||
|
||||
|
Thanks Chris,
Another update as it were. I have been spending a little time each evening working on this and that in relation to the build of this little float plane. I did complete the engine to a point and then after studying Kroolos' excellent build up, I noticed a couple of things that I should have done differently. So I printed out and have started cutting out the parts to build version two of the Mercedes 160 HP aircraft engine. I have gotten the after part of the fuselage built up using the provided formers and outer sheets. I also started on the forward part of the rudder assembly. The cockpit is getting underway with the formers added to the floor board and then the instruments layered in place and the various pieces that go on the instrument panel part layered up as well to give it a bit more relief. The nose of the plane has the formers cut out and edge colored on the inner edges so I can start working on getting the whole fuselage together. 
__________________
Jay Massey treadhead1952 Las Vegas, NV
|
|
#14
11-30-2011, 04:03 AM
|
||||
|
||||
|
I am already enjoying the wooden textures on the fuselage. Such a challenge to reproduce and replicate. Looking forward to seeing this model grow up.
Leif
|
|
#15
04-15-2014, 05:15 PM
|
||||
|
||||
|
OK, I know this is a necropost, but has anyone (else) built this model.
I'm looking for my next build and this atracts my attention. It would be quite a stretch for my skills, but I've got to try if I'm going to learn. I have Fitters land version of one of these Albatros'. It looks complicated. Any input would be appreciated. Baring getting my hands on Murphs upcoming HE-59 release (it's in beta build right now), this looks interesting. JoeG
__________________
Currently building Heinkel Models/Ron Miller Authentic Nautilus.
|
| Google Adsense |
 |
|
|


 Linear Mode

