


|
|
|
|||||||
| View Poll Results: What do you think? | |||
| Finish the design. |
|
61 | 63.54% |
| Make it very detailed. |
|
46 | 47.92% |
| Make it a one page quick build plane |
|
9 | 9.38% |
| Get another hobby and let the pros take care of this. |
|
0 | 0% |
| Multiple Choice Poll. Voters: 96. You may not vote on this poll | |||
 |
|
|
Thread Tools | Display Modes |
|
#91
 03-18-2012, 06:12 PM
|
||||
|
||||
|
Wow Mike, I had no idea that designing the canopy was such a rediculouse amount of work! I am sorry that I wasn't able to get any good pics of that...it is always covered unless there are a group of people there working and it is a little to hard for me to get the cover on and off by myself. I will try to get some detailed shots this Sat when I go out to work on it if you think it will help. Might be too late by then.

|
|
#92
03-18-2012, 06:19 PM
|
||||
|
||||
|
Also, I am pretty sure you are already aware of this but I thought I should bring it to your attention just in case. It looks like the very end of the nose (the part that is all white) in your sketch up on page 6 is very stubby. the actual nose on the plane is fairly "pointy". there are a couple of good pics of that in the emails that I sent. Just a little observation.
Keep up the great work! I wish I had half the talent in designing that you do (but then again, if I was designing this myself I wouldn't have the joy of watching all of your amazing progress every day.  
|
|
#93
03-19-2012, 06:31 AM
|
||||
|
||||
|
Quote:
I liked the suggestions well enough that I went down that path. Fair lines. I like that term. Nautical in nature. A smooth curve with no deviations in hull lines. My wooden boat days in lofting lines. So lofting lines is the same process that you use to get a shape when you are working with three views of a plane. Not as accurate as a ships print but can get you the shapes pretty close. So here are some pics of the suggestions in practice. I built the framework and inserted it into the joined sections of the model. I then injected some closed cell foam. I let this set for about 15 minutes. Then I sanded the entire outside of the fuselage with some 120 Grit paper till it was smooth no joining lines to the touch were apparent. Then I used ZipDry paper glue to adhere the skins. The result was not bad at all. If the panel parts were cut to the proper sizes and then applied I think it would give an entirely new look. There is still the problem of transition from one former section to the next, if the panels were to overlap across the transition lines of the former the panel would want to wrinkle as it tried to make this curve as the paper is flat, so you would have to introduce some more cut lines and fit these together. I did not attempt this in this series of photos and just kept to the conical sections, but will go for the overlap into two or more sections on the next test build. This was just an experiment to prove the technique to myself. 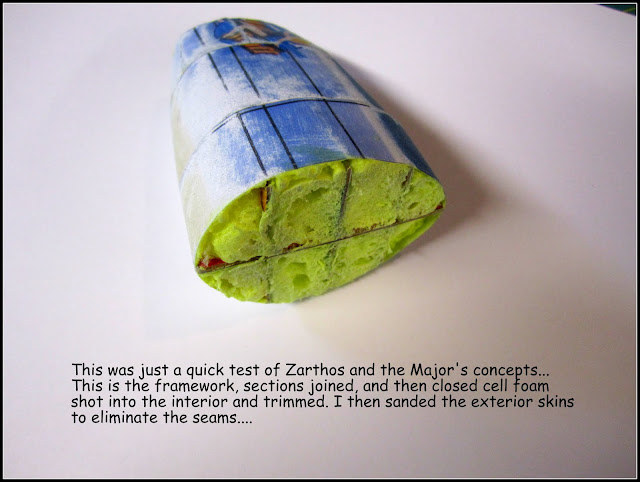    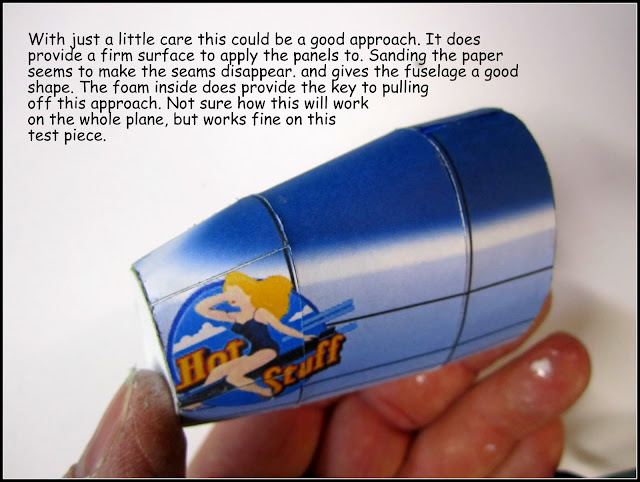
__________________
Mike Dixon Anything in paper is fine with me
|
|
#95
03-19-2012, 10:42 AM
|
||||
|
||||
|
Quote:
Here is the canopy, I think I will stick with this for now. I cut out the windows and colored the edges. Then I colored the back with felt tip maker. Sprayed it with permanent spray adhesive and laid it down on clear acetate Cut it out and glued the edges with Gel super Glue 20 second open time. It caught and held right off. The clean up with Q tip and solvent. Odorless mineral spirits. If it gets on the paper I don't mind as it does not run my ink and then just evaporates. However I guess it adds to the combustibility of an otherwise highly flammable product. Moving on to some other part now.     
__________________
Mike Dixon Anything in paper is fine with me
|
| Google Adsense |
|
#96
03-19-2012, 02:00 PM
|
|||
|
|||
|
Wow, excellent!! This is probably the hardest part of the fuselage to do this with. It has the most curves. I think you will see a real payout out of the bulk of the fuselage shape where you will be able to staircase panels and make the eyes gloss right over the shape. No meat cleaver sections. This will be a first. CDaveport has a video where he shows how to get a compound shape by rubbed a surface with a rounded piece of metal. I think something to that effect can be done with compound areas but most people don't seem to want to go through all that. Maybe just for one offs. I look forward to your continuing efforts Pathfinder!!
|
|
#97
03-19-2012, 02:08 PM
|
||||
|
||||
|
Quote:
Oh yes, for all those who have taken the time to tell me the nose is not right ... I know the nose is not right but I hate petal work with a passion so I am working on that now.
__________________
Mike Dixon Anything in paper is fine with me
|
|
#98
03-19-2012, 02:43 PM
|
||||
|
||||
|
I figured you probably had the nose under control. Didn't mean to be critical, just understand that I am around this plane a lot and am able to "see" discrepancys like that. Based on your past work I figure that you want to make a very accurate model and just thought I would let you know.
|
|
#99
03-19-2012, 08:56 PM
|
||||
|
||||
|
Quote:
, the nose is a pain, to design and build, which is why you never really get to see it. However I am trudging along and will sooner or later get to it. Probably later than sooner. 
__________________
Mike Dixon Anything in paper is fine with me
|
|
|
|


 Linear Mode

