


|
|
|
#1
 07-13-2014, 11:36 AM
|
||||
|
||||
|
AT6 Texan Build - Photoset
Hopefully this thread works in cooperation with Gary's (MacSongLi) build thread for his RCAF Texan repaint.
I have been wanting to do a new Texan "Build Set" of photos for some time. The existing Photo Build Walkthrough (that you can download from my website) is an older model...there have since been a few changes. So, its time to do an updated build and compile a new set of photos. This will be a build of one of the new AT6 Air Racer kits. This is "Lickety Split" as flown by Bud Granley. I'll do a standard "build thread" using what will hopefully be the new Photo Build Walkthrough that I will make available for download at www.papermodelshop.com. .... Printed out all the model pages this morning and started this build at about noon today...waiting for the New Hampshire Nascar race to start. Lets see how much I can get done before the end of the race (about 4 hours?). ... All Parts pages printed on plain white 65lb cardstock (Letter 8.5" x 11"). Instructions and Formers printed on 20lb plain paper. Didn't bother printing the Cover page. I didn't coat the paper, but I recommend spraying the printed pages with something like a Photo fixative. Krylon makes many types of such sprays.  ... Former page I glued to two layers of "cereal box" cardboard. Sand the glossy printed sides, and glue the two layers of cardboard together using 3M Spray 77 spray glue. (Use a brayer roller to get good contact) Then apply the Former page in the same manner, to the cardboard. *I have removed, from this page, the part for the horizontal stabilizer. It does not need to be laminated to heavier card. 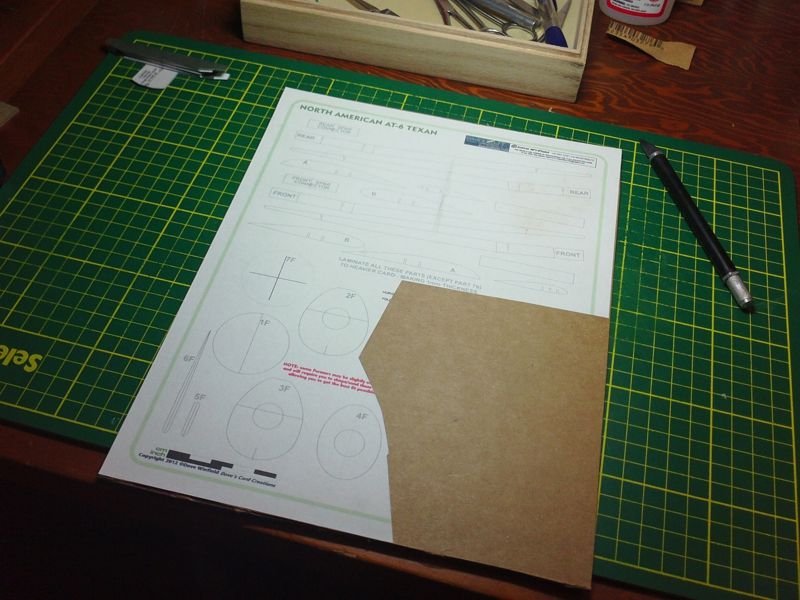 ... Cut out all the former parts and cut out all the connecting slots. Be careful to match the width of the slots to the thickness of your Former parts. I use sandpaper (cheap nail files work well) to shape all the cut edges of the parts. Don't go overboard with the fuselage formers, we will adjust their fit later in the build. 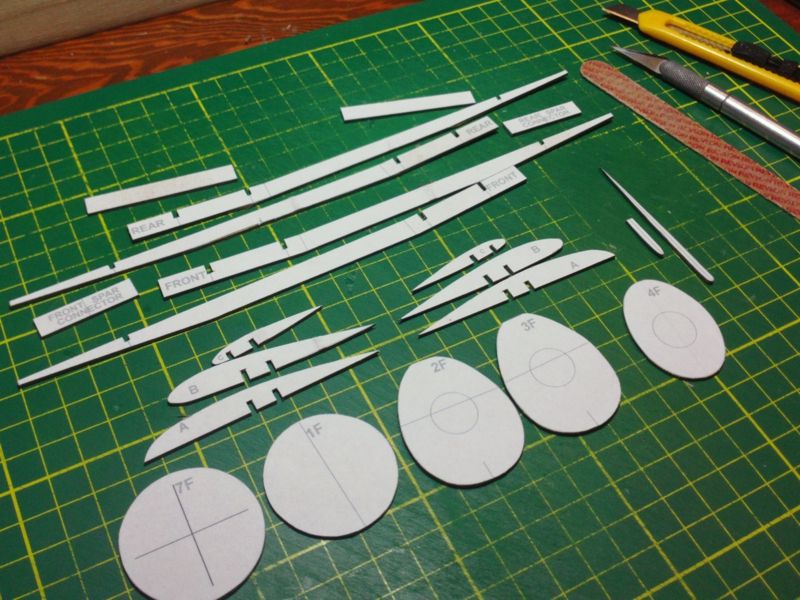 ... Assemble the Wing Spar and Rib assembly by joining the two main Spars with the center joiners. Glue, clamp and wait. Then slot all the parts together - use plenty of glue at each connection for a solid assembly. Make sure to keep everything as square and parallel as possible until your glue is dry. At this point, you can also apply some CA (cyanoacrylate) glue to the edges of these parts. It serves to strengthen and stiffen all the parts and keep smaller parts from delaminating. Be careful not to glue your assembly to the worktable! 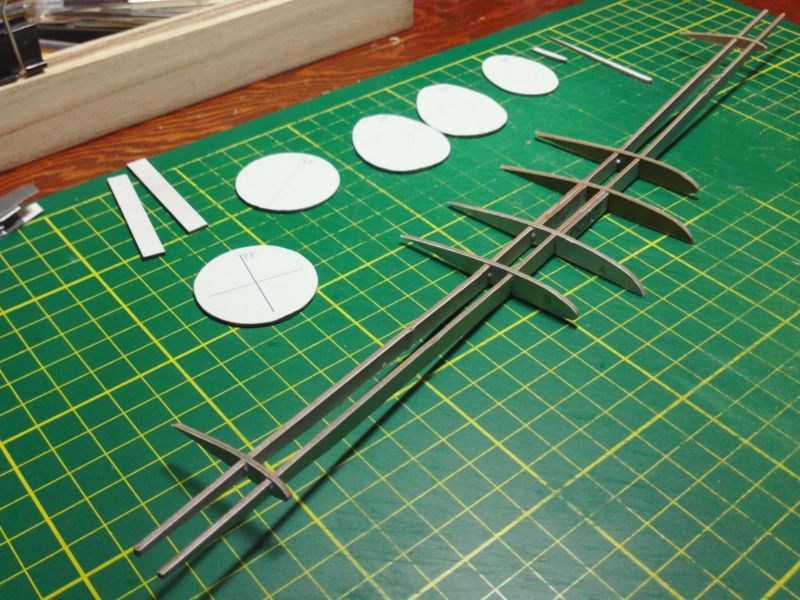
__________________
SUPPORT ME PLEASE: PaperModelShop Or, my models at ecardmodels: Dave'sCardCreations 
|
| Google Adsense |
|
#2
07-13-2014, 12:11 PM
|
||||
|
||||
|
You're definitely a lot faster then me! I'm glad you've started on the wings, because that is my next step, so I can follow you.
Gary
__________________
"Fast is fine, but accuracy is everything" - Wyatt Earp Design Group Alpha https://ecardmodels.com/vendors/design-group-alpha
|
|
#3
07-13-2014, 05:53 PM
|
||||
|
||||
|
okay, I quit about 4.30pm...to watch the end of the race and go have some dinner...
thats about 4-5 hours working on it (while watching TV). I find I am rushing to prove I can get a lot done in that short time, which only resulted in a number of messy glue cleanups and flubbing a couple of parts! Luckily, parts came apart with minimal trouble and I was able to soldier on. Moral...slow down if you want a better job. ... continuing with the wing assembly first (which is contrary to my usual build method, but thats okay)... center section...cut it out, cut out the middle part, and preform the curve. You have the assembled wing spars to use as a guide for the correct shape. I, personally, prefer NOT to crease the front...on this particular plane, its a more rounded leading edge to the wings, so I use a dowel. 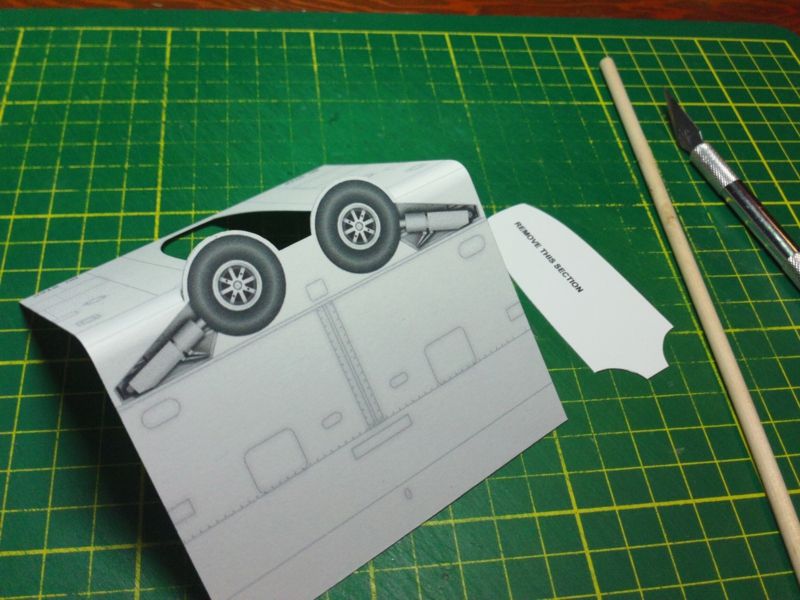 ... Next you want to attach the trailing edge glue strip...crease, fold, glue. Make sure you set it in a bit from the edge...2-3mm or so...which allows for a tighter trailing edge connection. Then attach the side joiners. I recommend the side joiners are glued on one side only, until you get the center part folded over.  ... Now fit the Spar assembly into place...find the center and pencil in a refernce mark or two...then apply a small amount of glue on the undersides of the ribs. Just enough to grab...not enough to cause wrinkles. Fit the Spar assemble and get ready to fold over the top layer. 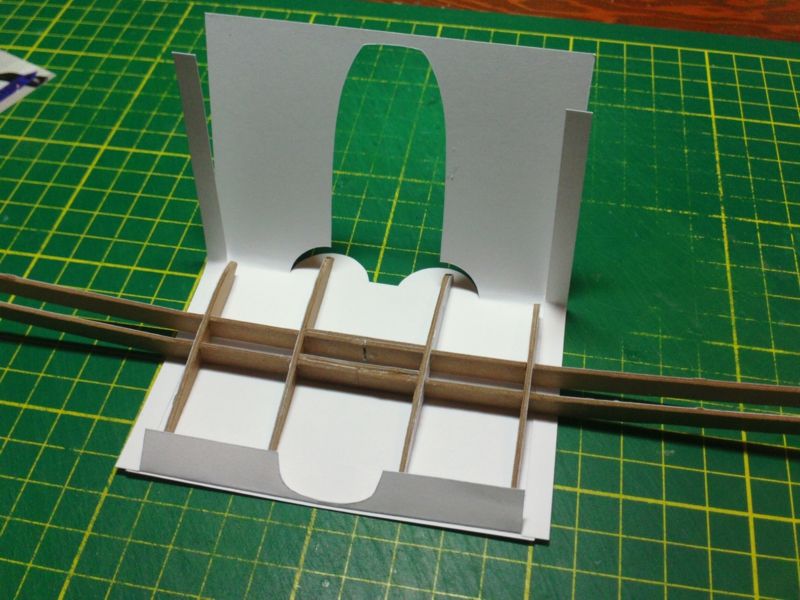 ... Its best to dry fit (no glue) these steps first to make sure things line up. It is now that you can make trims and adjustments. And dry fitting gives you an understanding of how things will or will not go together! You can fold over the top and glue the side strips into place or wait...its really not that difficult to glue them later, before the wings are fitted.. Fold over and line up the trailing edges...having already applied glue to the inner glue strip. And apply even pressure across the seam to create as tight a seal as possible. 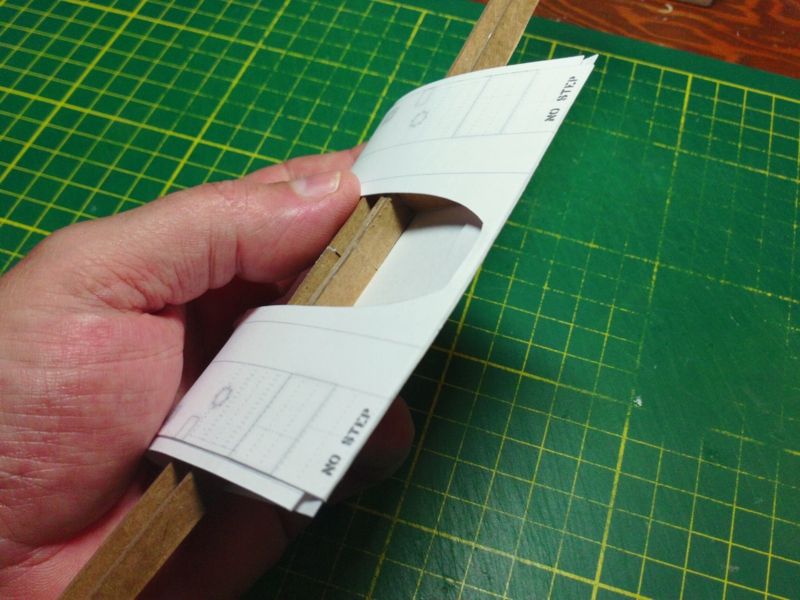 ... Cut out the wing parts... this includes the right and left wing extensions and the wing tip parts and the tabbed glue strips (for the wing tip parts) Prescore the trailing edge glue tab as well. 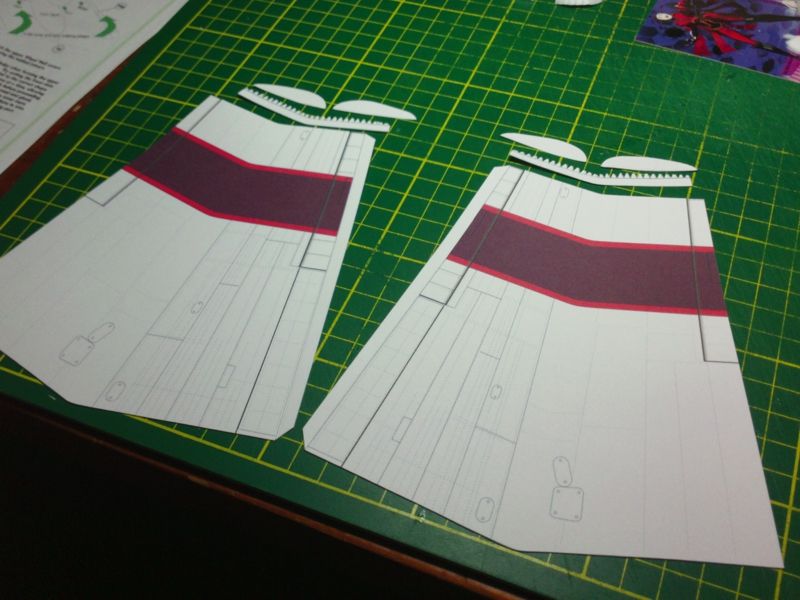
__________________
SUPPORT ME PLEASE: PaperModelShop Or, my models at ecardmodels: Dave'sCardCreations
|
|
#4
07-13-2014, 05:54 PM
|
||||
|
||||
|
Now form the wing extensions.
Again, I prefer to use a dowel to roll the fold, rather than a straight line crease. But the edge must be tighter as it gets further away from the fuselage. Try to match the wing ribs for shape. I have also folded the trailing edge glue tab.  ... If you want to install the wing tip glue tabs, you must preform the wing (fold it over) and then glue the tabbed strip in place. Or, wait until after the wing has been formed and glued. Preform the tip parts...most of the curve should be toward the front end. 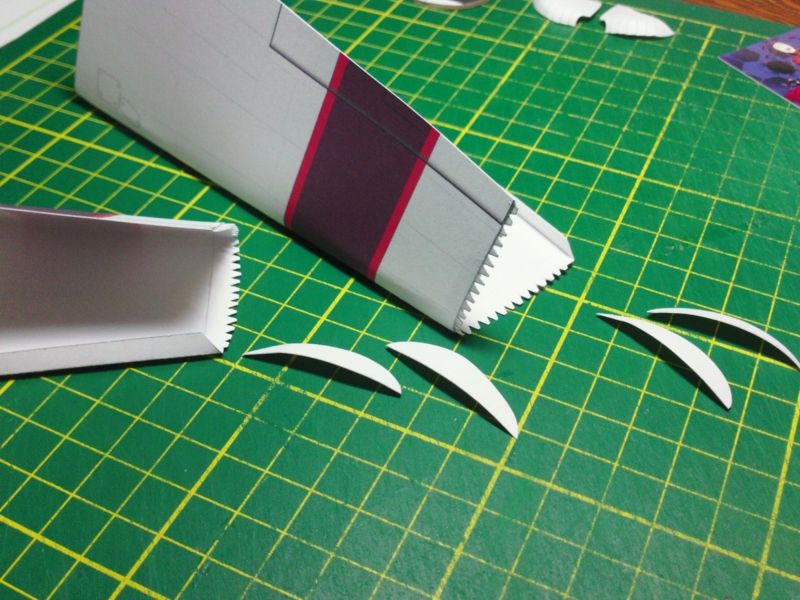 ... Fold and glue the wing parts, making sure the edge is tight and straight, and the ends are lined up. Take your time to glue this tightly and cleanly. Use pressure to flattent the parts and create a "knife edge". This is where you will cause "wing twist", a common problem in paper models. Making sure the ends are properly lined up, will reduce any chance of twist. But if the leading edge crease is not perfectly placed, it won't matter how well the ends line up! This is another reason I prefer to "roll" the leading edge...then you can tighten and crease it more after you have glued the trailing edge. 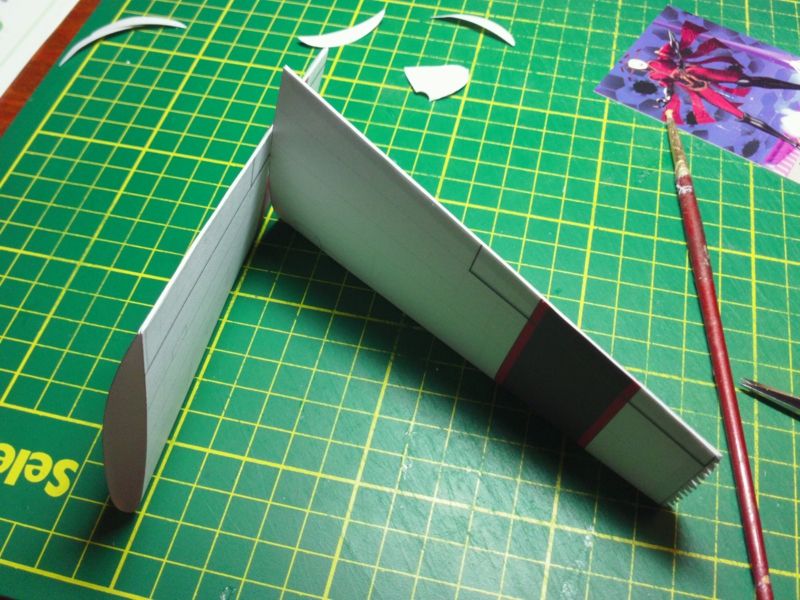 ... Glue the tip parts in place onto the tabbed glue strips. Its all about the cirrect curved shape. Oen up the wing as much as possible to get the parts glued into place. You can close it up, glue and trim the parts . 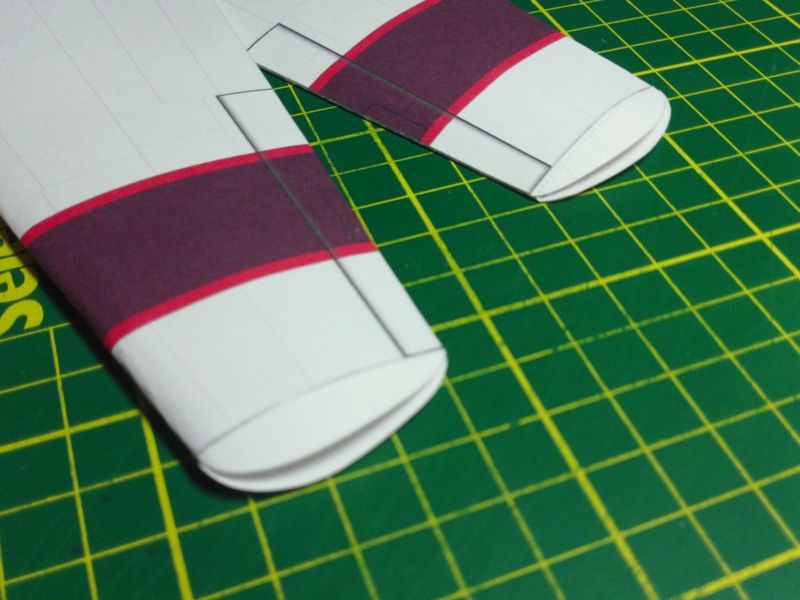
__________________
SUPPORT ME PLEASE: PaperModelShop Or, my models at ecardmodels: Dave'sCardCreations
|
|
#5
07-13-2014, 05:55 PM
|
||||
|
||||
|
One of the trickiest parts of this kit, is the Wheel housings.
These are domed parts that must be fitted to the top side of the central wing section. They are actually quite easy to do if you take your time. Cut out the left and right parts, and cut the petal cuts into the parts. Then you must start to curve the parts in one direction only - down. As you close up the petal connections, you will create the horizontal curve to the part. In this demonstration, I cut one side of each petal and used the Vee section as an overlap tab. This results in a bumpy, overlapping connection...but it uses no other parts. An alternate method is to cut out the Vee section between each petal, and edge join the petals. This results in a smoother exterior, but requires adding inside tabs across each join. The more you preform the curves before you start gluing, the easier the assembly. 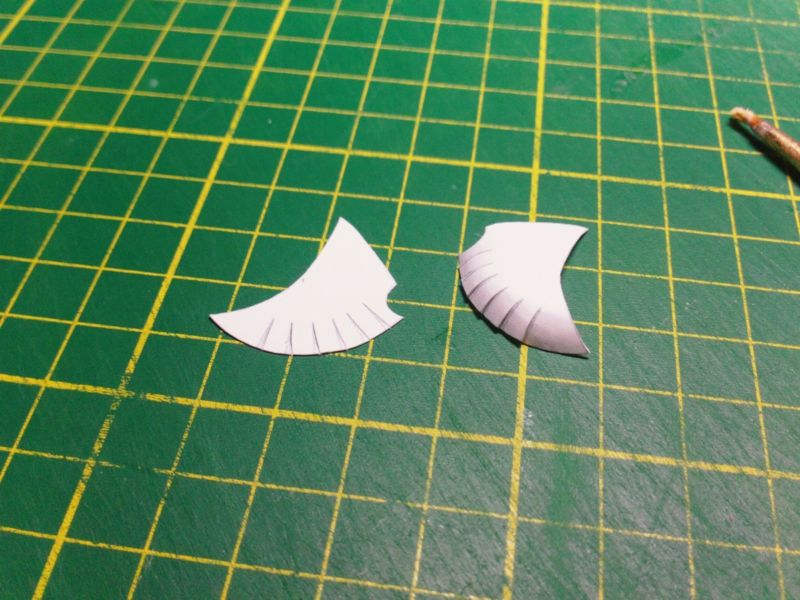 ... Heres the patience part...form and glue each petal connection, one at a time. Wait!...for the glue to dry, and for the connection to become secure and strong. Then move on to the next petal connection. You can also preform and curve the parts, each time you move on to the next petal. Slowly, the part will take shape. If you try to hurry it, you will not achieve a good shape. After the part has been fully formed and glued...and is cured...I use a rounded tool to shape the curve even more. You can flatten seams and joins even more and stretch the paper a little bit into a more domelike shape. 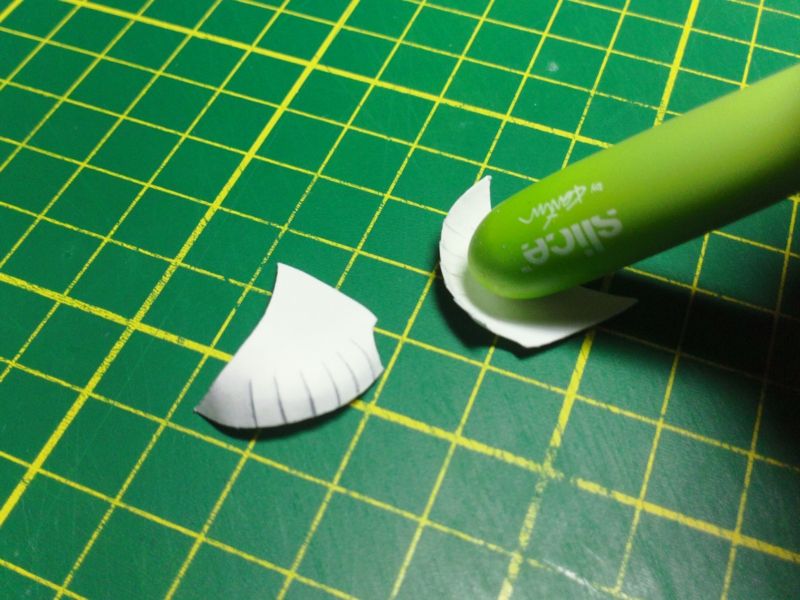 ... Now the parts are ready to attach to the central wing section. Attach the small tabbed glue strips to the central part first. Dry fit testing is important once again! You can trim the front cutout to fit tightly against the wing part. 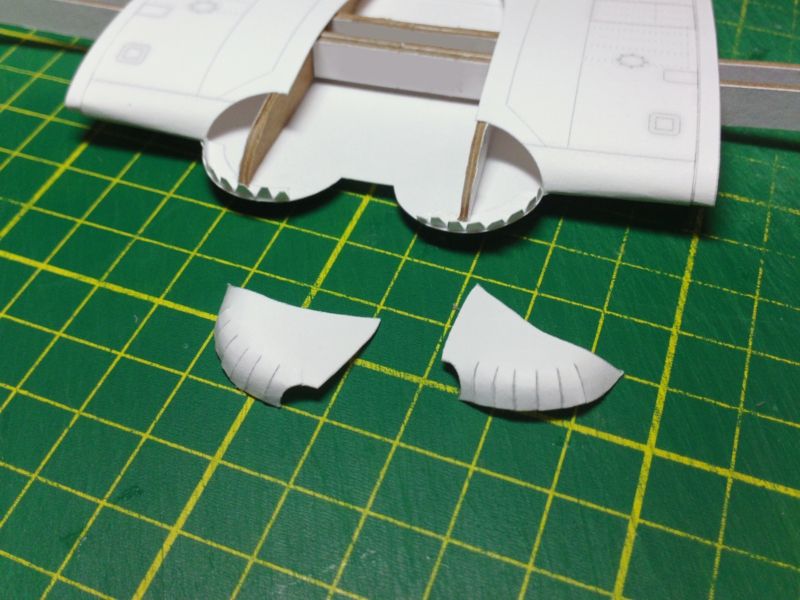 ... Glue the front of the domed parts in place, along the tabbed strips. You don't have to glut the entire strip in one shot...if the domed part doesn't fit perfectly, then glue one tab at a time. Work your way around until it lines up nicely. Dry fit...and take your time. Wait until the parts are securely glued before fitting the top edges. 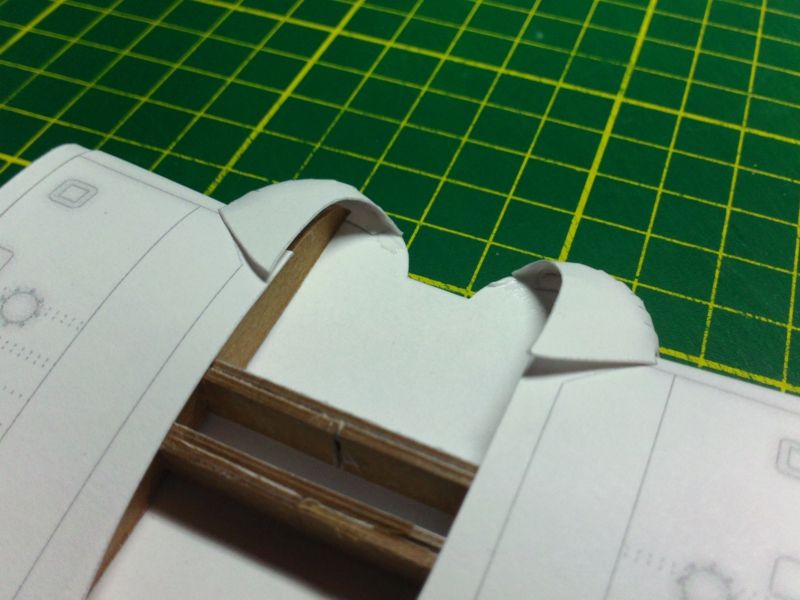 ... Final step will be to pull the parts backward, as tightly as possible to fit against the wing and glue the trailing edges to the top of the wing surface. The parts will also form the large fuselage cutout, so its important that the inside edges line up properly with the cutout. 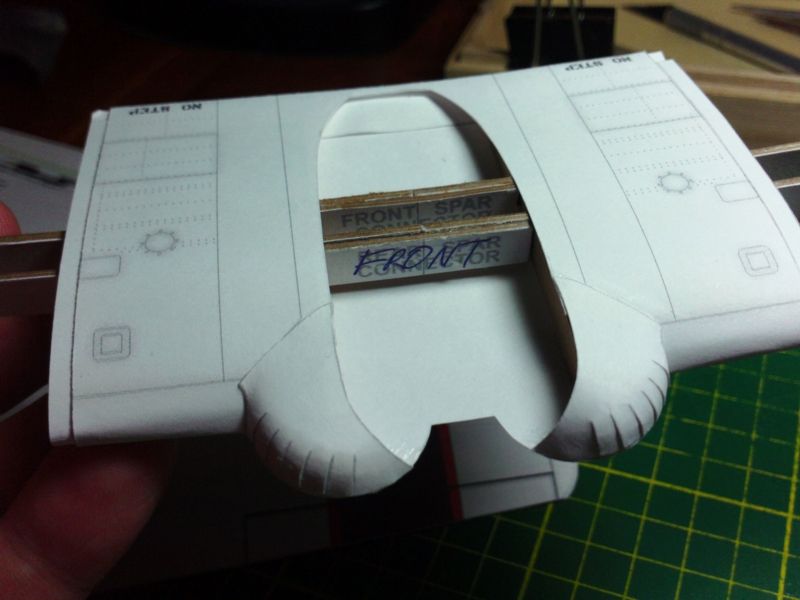
__________________
SUPPORT ME PLEASE: PaperModelShop Or, my models at ecardmodels: Dave'sCardCreations
|
| Google Adsense |
|
#6
07-13-2014, 05:55 PM
|
||||
|
||||
|
I opted for a "gear up" version on this particular build.
I'll use photos from another build to detail the manding gear assembly. There are two central wing section parts supplied in the kit. One has landing gear artwork already in place. You can also choose to add some 3D effect to the raised landing gear, by using part of the wheel assemblies. Basically, just assemble the ouster face of each wheel using two wheel parts (and a wheel disc). 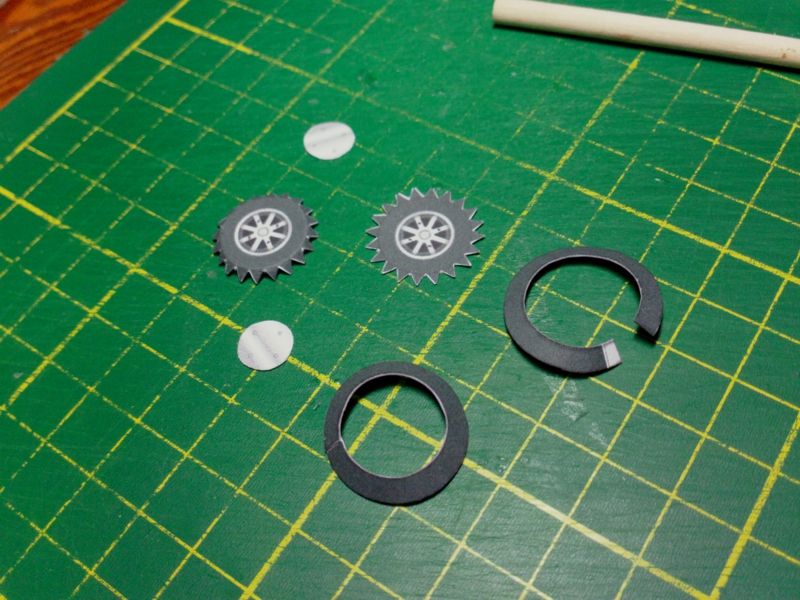 ... Assemble the parts... 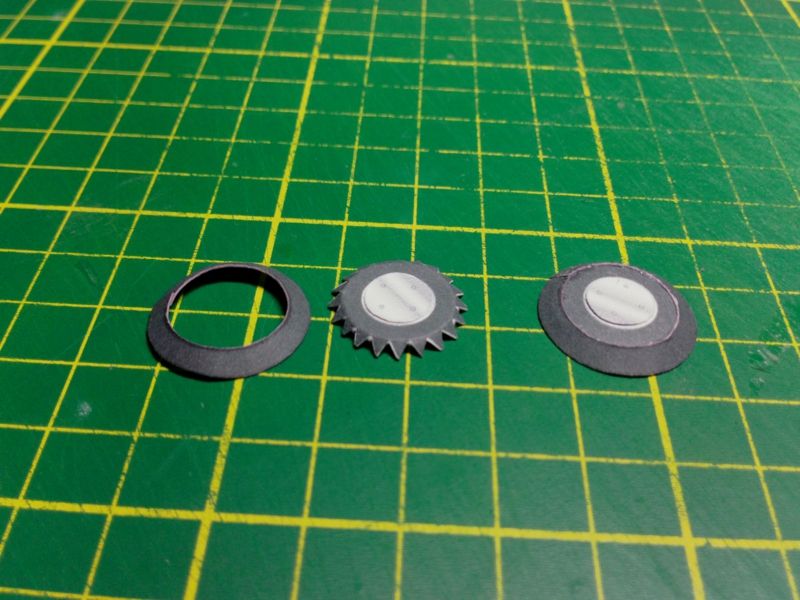 ... And then fit to the existing artwork, on the central wing part. 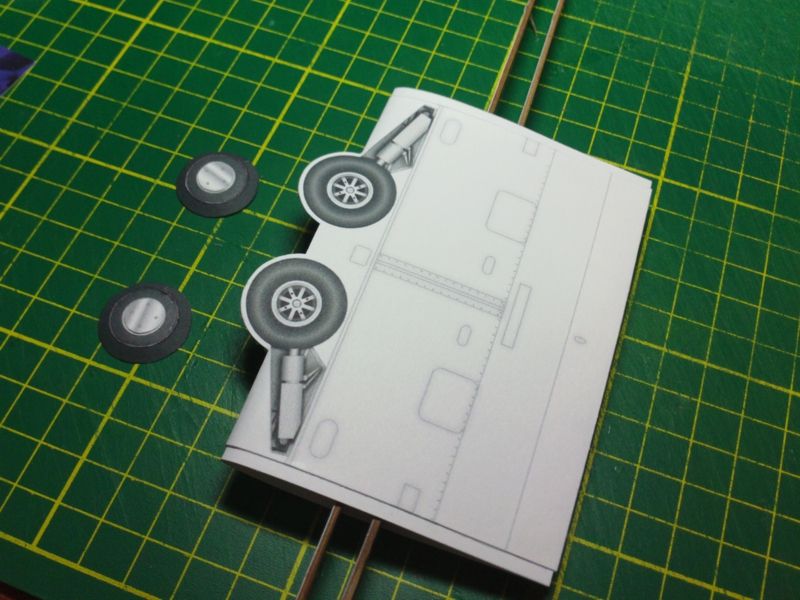 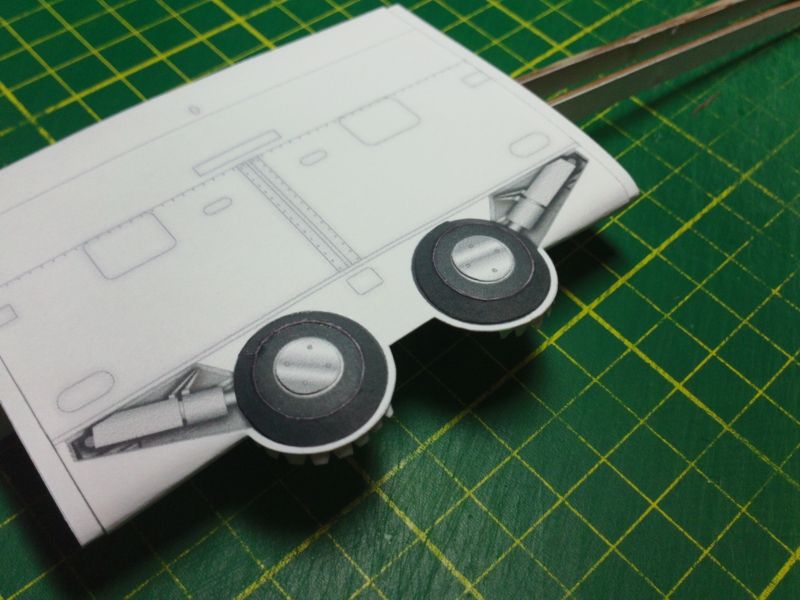 ...
__________________
SUPPORT ME PLEASE: PaperModelShop Or, my models at ecardmodels: Dave'sCardCreations
|
|
#7
07-13-2014, 05:56 PM
|
||||
|
||||
|
Now its time to fit the wing extensions.
They will just slip over the spar assembly and should fit over the joiner strip and butt up against the central wing section. 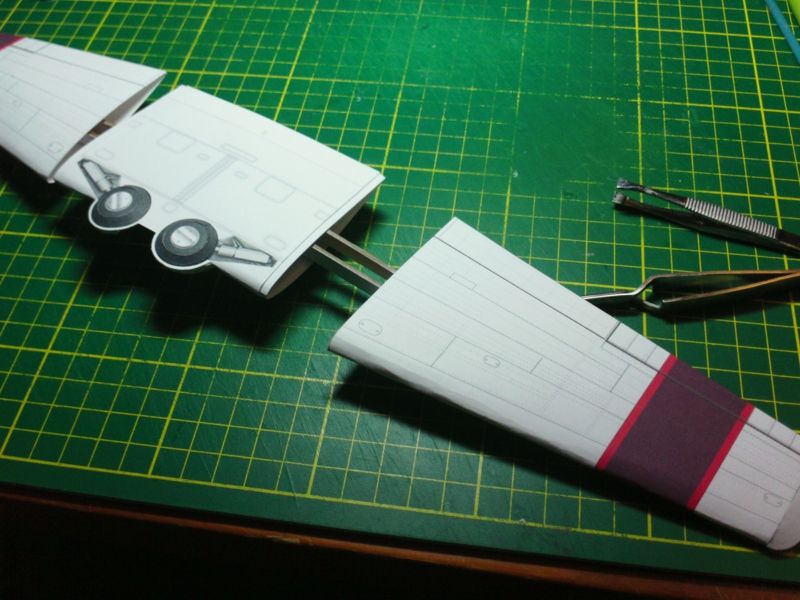 ... Its important the underside edge (which is a straight edge) fit tightly. Glue this connection first, lining up the trailing edges of the wing. The top connection is not quite as perfect, since the wing edge is curved and the connection is angled because of the wing dihedral. But the top connection will be covered by a trim piece, so it doesn't need to be perfect. 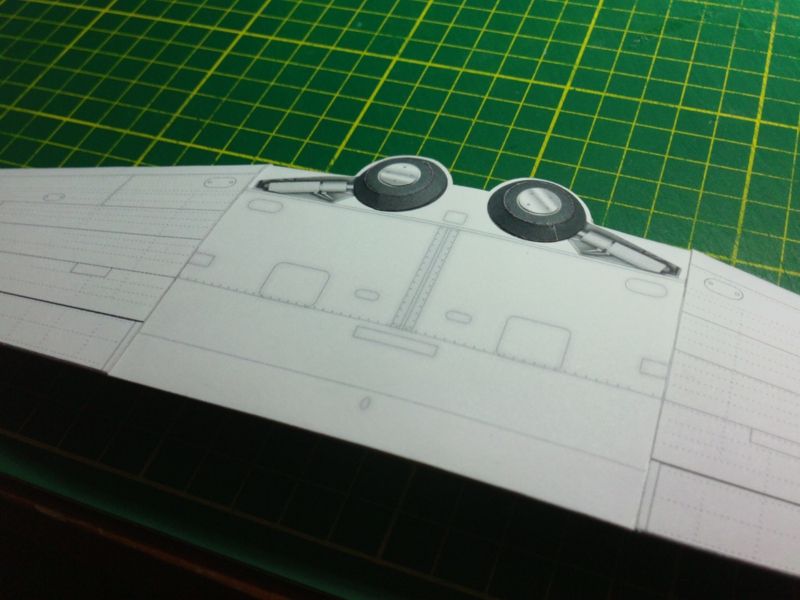 ... Thats as far as i got today...more tomorrow!@
__________________
SUPPORT ME PLEASE: PaperModelShop Or, my models at ecardmodels: Dave'sCardCreations
|
|
#9
07-13-2014, 09:19 PM
|
||||
|
||||
|
haha...I think not.
but thanks for the compliment. ... okay, lets finish up the Wings... took me a few minutes this evening to complete things. The underside connections of the wing parts has had time to cure so now I just run a bead of glue in the top seam and lift the wing a bit to close up the gap as best as possible. As I said, the upper seam does not have to be perfect. And while the final wing connections are drying, I cut out and prepare the trim strips that will cover the seams in the wings. There are four strips to cut: two wider strips - the visible trim pieces and two narrower strips, which go underneath as filler. 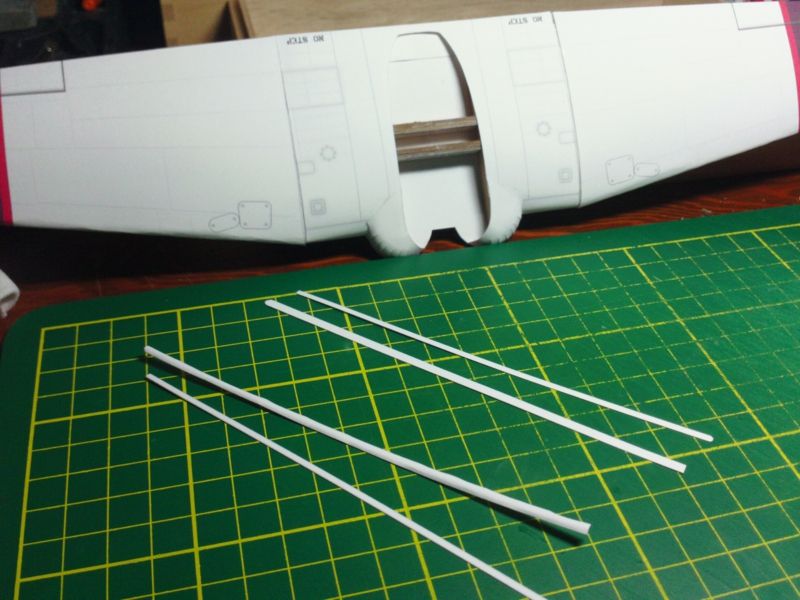 ... Trick here, is shaping the wider strips to be curved...raised...convex. I use a piece of wire...maybe 1mm thickness...to roll a longitudinal cconvex shape into the strip. Curve the entire strip(s) from end to end.  ... Once there is a good curve to the part, apply a bead of glue, and fit the narrower strips inside the curved ones. This is just filler and will help hold the raised shape in the strips. Notice one end of the strips is rounded (same on both the inside and outside pieces). This rounded end will hang out over the trailing edge of the wings.  ... Start by gluing the trim strip onto the top side of the wing, directly over the wing seam. The rounded end hangs out just past the trailing edge of the wing about 3-4mm. Wrap the strip over the front edge of the wing - don't pull it tight, just let it fall to the wing - it will flatten out somewhat, but not too much if you don't pull it tight. Try not to flatten out any of the convex shape. 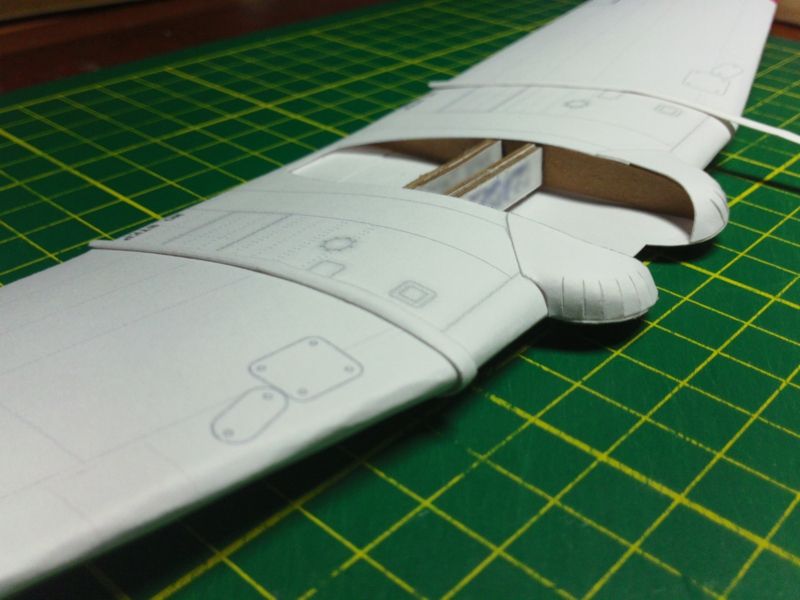 ... Wrap the strip over the front and under the wing. Keep gluing as you go. The strip should end right at the flaps. If its too long (because you didn't give it enough overhang at the start) just trim it. The trim strip can not extend any further, or it would interfere with the flaps. Other than gluing and trimming the wing tips, the wings are done. On to the fuselage. 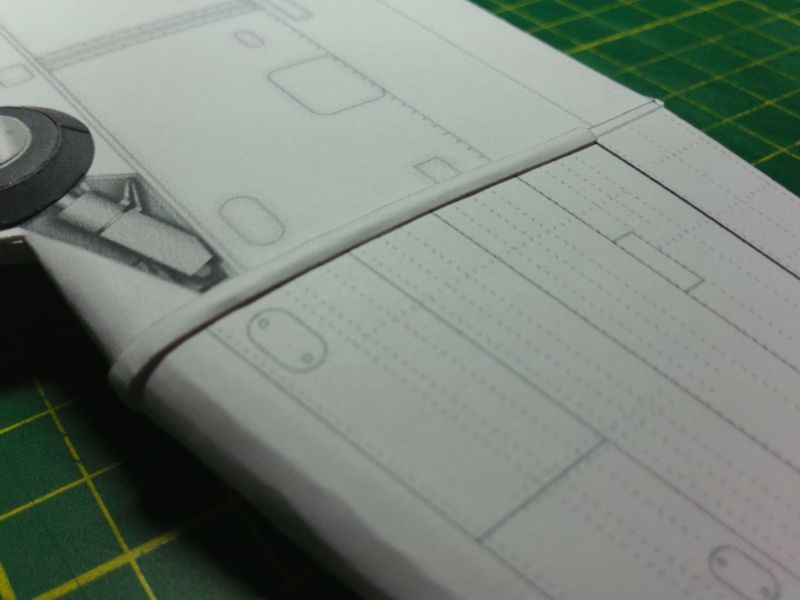
__________________
SUPPORT ME PLEASE: PaperModelShop Or, my models at ecardmodels: Dave'sCardCreations
|
|
#10
07-14-2014, 03:48 AM
|
||||
|
||||
|
Excellent build thread, keep it coming!!!
NH78
__________________
Joshua
|
| Google Adsense |
 |
|
|


 Linear Mode

