


|
|
|
#61
 04-16-2018, 11:36 AM
|
||||
|
||||
|
Thanks guys! Now I have to start to make up my mind soon. Make my own canopy or buy :-) I am leaning towards getting a ready one but I have to see if I can get material for the vacuum box in time.
__________________
website: http://www.papierschnitzel.com - patreon: https://www.patreon.com/papierschnitzel - facebook: https://www.facebook.com/papierschnitzel 
|
|
#62
04-17-2018, 11:10 AM
|
||||
|
||||
|
Putting the last two segments together, was a little harder than expected. I think the next time I have to start on one end and the built to the other. I ran out of places to glue tabs together in a controlled fashion.
If you look closely you notice that the seams before and after the cockpit segments are a little fuzzy.  On the other side I also had this problem. Due to a former I was not able to close this gap. This should not happen when I go in one direction all the way. 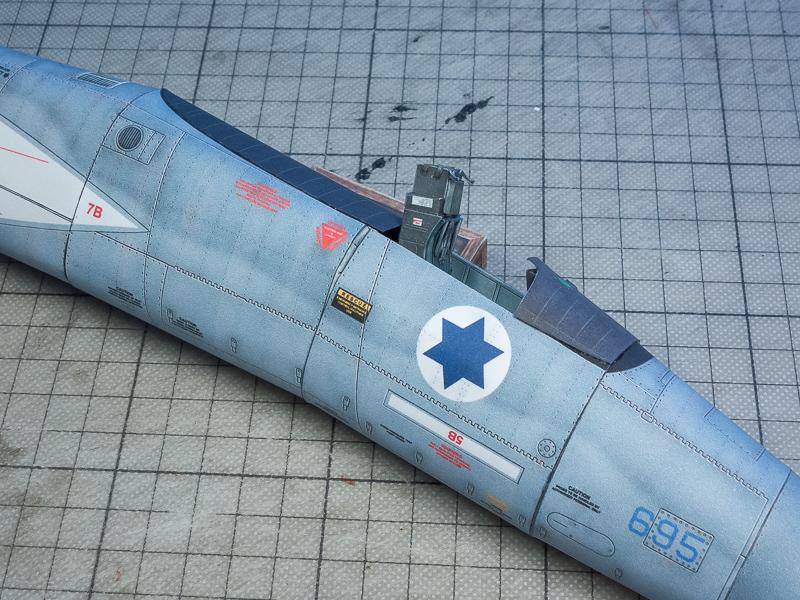 In the instructions the build order is from back to front. My instinct would be to go from front to back but I think the last part would be more difficult to insert than popping the little pointy front part on. I guess Yoav knows what he's doing  I might do this whole section again but for now I tried to cover up the gap with some scrap pieces of texture I had from the first bad try. Should look good enough for visitors who don't know much about these planes  For the steering stick I decided to go for the "thick cardboard" option. Looks good enough for me and if I do it all again I can try another option then.  So for now this whole section looks like this and I am impressed by the size (esp when I hold it next to the main fuselage section!).  It's great to see these new challenges and how to tackle them. Learning a lot with this build!
__________________
website: http://www.papierschnitzel.com - patreon: https://www.patreon.com/papierschnitzel - facebook: https://www.facebook.com/papierschnitzel
|
|
#63
04-17-2018, 11:50 AM
|
||||
|
||||
|
Something tells me that when this is done, the little bit of a problem is going to seem insignificant to the overall bird. The viewer will be looking at so many things that they won't notice. Frankly, if you hadn't said something, I wouldn't have noticed in the distance photos
__________________
A fine is a tax when you do wrong. A tax is a fine when you do well.
|
|
#64
04-17-2018, 01:48 PM
|
|||
|
|||
|
The model begins to take shape ... well done.
with your permission, a little note. I think that because it's a big model and your first experience with a model like this size ... you should try to stick more to the instructions and follow the order of building the parts as written in the instructions. because 4 of my friends built it and there was no problem fitting parts in the nose section or the central body. I very much hope that the gap between parts 4+5(at the top) will not cause you any problems in the future by adapting the canopy to the model. In this model, I did a lot of instructions with a lot of pictures to explain as much as possible the building process. So I do not think there should be any special problems. If you have any questions and lack of clarity in the instructions, you may feel free to ask me, even in a private message. keep on the good working YOAV Last edited by YOAVHOZMI; 04-17-2018 at 02:02 PM.
|
|
#65
04-17-2018, 11:18 PM
|
||||
|
||||
|
There is no lack of clarity in the instructions, Yoav :-) Just me being me.
I should publicly declare that all "problems" documented in this thread are of my own doing. I just post them in case someone also thinks he can do better than the master! I am used to building a model multiple times so it is no big deal to me. I like to get to know a model and then perfect the building process.
__________________
website: http://www.papierschnitzel.com - patreon: https://www.patreon.com/papierschnitzel - facebook: https://www.facebook.com/papierschnitzel
|
| Google Adsense |
|
#66
04-18-2018, 12:28 AM
|
||||
|
||||
|
It is looking good.
Your little fix is fine - that's something I do if have an issue - print the nearest part/texture on thin paper and then use a bit as a patch. Useful if you damage something after the model is made up. You may need to make a plan like this if the canopy does not fit? At the rear of the canopy maybe. ----------------------- Try your own canopy! If I could locate the plastic sheet cheap I would like to. The only sheet (A4) I can locate here costs about 14 Euro a sheet at the moment - ridiculous as I would need a couple maybe. The hunt continues!
__________________
The SD40 is 55 now!
|
|
#67
04-18-2018, 05:08 AM
|
|||
|
|||
|
If something goes wrong or a stain is created on the paper that does not come off, I create a small panel, print it on thin paper and paste on the damaged part.
It comes out like a real airplane making temporary repairs. YOAV In the next picture you can see a patch with a glued panel.....marked with yellow tab. When I took this model to the annual exhibition, it got a stain from someone who spoke near the model and a little rock flying on the wing.  When I returned home, I printed on the thin paper the same part of the wing with the same color, cut into a panel shape, and gently painted the edges of the panel with black paint and glued to the wing.  
|
|
#68
05-16-2018, 11:40 PM
|
||||
|
||||
|
Quick update: Due to the nice weather I am unable to continue for a while. Waiting for a rainy period or the winter :-)
So, will be continued but not sure when! Chris
__________________
website: http://www.papierschnitzel.com - patreon: https://www.patreon.com/papierschnitzel - facebook: https://www.facebook.com/papierschnitzel
|
|
#69
05-17-2018, 10:04 PM
|
||||
|
||||
|
As written per mail: Your canopies are ready to send
Nice job so far!
__________________
Cheers from germany, Chris Currently building: Colonial Viper from Uhu02 Finished:Yoav Hozmis Kfir
|
|
#70
05-18-2018, 12:25 AM
|
||||
|
||||
|
Looking forward to get them! :-)
__________________
website: http://www.papierschnitzel.com - patreon: https://www.patreon.com/papierschnitzel - facebook: https://www.facebook.com/papierschnitzel
|
| Google Adsense |
 |
|
|


 Linear Mode

