


|
|
|
#1
 03-17-2018, 03:53 AM
|
||||
|
||||
|
F-15A Eagle first attempt
I have finally decided it's time to step up my paper model game and try a more challenging build. Every time I see a plane or helicopter I am in awe. I am astonished how these shapes can be made out of paper and I now want to try one myself.
I have this folder on my hard drive called "tomcat" where I have downloaded a paper model sometime in the past. After looking at the instructions I found that I made a mistake as it is not the F-14 "tomcat" but rather the F-15 eagle by our friend YOAVHOZMI I probably confused the plane with the F-14 featured in a movie I loved as a child "The final Countdown". I do like the shape and visual design of both the F-14 and F-15. It was the first time I saw an aircraft carrier in this movie and I was utterly impressed back then. So let's get started. I have begun this journey - as per the instructions - with the exhaust tubes. Something new I learnt is to apply super glue to stiffen the outer edge. They went together without major problems. The only thing that required a little work was to fine tune the former discs so they fit the tubes. 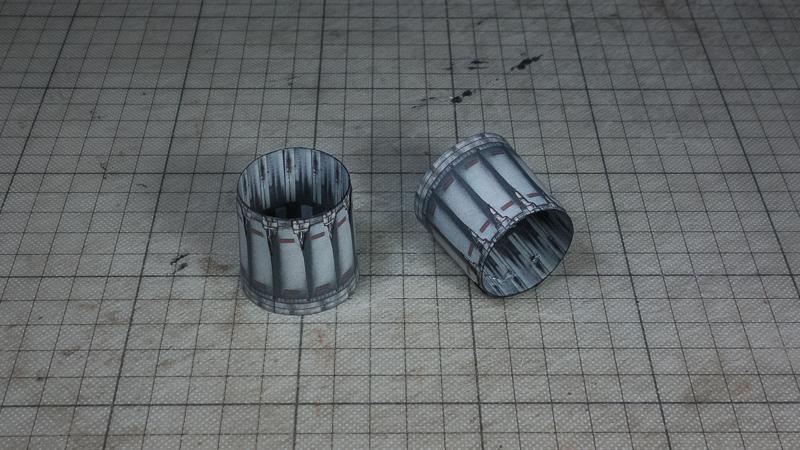 It's a small first step  I have mounted the inner rib structure to cardstock and am waiting for the glue to dry. I have mounted the inner rib structure to cardstock and am waiting for the glue to dry.When looking at the instructions I notice that the plane is in flight mode, without landing gear. Now I am wondering if anyone has suggestions as how to make a display stand (in case I do succeed with the full model!). Cheers, Chris
__________________
website: http://www.papierschnitzel.com - patreon: https://www.patreon.com/papierschnitzel - facebook: https://www.facebook.com/papierschnitzel 
|
| Google Adsense |
|
#2
03-17-2018, 04:59 AM
|
||||
|
||||
|
Some folk here use a magnet inside the fuselage to mount the model on the stand and this will require thinking about now rather than later. There is a form of magnetic strip, self adhesive, but this will be something you need to source locally.
|
|
#3
03-17-2018, 10:29 AM
|
|||
|
|||
|
A good start, my friend
If you follow my photographed instructions, you should not have a problem with the model, although the model is large and looks a bit scary.  In particular, pay attention to red and yellow notes in the photographed instructions, they will make it easier for you to do the construction work. And already 4 of my friends built it without any special problems. good luck YOAV
|
|
#4
03-17-2018, 12:29 PM
|
||||
|
||||
|
Thanks Mike for the tip with the magnetic strip. Sounds like a very good idea and I will look if I can find that here or on the net.
Yoav, I like large models! I am more scared of the teeny tiny ones :-) And although I am not the biggest war plane fan your A4 and F16 belong to the few I very much like. (Now I only need an air carrier in matching scale :-) ) The only thing I am really not sure about how well I can pull off is the vacu forming canopies. But I am looking forward to see how I can create the tools for it ... and also the look on my girl friends face when I march into the kitchen with the vacuum cleaner and start to bake the plastic sheet! Regarding the design of a skin and the inner rib structure I wonder how you calculate/design the difference of outer and inner parts. Do you just scale the inner parts a little smaller than 100% or do you offset the inner path shape more pecisely by the paper thickness of the outer skin parts? OK back to assembling the rib structure ...
__________________
website: http://www.papierschnitzel.com - patreon: https://www.patreon.com/papierschnitzel - facebook: https://www.facebook.com/papierschnitzel
|
|
#5
03-17-2018, 01:37 PM
|
|||
|
|||
|
You're off to a good start there Chris. Although this is a learning experience for you (good for you btw!) I expect with your skill that this will be a great looking model. No pressure, right?
__________________
This is a great hobby for the retiree - interesting, time-consuming, rewarding - and about as inexpensive a hobby as you can find. Shamelessly stolen from a post by rockpaperscissor 
|
| Google Adsense |
|
#7
03-17-2018, 11:26 PM
|
|||
|
|||
|
Regarding the canopy ....
If you can not produce a good one, you can ask my friend Chris from Germany, he created molds from the canopies of my models I gave him. Regarding the calculations of interior and exterior..... I do not do calculations but makes attempts, because I do not have software to create layouts for models. Also, sometimes I use my two friends to create layout parts for my models because they have suitable software. YOAV
|
|
#8
03-18-2018, 01:23 AM
|
||||
|
||||
|
Haha, elliott. I will try not to feel pressured now
My skills are tested on more or less straight lines and flat surfaces. This is a whole new level. So I am hoping for a "level up" It does feel like an adventure for me Don. I am excited like a little kid, as I have been dreaming about this for quite a while. The F-16 thread reminded me of this model hibernating on my hard drive and ignited my desire again. I am sure I will learn a lot and even if the first attempt will not be satisfying I will make another. All the models I design I build (sometimes very) often until I am happy with the result. Yoav, that is good to know there is a Plan B for me I do hope though I will be able to achieve this on my own. I can imagine so many other things I could create with this method!So here is my "rib cage" I have been working on. I did not have 1mm cardboard so I glued the printed parts page onto two layers of 300gsm paper which is apx 0,5mm thick each resulting in the desired 1mm. Somehow I was always turned off when I saw these structures on thick cardstock but I was surprised how easy I was able to cut them. When I am done with planes I can now even try some cool ships later!   Yoav, about the next back support plate: It says to laminate on cereal cardboard and not 1mm. As I do not have cereal cardboard, I wanted to check with you. I have printed it on 160gsm paper which is apx 0,25mm thick. Should I glue it on another 160gsm or is single layer OK then? Cheers, Chris
__________________
website: http://www.papierschnitzel.com - patreon: https://www.patreon.com/papierschnitzel - facebook: https://www.facebook.com/papierschnitzel
|
|
#10
03-18-2018, 02:52 AM
|
||||
|
||||
|
Quote:
__________________
Carborundum Illegitimi Ne Herky
|
| Google Adsense |
 |
|
|


 Linear Mode

