


|
|
|
#21
 09-10-2018, 07:38 AM
|
||||
|
||||
|
Quote:
The quest continues....
__________________
MS I love it when a plane comes together. - Colonel John Hannibal Smith, A Team leader Long Live 1/100!! ; Live, Laff, Love... 
|
|
#22
09-10-2018, 06:23 PM
|
|||
|
|||
|
You can bend the transparencies by adding heat (shhhhhh….. I used the wife's blow dryer). You aren't going to get any complex shapes though. Another thing, you can wash off the stuff the ink sticks to with plain water and then it is crystal clear. My only problem is figuring out how to glue it to the model or frames to it.
Mike
|
|
#23
10-17-2018, 05:21 PM
|
||||
|
||||
|
Greetings. In the next few days I will begin the J-29 of Gerard Methorst. Look at the canopy design. Interesting.
|
|
#24
10-17-2018, 05:31 PM
|
||||
|
||||
|
Sorry, and the photo? Here it is
|
|
#25
10-17-2018, 11:42 PM
|
||||
|
||||
|
Has anyone tried the Fiddlers Green packing tape approach?
It looks like a fair solution... But it would yellow over time?
__________________
The SD40 is 55 now!
|
| Google Adsense |
|
#26
10-18-2018, 07:01 AM
|
||||
|
||||
|
Issues I had with the packing tape method...
anyone who has handling packing tape will understand the difficulties of control! lol And you can't glue anything to the glossy tape surfaces easily. The Tape was a bit too glossy for my liking. It is however thin enough to be a lot more flexible, which comes in handy when you have to bend and curve the canopy parts. I have laminating plastic...on a roll, and sheets(pouches). Its a heavier clear plastic with a full adhesive backing. The roll stuff is a bit thinner than the sheets(pouches). Its like heavyweight packing tape in wide sheets and rolls! The idea is, you sandwich a sheet or business card or...between two layers of laminating plastics and then run the whole thing through a laminator to melt the two sheets together with heat and smooth out all the wrinkles and bubbles. I don't use the laminator, so I use a roller where possible to smooth out the plastic. But the bond is still rock solid...theres no way you are getting the sheets apart. I experimented with laminating model sheets for a glossy effect. Just using the laminating plastic on the printed side of sheets (an outside layer). It works well except you can't overlap parts and glue the lamination so I spent a lot of time peeling off sections of lamination to expose gluing areas and tabs. For the Harvard canopy, I cut small pieces of laminating plastic and covered both sides of the parts and then carefully cut out the parts as normal. The gloss is less...more of a satin gloss...which I like. Only issue is, for this canopy I used the thicker sheet material. And the inner and outer layers won't curve to the same degree, so the inside layer is buckling. The thinner roll stuff probably would have worked a bit better. The really tight radius of the canopy shape didn't help either. I attached the canopy to the model using thin strips of double sided tape and CA glue in various locations (corners, etc) The biggest problem with tape or laminating plastic is both the windows and the framework get glossed. And this stands out against the non glossy fuselage. 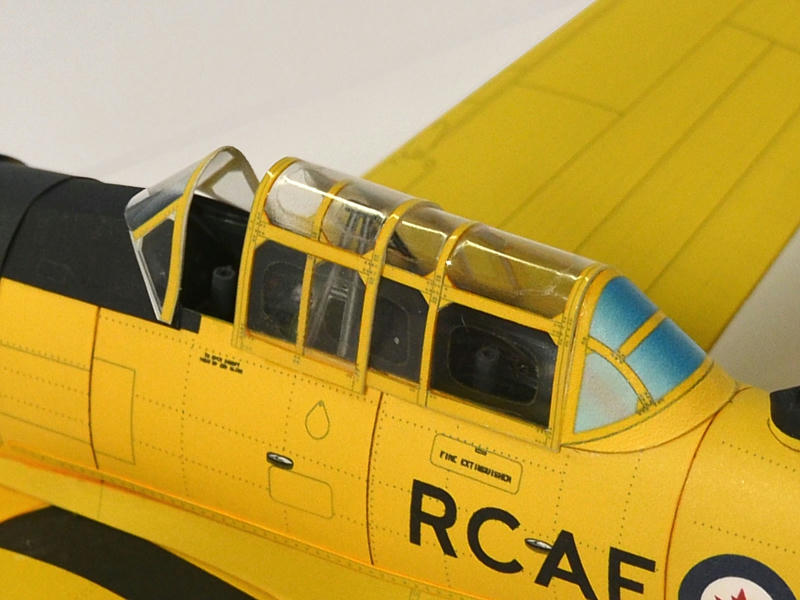 I have been using clear Nail Polish to add gloss to printed windows. It takes a few coats to get some gloss (because it soaks into the paper) but its thick, so it doesn't run all over the place... and dries fairly quick and you can build up the level of gloss as you like. I used it to gloss up the rear printed part of the canopy (which I left opaque). 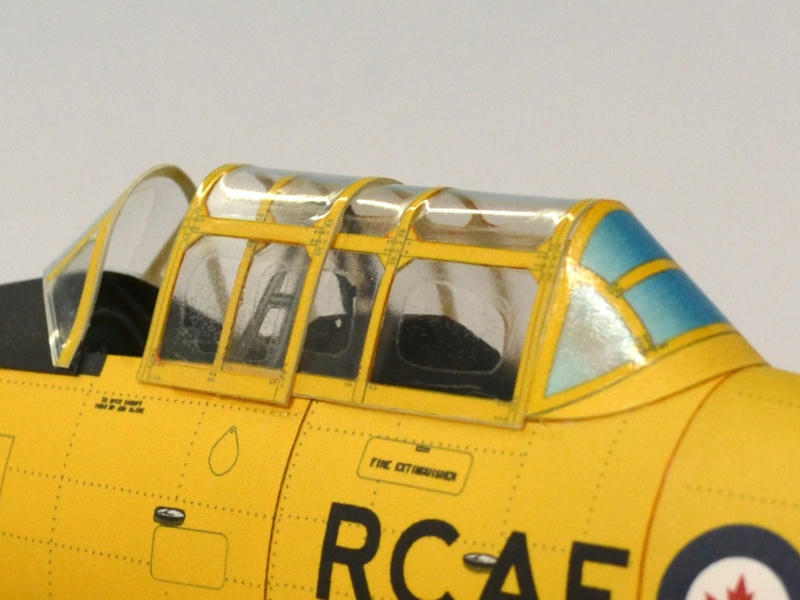
__________________
SUPPORT ME PLEASE: PaperModelShop Or, my models at ecardmodels: Dave'sCardCreations Last edited by airdave; 10-18-2018 at 07:13 AM.
|
 |
|
|


 Linear Mode

