


|
|
|
#11
 09-09-2018, 09:22 AM
|
||||
|
||||
|
I have done clear canopies on my 1:100 P-476 Razorback and my SBD's. Check the forum search to find them. It is not really that hard but it is "fiddly". I do think it makes for a much more convincing replica.
__________________
MS I love it when a plane comes together. - Colonel John Hannibal Smith, A Team leader Long Live 1/100!! ; Live, Laff, Love... 
|
|
#12
09-09-2018, 09:59 AM
|
||||
|
||||
|
Make it easy for us and insert the link ;-)
|
|
#13
09-09-2018, 10:47 AM
|
||||
|
||||
|
Jan's question really had nothing to do with putting in clear or plastic canopies.
He was referring to the idea of creating a paper canopy with a coloured or printed effect that somehow resembles a "glass" canopy. Its funny because this is one of the first things that I did with a paper model close to 20 years ago. Its one of the very first things I noticed and was irritated by, and why I imported a model into a graphics program to create a photorealistic canopy. It was this A-10 model...which I also enlarged (about double its size). I used a series of photos of a real A10 canopy and cockpit. Only problem with this method, is it looks good from one specific angle. But as you shift your viewing angle, the effect can get a little weird. 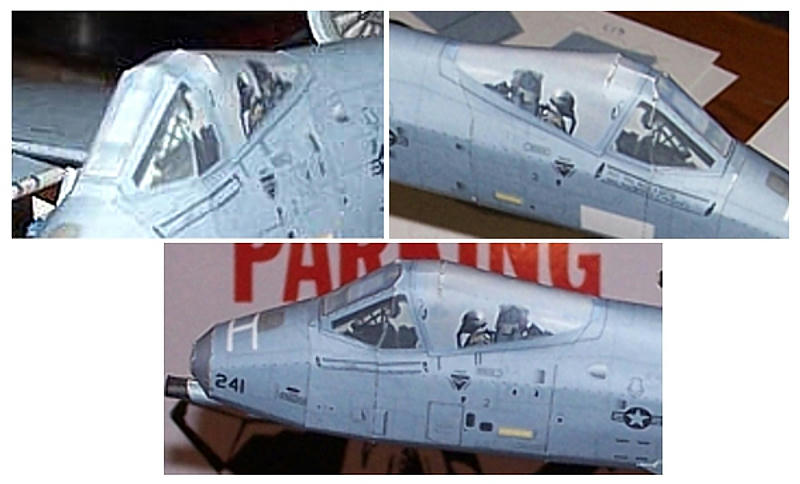 Ever since, I have experimented with a million different photo-effect and colour gradient effects. Some work, a lot don't. Some look good on certain models, and not on others. Every effect varies with different printings. I found the best effect for glass windows, is a simple mirrored effect. Just apply a photo of something reflected, like with these Jeeps. Tree reflections work really well! 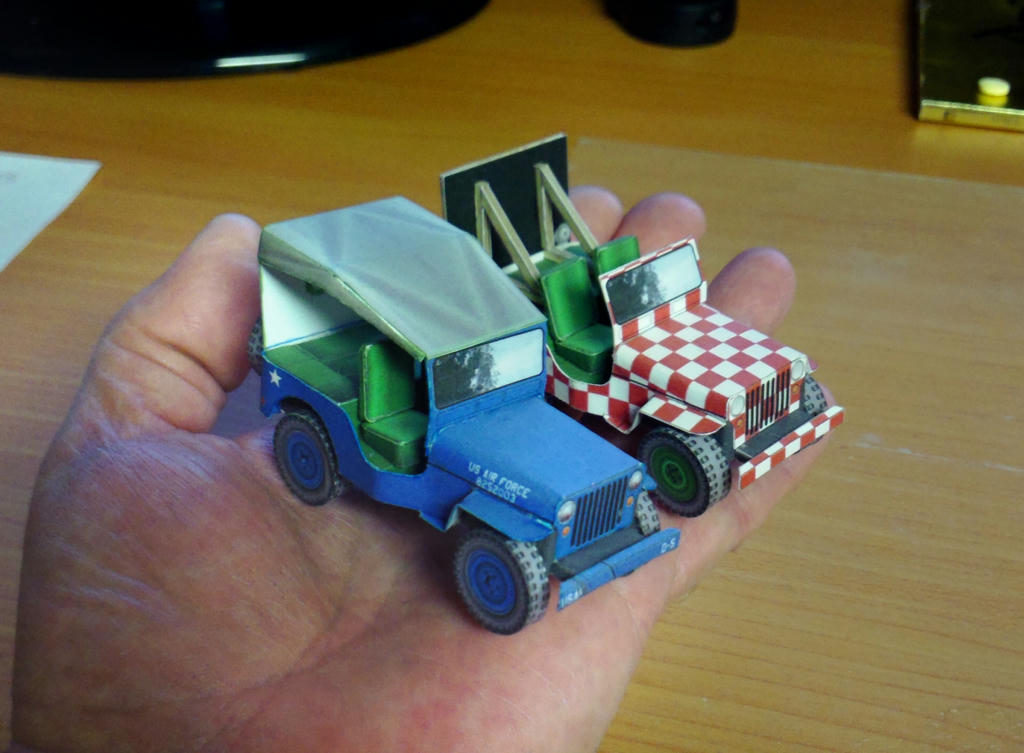 But it deson't work so good with aircrcaft, since most canopies are reflecting sky and clouds. Basically just grays and blues and gradient tones. So, may as well stick with gradient colours! But one thing that works is adding light streaks and bands that help show the curve in the surface of the canopy (if its a curved bubble type canopy) and gradient bands if it is flat glass. 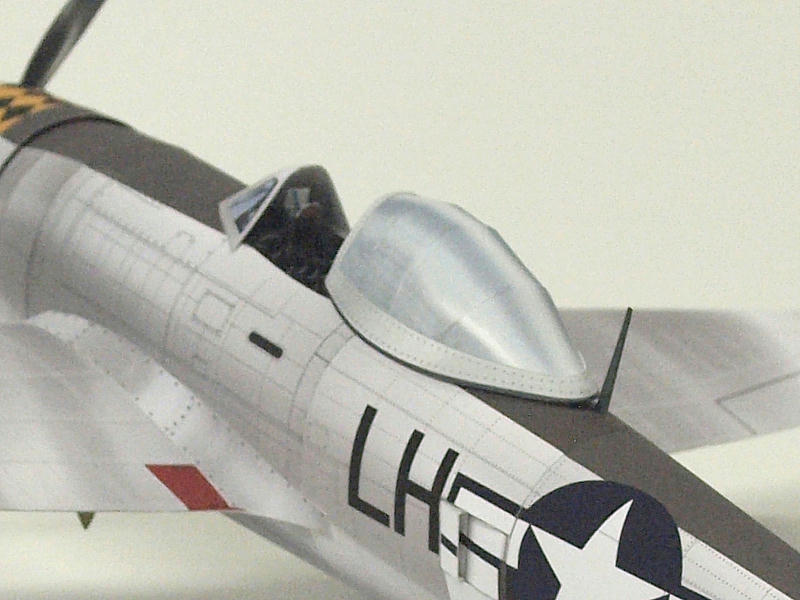 A paper kit should include a paper part (in my opinion) and not expect you to introduce other materials. that should be an option, you choose, not a requirement. So, I believe a paper canopy should be provide in an aircraft model. And I prefer it to be coloured, gradient or even a printed photo-realistic effect. I see Aaron's point about many outdoor Museums painting their canopies because they get crazed, fogged and discoloured anyway from outdoor exposure. But if the museum could fix its canopies to somehow stay clear, they would. So, Murphy's approach ( a plain or solid coloured window) is not my favorite.
__________________
SUPPORT ME PLEASE: PaperModelShop Or, my models at ecardmodels: Dave'sCardCreations
|
|
#14
09-09-2018, 11:00 AM
|
||||
|
||||
|
wireandpaper
How about Google build albums. https://photos.app.goo.gl/634ToSlZySFqnUmF3 https://photos.app.goo.gl/zstLZwM4dFCLgqLW7
__________________
MS I love it when a plane comes together. - Colonel John Hannibal Smith, A Team leader Long Live 1/100!! ; Live, Laff, Love...
|
|
#15
09-09-2018, 11:01 AM
|
||||
|
||||
|
Quote:
While I agree with you on taking the time to make sure other things are accurate I argue with you on spending the time on a detail like the canopy glass. When I airbrushed portraits, animal faces, etc...no matter what went into the artwork, I would always spend time and put more detail into making the eyes stand out. Adding little light reflections and other details to make the eyes pop, and really come to life could turn an average portrait into an amazing portrait. Give the viewer something specific to focus on. Some little detail that stands out and makes the rest of the model more exciting. A single colour model will benefit from a highly detailed and full colour item like a nicely done canopy.
__________________
SUPPORT ME PLEASE: PaperModelShop Or, my models at ecardmodels: Dave'sCardCreations
|
| Google Adsense |
|
#16
09-09-2018, 10:52 PM
|
||||
|
||||
|
Buy Some Inkjet Transparencies
Actually the answer for all "glass" is incredibly easy to do. Bought some overhead projector "Transparencies" for an inkjet printer.
Problem is do you really want to waste a whole sheet to do one small canopy? It would be best to get several models; cut and paste the canopies or car windshields onto a single sheet to do as many as possible at one printing. Maybe the designers who sell printed kits could do whole sheets and then cut out the individual ones to include in each model. Anyway here are some photos of what I'm talking about, you can see the actual transparencies on top of the folder that they ship in. I bought these at a local office supply store-can't remember but think it was office depot or wal mart. They work great, colors look good, but the actual color will be different than the same color printed on paper. Here is the first photo looking through several layers of transparencies to see the brand I bought:  Another photo a little better focus, but glare is still bright:  Last photo shows the detail of what the transparency looks like with inkjet printing-small photo on bottom right with the shark and aquarium colors:  Print the canopy frame as normal, but remove/recolor the blue tint, leaving it blank. Might even use a little blue to show reflection of sky... Dave, your A-10 rendering is genius! Looks great, the jeeps look just as good. Looks like you've spent lots of time experimenting to get a workable solution! Best regards, Mike
__________________
Cardstock Property Tables and Terms Flying Cardstock Models http://www.papermodelers.com/forum/m...uers-projects/ Last edited by mbauer; 09-09-2018 at 11:07 PM. Reason: corrections..
|
|
#17
09-09-2018, 11:47 PM
|
||||
|
||||
|
Quote:
|
|
#19
09-10-2018, 07:34 AM
|
||||
|
||||
|
Quote:
__________________
''Oh, stop whining! Can't you just print off another one?''- my wife ca 2018
|
|
#20
09-10-2018, 07:37 AM
|
||||
|
||||
|
Quote:
Sometimes I am a real dumbazz!!
__________________
MS I love it when a plane comes together. - Colonel John Hannibal Smith, A Team leader Long Live 1/100!! ; Live, Laff, Love...
|
| Google Adsense |
 |
|
|


 Linear Mode

