


|
|
|
#53
 02-05-2019, 12:57 PM
|
||||
|
||||
|
Bp188
Hello Erik
The old Huribag is coming along great. As for the dirt trail (exhaust fumes) on the side you mention, have a look at this pic of BP188 in the desert: 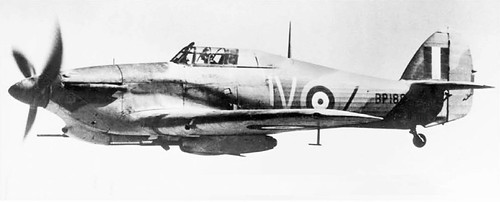 Hope this helps 
|
|
#54
02-06-2019, 09:19 AM
|
||||
|
||||
|
Quote:
Erik
|
|
#55
02-06-2019, 09:40 AM
|
||||
|
||||
|
Erik - suggestion - be careful. The exhaust weathering could really dominate the model and probably not look right if it is as strong an effect as in the photos.
Print your profile pic life sized and give it a trial and see how it looks in the scale effect.
__________________
The SD40 is 55 now!
|
| Google Adsense |
|
#56
02-11-2019, 07:00 AM
|
||||
|
||||
|
Tail tales
Thanks guys for your comment! Time for another update. Thank you Kevin for your remark of caution regarding the exhaust trails. I will definitely try it out first on the profile picture.
The horizontal and vertical stabilizer as well as rudder and elevator surfaces are tricky, especially the movable parts. They need to be carefully pre-shaped and glued together like the two halves of a shell. It would have been easier, and also possible, if Orlik had decided to combine certain parts into one, rather than individual parts to be entirely glued together. The instruction drawings do not clearly indicate how the internal structure has to be positioned, which is somewhat frustrating. Particularly the rudder was a difficult assembly to make, the bottom edge partly consisting of too small petals and the front edge consisting of two halves making up one round surface. I didn't make many pictures of the in-between stages, I was too occupied with getting the job done in a decent way. Eventually, things turned out quite well. Ensure that the horizontal stabilizer is in a true horizontal plane as indicated in the overview drawings. There is no V-shape but I found that the left stabilizer is slightly off-set and hopefully when the build is done I can correct that by slightly bending it down. Will use the wings for that purpose as reference, once the time is there. Also the small position light on the rudder has been detailed, to make it stand out better. A remark on the vertical fin: I reinforced this part internally with left over paper to make it stiffer and to avoid accidentally pressing through of the inside former. That's it for now. Erik
|
|
#58
02-12-2019, 04:13 PM
|
||||
|
||||
|
good work on the tail Erik.
__________________
David........... Paper modelling gives you a happy high. currently building. c GAZ 51 ALG 17, wagon 111a. unex DH411 excavator and spitfire Mk 9
|
|
#60
02-18-2019, 05:55 AM
|
||||
|
||||
|
Central wing section - 1
Thank you Ricardo, David and Kevin.
The build continues with the internal frame of the central wing section. Nothing particular to mention here except for the fact that the pipe (in real, a hydraulic line connected to the flap activators?) that curves around the small container in the wheel wells (part of the landing gear retraction unit?) does not fit if you use the template provided with the model. A bit of an irritating moment but after fiddling with a small plastic rod, finally something acceptable came out that fits. I punched out the black circles in the structural parts and glued a small piece of paper behind it (painted black), to accentuate the holes in the structure. Next will be the wing skin around this part and hopefully it will become clear at which exact location the central wing section has to be positioned underneath the fuselage. At the moment a question mark... Erik
|
| Google Adsense |
 |
| Tags |
| 1:33, hawker hurricane, orlik |
|
|


 Linear Mode

