


|
|
|
#11
 07-20-2019, 05:07 AM
|
|||
|
|||
|
Moshe,
Your Harvard is looking very good. 
|
|
#12
07-22-2019, 02:36 AM
|
||||
|
||||
|
Update...
the last pic shows a change I made to fit the actual plane after a lot of research I did ...after i will finish this build i will send the final fixed files to dave should he chooses to replace them with this one. enjoy moshe
__________________
Moshe O
|
|
#13
07-22-2019, 04:01 AM
|
||||
|
||||
|
The fuselage looks great. Nice job, Moshe.
Gary
__________________
"Fast is fine, but accuracy is everything" - Wyatt Earp Design Group Alpha https://ecardmodels.com/vendors/design-group-alpha
|
|
#15
07-22-2019, 08:23 AM
|
||||
|
||||
|
Moshe
Great build! You may want to consider a slight improvement to the engine cowl. The forward lip portion ( and I noticed it on Gary's yellow version ; see picture below ) needs an extra section for a smoother looking rounded transition here is Gary's engine cowl    Maybe Dave can add it to his kits as well. Isaac
__________________
My gallery [http://www.papermodelers.com/gallery...v-r-6&cat=500] Recent builds  Meteor F1, Meteor F8, Mig-Ye8, NA Sabre, A-4E Skyhawk,Mig-15 red, Mig-17 repaint Meteor F1, Meteor F8, Mig-Ye8, NA Sabre, A-4E Skyhawk,Mig-15 red, Mig-17 repaint
|
| Google Adsense |
|
#16
07-22-2019, 09:09 AM
|
||||
|
||||
|
I did noticed that issac ,i may give it a go and fix it...all in all it is a level 2 model and it is a balance between simple looking model and a accurate looking model that the designer is doing when designing a model...there are some things that make me wonder about why the design is one way and not another but i do enjoy building this kit ,and it terns out as a nice model in the end.
__________________
Moshe O
|
|
#17
07-22-2019, 12:17 PM
|
||||
|
||||
|
Only a suggestion to an otherwise visually appealing model.
Isaac
__________________
My gallery [http://www.papermodelers.com/gallery...v-r-6&cat=500] Recent builds Meteor F1, Meteor F8, Mig-Ye8, NA Sabre, A-4E Skyhawk,Mig-15 red, Mig-17 repaint
|
|
#18
07-24-2019, 02:33 AM
|
||||
|
||||
|
engine cowl...
so this is what I did to the front cowl part, I cut the part on the color border between the brown and gray then glued it on a segment by segment 'stretching the paper gently...and when I got to the last centimeter I had an overlap of about 2 mm to snip off. then using a rounded tip tool I curved the front end of the cowl from the inside gently until I got a small curve. I think it looks ok now and not so flat.
__________________
Moshe O
|
|
#19
07-24-2019, 03:39 AM
|
||||
|
||||
|
That trick worked very well on the cowling. It looks really nice. Much appreciate the tip.
Gary
__________________
"Fast is fine, but accuracy is everything" - Wyatt Earp Design Group Alpha https://ecardmodels.com/vendors/design-group-alpha
|
|
#20
07-24-2019, 08:29 AM
|
||||
|
||||
|
I've explained this before
and its explained in the Build Photo Set you can download at papermodelshop.com... (3 photos from that build set shown below) there is no need to cut or trim anything. The Cowl rings are thin enough, they can be easily stretched. Burnishing the seams after assembly will give you a fairly rounded shape. You need only take your time to get the best fit of the three rings. Yes, it would be simple to add an extra ring (or two) and get a much rounder shape, but this would defeat the whole purpose of trying to publish a simpler model for beginners. As Moshe already said, this is only a 'level 2' kit...I am not going to make it more complicated. Your cowl appears to have turned out okay Moshe. Its a simple design, theres only so much you can do with it. 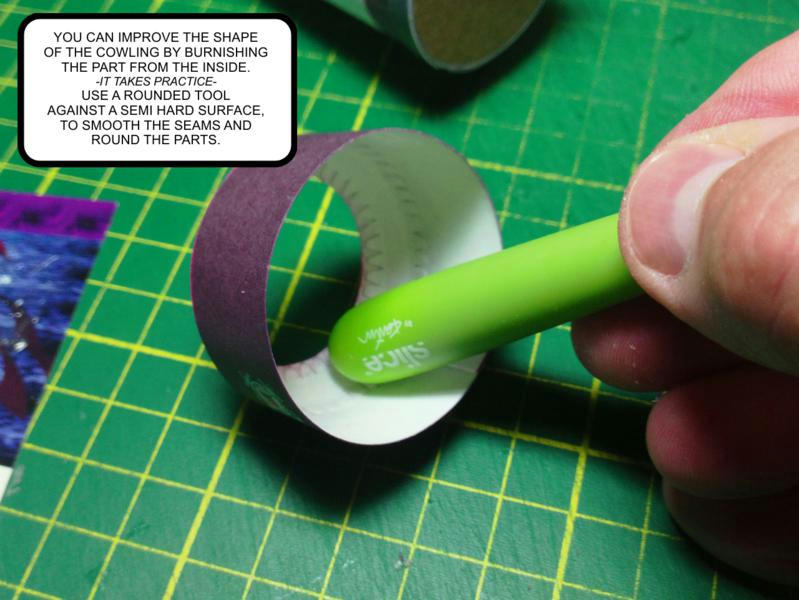 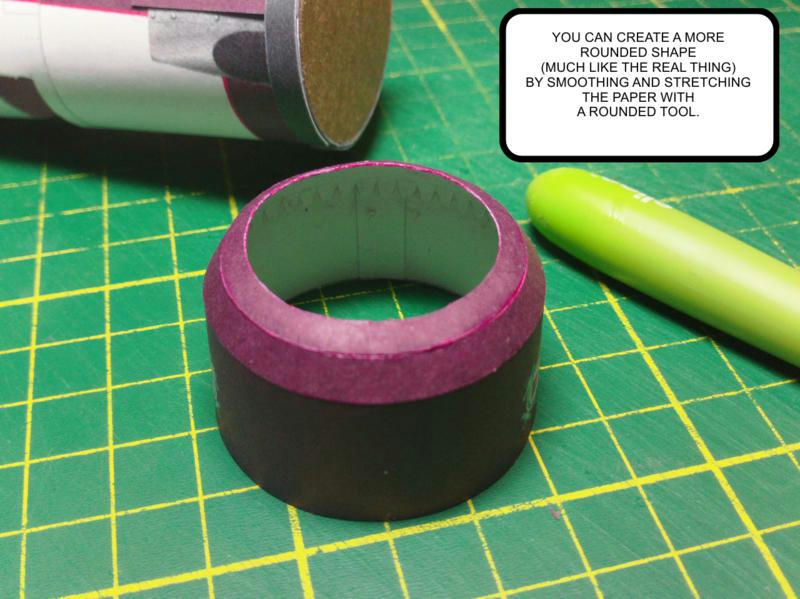 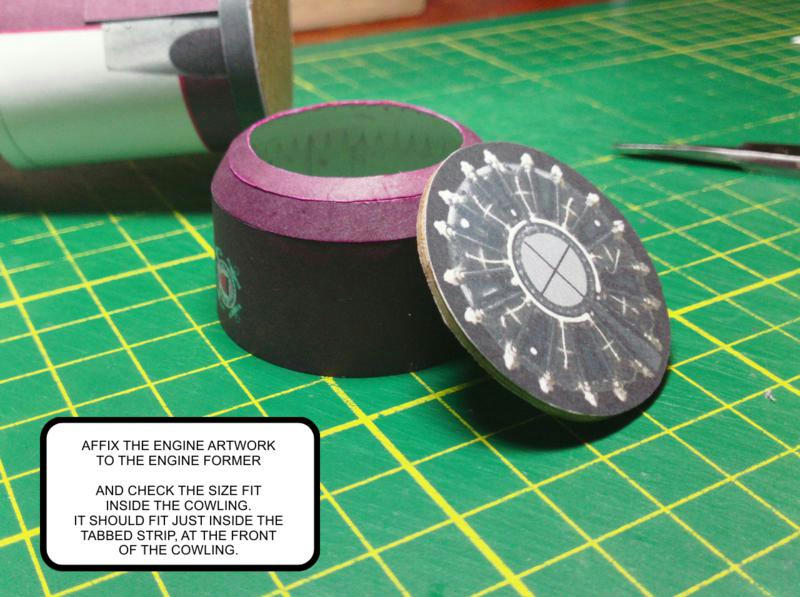
__________________
SUPPORT ME PLEASE: PaperModelShop Or, my models at ecardmodels: Dave'sCardCreations
|
| Google Adsense |
 |
|
|


 Linear Mode

