


|
|
|
#21
 07-29-2009, 08:45 PM
|
||||
|
||||
|
now comes the big tricky part!...
These side assemblies/wing mounts are not going to fit properly. They have a formed shape that sorta matches up to the fuselage, but they are gonna require a little twist and glue, twist and glue, etc I found that I have to get the back fitted in first and then work forward toward the cockpit area. First problem was keeping the rear part in place...so I rigged up some card to hold the rear in the right place as I twist the front to fit. Then I decided I need a "card sandwich" in the front to squash the cockpit a little, and widen the fuselage, for a better fit. Then I noticed that the side pods collapsed when being twisted slightly, so that means adding some ribs for support! ...phew and I haven't even started glueing anything yet!  but, I have a feeling that I may have to make a full former inside these side pods to make them retain their shape and fit the fuselage properly...I'll give that a try tomorrow!
__________________
SUPPORT ME PLEASE: PaperModelShop Or, my models at ecardmodels: Dave'sCardCreations 
|
|
#22
07-29-2009, 09:06 PM
|
||||
|
||||
|
Remember Dave......... it's not the summit that makes us do this........ it's the climb!
 It is looking pretty close to a Hornet......... :D All kidding aside........ the F/A-18 IS a tough one to model in paper..... and it does look like you are doing a good job of it! john
|
|
#23
07-31-2009, 11:55 AM
|
||||
|
||||
|
these side ASSemblies are a paint in the...side ASSembly
lol they definately require better forming before you try to attach them to the fuselage. this time its my impatience that has resulted in a not so perfect fitting. first thing I noticed was the side "pods" (can I just call them that from now on?) ...sat a little low and revealed a sliver of unseen area. So I decided to add a "shim" and raise the pod, although this affected the top level surface a little bit.  Then I fit the side pod ...using some card to hold the rear in place I applied glue to the whole structure and carefully positioned it against the fuselage. I did my best to get it in the right spot on the first try, trying to keep the glue in place ...but you kinda got to twist and push and pull the whole structure until its sitting properly (and hold it there long enough for the glue to set!).  From the outside it doesn't look too bad ...but I fought and fought to get the pod tight against the body and just couldn't do it. So... from the wrong angle you can see the improper fit.  I'm not sure how much better I could do this... but I think the better design would be to have these pods fit into the fuselage ...rather than against the fuselage. I would also add some more formers and get the side pod into a better shape before trying to attach it. I'm thinking about adding a paper seam filler to cover this gap.
__________________
SUPPORT ME PLEASE: PaperModelShop Or, my models at ecardmodels: Dave'sCardCreations
|
|
#24
07-31-2009, 12:06 PM
|
||||
|
||||
|
oh....
and this is where its at right now  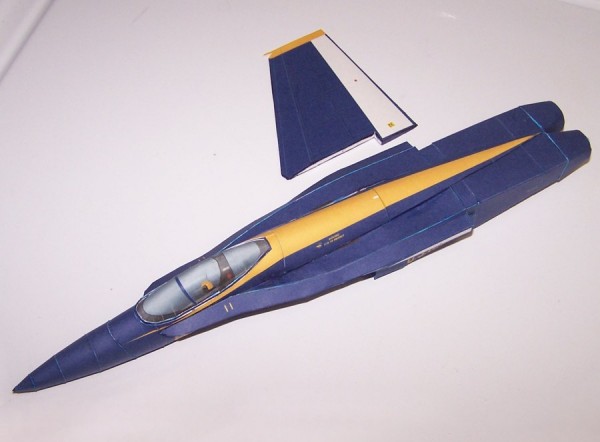 I have touched up a few visible open gaps and imperfections with some blue art markers. Don't like using the markers in the really visible areas, but I had to do something to clean it up. Hopefully some fixative at the end will even out the colours.
__________________
SUPPORT ME PLEASE: PaperModelShop Or, my models at ecardmodels: Dave'sCardCreations
|
|
#25
07-31-2009, 01:12 PM
|
||||
|
||||
|
Looking good! For the slightly improper fit of the pod, why not try a tiny drop of superglue to close up the gap between it and the fuselage?!
__________________
My website www.chrissmodels.webs.com My Facebook page www.facebook.com/chrissmodels
|
| Google Adsense |
|
#26
07-31-2009, 03:41 PM
|
||||
|
||||
|
Quote:
do you think latex caulking comes in navy blue?
__________________
SUPPORT ME PLEASE: PaperModelShop Or, my models at ecardmodels: Dave'sCardCreations
|
|
#27
08-01-2009, 12:38 AM
|
||||
|
||||
|
Oh ok, it's obviously much worse than it looks even in the photo then.
__________________
My website www.chrissmodels.webs.com My Facebook page www.facebook.com/chrissmodels
|
|
#28
08-01-2009, 07:11 AM
|
||||
|
||||
|
yeah, I think you are being generous...and I appreciate it.
from certain angles it doesn't look too bad, it could probably be a lot worse, but I guess I feel guilty about allowing the photograph to fool you into thinking its any better than it really is. I have used the blue marker as much as possible to hide imperfections and visible white areas within the gaps. the attachment of the these side pods has resulted in a slight distortion of the fuselage (you can actually see a little ripple just behind the cockpit)...this is more annoying than the gaps! lol a fresh look at it this morning has given me a new opinion..."it is what it is, and it could definately be a lot worse!"....so I will move on. 
__________________
SUPPORT ME PLEASE: PaperModelShop Or, my models at ecardmodels: Dave'sCardCreations
|
|
#29
08-03-2009, 07:54 AM
|
||||
|
||||
|
The lack of detailed instructions, leaves me guessing at the construction of many areas of this model
...all you are given is a series of about 12 (small CG) photos of the model at various stages of construction. I blame all my problems on this fact! lol ...but thats also no excuse for not reading (or looking) ahead before you leap! I commented earlier on the engine inlets needing a filler or insert piece to close them ...but later in the series of "instruction" photos, I find that pieces have been provided for that purpose! Only problem is...they should have been installed, on the back of the inlets, before the inlets were installed. I see no way to properly fit them inside the engine assembly at this point. (as a matter of fact, I am not even gonna try to install them!) -had I read ahead and learned about these parts, I could have installed them earlier in the build! Anyway, heres the progress so far...  Assembling the main wings. The rear aileron construction was a bit confusing at first, but straightforward once you figure it out. The assembly that mounts at the end of the wing, makes no sense. It is difficult to verify the mounting position from the "instruction" photos. The glueing/mounting square on the assembly does not match anything on the wing. In the end, I compromised and devised my own method. I coloured in the white area with yellow marker and created a "slit" in the assembly that the wing fits into. It may or may not be accurate but fits simply and more securely. Once the wings were ready to install, I looked at the mounting area and decided that the wings would not be very secure ...again, I like the idea of inserting the wings into the fuselage, as opposed to just glueing them flat to the outside. I decided to add some toothpicks as locators and hopefully additional support. (although it would have been a good idea to glue these supports in before the side pods were attached to the fuselage.) 
__________________
SUPPORT ME PLEASE: PaperModelShop Or, my models at ecardmodels: Dave'sCardCreations
|
|
#30
08-03-2009, 08:01 AM
|
||||
|
||||
|
While I wait for the wing supports (toothpicks) to set up,
I went ahead and completed all the other wing assemblies. All very straightforward and ready to install.  I also took a look at some of the extra "detail" parts left to install... first thing I found was a small covering piece for the leading edge of the cockpit canopy. It covers up all the messy build in that area...nice! Only issue was, it prints out on the parts sheet as white? This is obviously a design or print error...so I just went ahead an used my navy blue art marker. The colour isnt perfect but very close.
__________________
SUPPORT ME PLEASE: PaperModelShop Or, my models at ecardmodels: Dave'sCardCreations
|
| Google Adsense |
 |
|
|


 Linear Mode

