


|
|
|
#1
 07-26-2009, 04:32 PM
|
||||
|
||||
|
Blue Angels F-18
okay, here we go again...
my limited impatient building skills... and I'm building a big airplane for myself! lol could be an Irwin Allen disaster in the making! I was hoping to find others who had this model and can offer some tips. anyway...here goes...my Blue Angels F-18 build (okay, stop laughing already....hey!!....I mean it!!) so, the model is from Paper-Replika.com  I am printing it out on 110lb cardstock and I going for the regular print (not glossy stock) and I may try to clearcoat it when I'm done. Instructions are on their website but they're not really instructions...just a set of photos/images. Nice looking images, with all the parts numbered...but not the clearest for me...we'll see.
__________________
SUPPORT ME PLEASE: PaperModelShop Or, my models at ecardmodels: Dave'sCardCreations 
|
| Google Adsense |
|
#2
07-26-2009, 04:49 PM
|
||||
|
||||
|
So, I started with photos 1 and 2 this afternoon
(while watching the Nascar race) Nose and Cockpit First thing I noticed was this tiny little cone for the very tip of the nose. LOL you got to be kidding! This is not a good start. Now lets be fair...I'm not good with little parts. This "cone" is small....very small....extremely small.... and its not even a cone yet! lol  and you want me to roll (and glue) this into a cone?! ROFL so, needless to say, this part has conveniently been lost in the large paper file I call a waste basket...and we move on to parts 2, 3, 4, 5 etc Most of it went fairly easy. Trying Aileens Tacky Glue for the first time and it works pretty good.   Ran into my first major problem. The canopy fit, and the small sections that create the canopy opening. I just found these small slivers of card, with very small glueing tabs, too difficult for me to get a good clean fit. The area around the front edge of the canopy has a few layers of small pieces and it got a little sloppy. I found it easier to use a little extra glue and form the pieces as the glue set. Its still a little messy, but it is what it is! 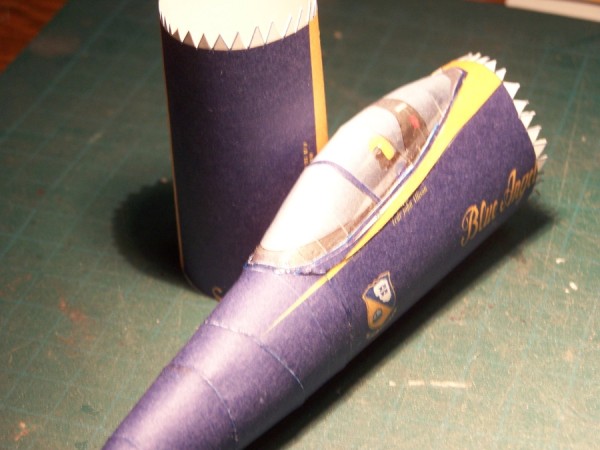
__________________
SUPPORT ME PLEASE: PaperModelShop Or, my models at ecardmodels: Dave'sCardCreations
|
|
#4
07-26-2009, 06:03 PM
|
||||
|
||||
|
Thats quick! Looks great
 I want to see a macro shot of part one built and put on!  Chris
__________________
Want to buy some models from independent designers? http://www.ecardmodels.com and visit the shop!
|
|
#6
07-27-2009, 01:51 AM
|
||||
|
||||
|
Looks good to me!
__________________
My website www.chrissmodels.webs.com My Facebook page www.facebook.com/chrissmodels
|
|
#7
07-27-2009, 07:04 AM
|
||||
|
||||
|
"see what I'm gonna do with it"?...you'll be lucky if I can just follow the basic instructions! LOL
I watched a little TV last night and when I do that, I usually sit and work on my models. So I put the last extension piece onto the fuselage/cockpit assembly and moved on to the main "engine housing"?...thats what I'll call it for now. I admit that my skills are weak...but I'm working with two digital images as instructions, no other details or text instruction...and I glue, unglued, cut apart, re-attached a dozen tabs and connections before finally figuring out how to properly put this piece together. First, I think it is overly complicated as one piece...it could have been broken in to two or three section (and when you see the half a dozen add-on pieces, you wonder why it wasn't?) Its one of those "once you get it, it is very simple" kinda parts...but it took me three hours to get it! ...and in the end, its a little sloppy, but passable.   There a couple of sections that are cut, but for no apparent reason, and then seem to be attached back together, but without joining tabs...so I have added a number of little joiners (that with my luck will probably have to be cut out again later!)...another result of limited instructions I think.
__________________
SUPPORT ME PLEASE: PaperModelShop Or, my models at ecardmodels: Dave'sCardCreations
|
|
#8
07-27-2009, 07:27 AM
|
||||
|
||||
|
Heres a couple more details regarding the "engine housing" assembly
 
__________________
SUPPORT ME PLEASE: PaperModelShop Or, my models at ecardmodels: Dave'sCardCreations
|
|
#9
07-27-2009, 07:33 AM
|
||||
|
||||
|
That looks very nice. i have seen the real air planes fly, so I look here to see the model... I like it very much. For the TINY Nr. 1 part. I would cheat and use some shaped wood and paint it blue!
|
|
#10
07-27-2009, 09:41 AM
|
||||
|
||||
|
If you were building this model any larger, then you could find a way to do the nose tip
...but at this scale, the hole in the end of the nosecone, is so small, about the size of a toothpick, that its just not worth worrying about.  I am going to round off the end of a fat toothpick (to a blunt cone shape) and insert it through the hole. And a little blue paint should fix it up.
__________________
SUPPORT ME PLEASE: PaperModelShop Or, my models at ecardmodels: Dave'sCardCreations
|
| Google Adsense |
 |
|
|


 Linear Mode

