


|
|
|
#21
 05-14-2010, 01:46 AM
|
||||
|
||||
|
Dave,The Marek Mustang seems to have these fit issues from the get go. I use GIMP and paint.net. Gimp has a nice little measuring tool. pixel,mm and inches. This can be used to check distance of lines at break points in the fuselage. It saves a bit if time for Me.
By the way, thanks for publishing the cockpit!!! Looks great! I'll be popping one in a recent rescale/repaint soon. 
|
|
#22
05-14-2010, 05:45 AM
|
||||
|
||||
|
I spent last night assembling and making some small mods
and here is what I have come up with; first...no the marek kit isn't perfect and there are alignment issues with the printed lines on the forward fuselage. second...most of the problem seems to lie with Part#3 (the second forward fuselage section. 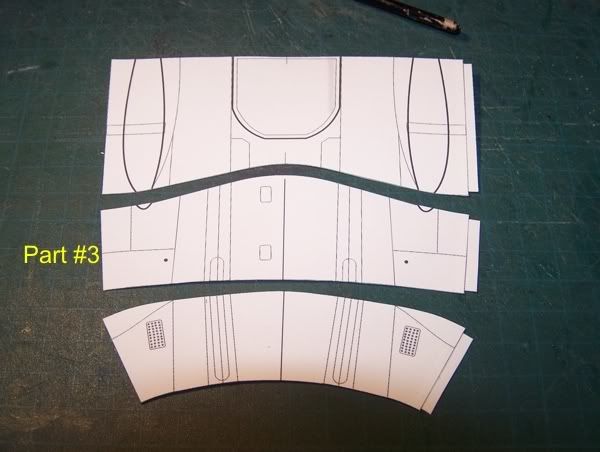 third...my original upscale of this model exaggerated these discrepancies fourth...it never was so obvious as it is now with spanning graphics (in this case, the mission markings) so...I printed out the parts (first three fuselage sections) and fitted them to examine the worst areas. There are two main areas of printed line misalignment. The lower wing lines are actually hidden once the wings are installed so this isn't a critical area. But the upper line is the main reason to modify this part. 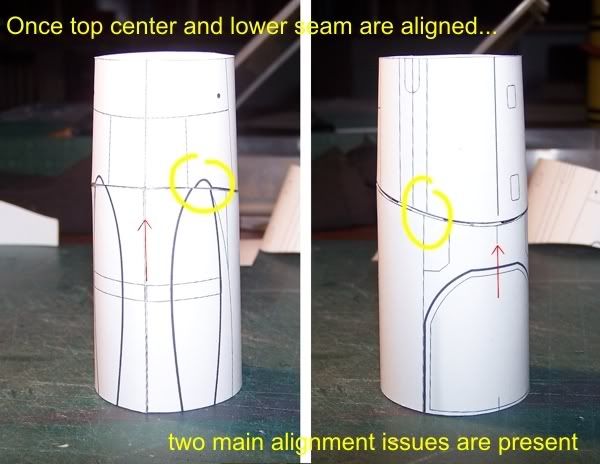 I found that by enlarging Part #3 horizontally, to 104%, it lined up the problem areas and would then only require a small trim to the lower seam area. A test assembly would help verify... 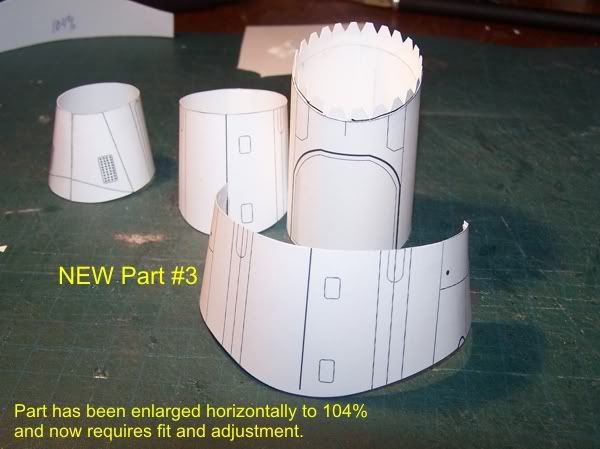 Using glue strips...but no formers...I assembled the new Part #3 and made small trims to the overall increased size of the part and the fit was dramatically improved. All panel lines seem to line up nicely now. 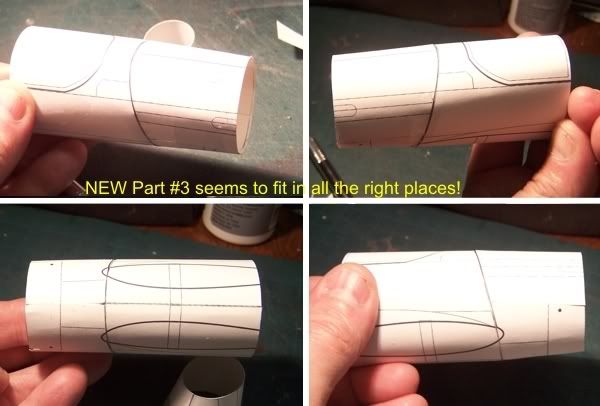 Even the forward fuselage section (Part #2) seems to line up a lot better. Although this section requires formers to properly assemble, there is a large change in the angles and slope of the nose...and I couldn't dry fit it very well... but certain alignment changes are obvious. 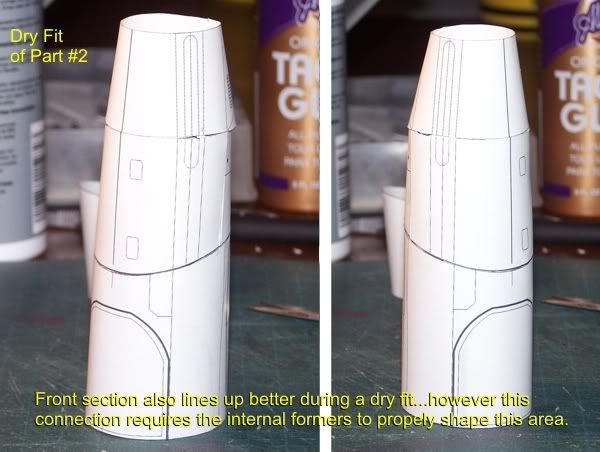 I am quite happy with the level of improvement. ...and so I am in the process of scanning the newly formed Part #3 and I will spend the day modifying the model to include the new part. All my Mustangs will get this updated part! Watch for updates.
__________________
SUPPORT ME PLEASE: PaperModelShop Or, my models at ecardmodels: Dave'sCardCreations
|
|
#24
05-14-2010, 06:39 AM
|
||||
|
||||
|
hmmmmm maybe i should hold off on my blue nose - thanks for the efforts!
Chris
__________________
Want to buy some models from independent designers? http://www.ecardmodels.com and visit the shop!
|
|
#25
05-14-2010, 08:32 AM
|
||||
|
||||
|
first off, let me apologize for sidetracking this thread with all my updates.
now let me continue to hijack your attention with more updates! I have modifed all my "ACES" P51 Mustangs with the new Part #3! Kidd Hofer's Salem Representative Kidd Hofer's Salem Representative D-Day version Bud Anderson's Old Crow Meyer's Lambie II Bradley's Margie Maru (under development) I will be passing along the new models today (May 14) to Chris at ecardmodels. just check with him and get the updated version. .................................................. .......................... Chris (cjwalas) made a comment to me in a private message, and I just wanted to pass along my thoughts. He apologized to me for "creating more work" by bringing up this issue of a part misalignment. I said to him, that not only is this not a problem...but I hope more people will buy my repaints because of the fact that I will constantly do my best to fix or update these models whenever possible. I know not everyone agrees with me, but its my opinion that most models are flawed in some way. There are always gonna be defects and design issues...its a question of whether the designer (or in this case, me) is gonna keep trying to improve things and make the necessary updates. I do my best to make my repaints as good as possible...but I admit, sometimes I lose focus, or have too many projects on the go at once, or just rush to complete a job and make a mistake in the process. And for that reason I apologize to those who have bought a kit and now have to get an updated version. okay, enough of me...back to build!
__________________
SUPPORT ME PLEASE: PaperModelShop Or, my models at ecardmodels: Dave'sCardCreations
|
| Google Adsense |
|
#26
05-14-2010, 10:14 AM
|
||||
|
||||
|
Thanks Dave. I know I'm not the only one that appreciates your hard work and commitment!
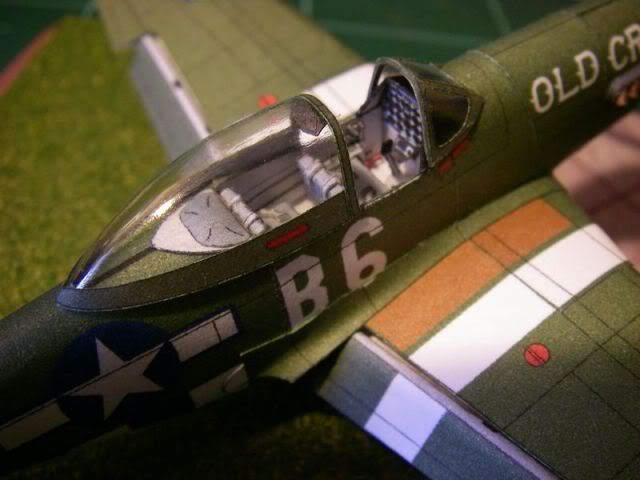
"And now, back to our regularly scheduled build thread...":D Attaching the main wings on this one is complicated by the line up of the invasions stripes at the rear of the wing fairings and for that reason, I suggest that the fairing be attached to the wing before attaching the wing itself. I glued the back of the fairing in place first to assure alignment;  I think this worked fairly well and anyone building this one should consider it as there's pretty good opportunity to mess up the alignment here. The wings were somewhat ungainly to glue, and I didn't do the best job, but I eventually wrestled them into position;  I'm working on the landing gear at the moment, but now that the fuselage is all together, I've had the chance to do a test fit of my canopy form... it's not all that good and I think it's going to be easier to start from scratch again rather than try to get this form to work.  Rear wheel went together no problem.  Air scoop. Hmmm. I wound up with an imperfect fit and had to slightly crimp the rearward part to match the forward section. Not horrible, but not great. That canopy is starting to worry me now! Chris
|
|
#27
05-14-2010, 11:14 AM
|
||||
|
||||
|
Chris, this is looking really good. I also have issues with the installation of this wing. spacifically I find the "wing root" portion to be kinda ugly. The mustang never had all these (cuts). I faded the cut lines as to attempt to hide this. I still kinda want to kit bash Modelarts' counter part for this portion. (I know thats cheating)
I gotta say, this build is very encouraging. Your making this look pretty darn sweet!
|
|
#28
05-14-2010, 11:22 AM
|
||||
|
||||
|
looks great! I agree about two things - your canopy doesnt look quite right. From the bit of reseaarch I did its like the normal B straight canopy with just a bubble in the middle part.
I also hate wing roots with a passion and appreciate the tip! I may also kit bash the smoother style wing root from one of paper airkraftworks p-40's we shall see!  Chris
__________________
Want to buy some models from independent designers? http://www.ecardmodels.com and visit the shop!
|
|
#29
05-14-2010, 12:23 PM
|
||||
|
||||
|
I agree about the wing root lines. I photoshop them out of mine, then carefully breath on the part to soften the paper while forming the complex curvature.
Of course, this works in 1/144, not sure how it would work in the larger scale.
__________________
Ray Respect the Paper, RESPECT IT! GET OFF MY LAWN!
|
|
#30
05-14-2010, 04:01 PM
|
||||
|
||||
|
Yea I've wondered about the way I've seen the Dave's wing root fillets being built. I always see them with a hard 90* fold and the top parts split on those lines. The fillet, being a fillet, is supposed to be a smoothly-bent transition from wing to fuselage. You can see How I bent mine on my Old Crow model here (not a Marek or Dave model):
 And on the original here:  I think I'll be with Texman and pull out the lines in PSP before printing, then use this rolling technique to get that smooth transition. Makes it a bit more difficult to form and stay, but makes a nice smooth look.
__________________
Put on hold build (someday I'll finish): F-35A Lightning II 1:72 Previous builds: cMags' Card Model Builds
|
| Google Adsense |
 |
|
|


 Linear Mode

