


|
|
|
#141
 03-08-2012, 06:13 AM
|
||||
|
||||
|
got in the cab ajusted the seat, part turned the key for heat and fired it up but then shut it down as there was no radio! as stuning as always.

|
|
#142
03-09-2012, 04:34 PM
|
||||
|
||||
|
Thanks at all.
Art Deco, the headlights I said before how I do. I forgot one thing, before cut the circles I make in acetate paralel lines with a non-cutting part of x-act. Vermin King, the rims around the dial on the dash is made with telephone wire (0,5mm) around a drill. I cut the wire with a x-act when is still in the drill and then glue with a little drop (very few) of cianoacrilate glue. The steering wheel, I tried to find something with the necessary measures. I found a bottle stopper and done as to the rims.
|
|
#143
03-10-2012, 09:20 AM
|
||||
|
||||
|
Here's another build at Polish forum:
modelarstwo kartonowe, plastikowe ... :: Zobacz temat - ?adowarka HSW ?-34 - 1:25 Renova Model [relacja] This is not standard paper build (parts are painted), but how impressive!
__________________
http://www.ecardmodels.com/Modern Naval Warfare ---------------- imagination+extrapolation
|
|
#144
03-10-2012, 11:36 AM
|
||||
|
||||
|
strk.

|
|
#145
03-10-2012, 12:14 PM
|
||||
|
||||
|
Zé, good idea to scratch the acetate on the headlights, they really look like lenses.
Where did you describe your technique for creating the headlights? i would like to read that. Thanks!
|
| Google Adsense |
|
#146
03-10-2012, 03:26 PM
|
||||
|
||||
|
Art Deco, I say in a previous post. I used in outside paper, inside foil and to "glass" acetate. Inside left some wire visible to reflect and give some color. There's no special technics.
................................................ ooOoo ................................................ Applied in the roof, the inside rearview mirror, light and wiper motor.  Now with the roof, doors and the front and rear window wipers. 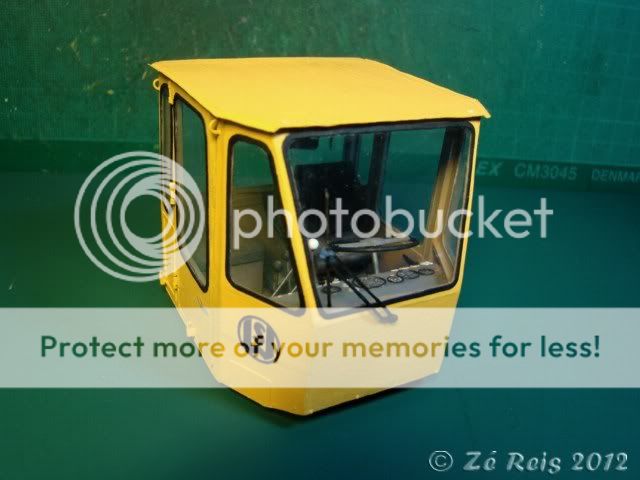 With the doors open.  
|
|
#147
03-10-2012, 08:01 PM
|
||||
|
||||
|
Quote:
As for the rest of your model, words can not describe how awesome it is looking, that engine is simply stunning to say the least.
|
|
#148
03-10-2012, 10:09 PM
|
||||
|
||||
|
Jaffro, the headlights have many few parts and there isn't many technics to apply. Maybe something the way I do, I dont know.
Lets go to a step by step: - I make the exterior with the parts that came with the model; - Cut squares from foil; - Put the squares on top of a paint-brush and give the format pushing down the foil, I don't cut anything for now; - I Put the foil in place and then cut the excess, don't apply glue; - Make in a acetate sheet some paralel lines. How I said before. I make the lines with a lenght for all headlights that is necessary; - Then cut the circles and glue them on the headlight. I use fast dry white glue. You can see the packaging in my blog in section "Tips - How I do". Here you can see all glue types that I use. The text is in portuguese but you have in the top the button to the Google translate. The acetate, I said before, is plastic sheets used on classroom projectors. It's a little hard plastic and I use for all "glass" and "windows" on my models. I hope that can help. Where you think that is the diference?
|
|
#149
03-11-2012, 02:11 AM
|
||||
|
||||
|
the difference is that yours look awesome and very realistic compared to mine, I guess the compliment was lost in translation somewhere.
|
|
#150
03-11-2012, 07:51 AM
|
||||
|
||||
|
Sorry I missed the earlier description of the process for the lights, thanks for writing up the extra details! Even though the steps sound "straight forward" (direct and simple), your careful and precise assembly really made them appear so realistic.
The cab looks fantastic, it is impossible to guess the scale from those photos!
|
| Google Adsense |
 |
|
|


 Linear Mode

