


|
|
|
#21
 12-31-2011, 04:44 PM
|
||||
|
||||
|
Really a nice build thread with tons of great tips and advice for anyone who might build this superb little model...Corey is really quite talented, eh? We are very lucky he treats us to his wonderful creations...and lucky for folks like you to show us how great these models come out. I love the way the wheels on the gun came out using the clear plastic, really outstanding!
Very much looking forward to seeing the fiddly bits added when you have the time! Wishing all of you a very healthy and peaceful New Year!!  Cheers! Jim 
|
|
#22
12-31-2011, 05:20 PM
|
||||
|
||||
|
Jim, Corey and I have been sidebarring about a buncha projects, and much of what transpires will never end up on the 'Blog--it's the geeky deep-immersion stuff that will INFORM the models and the builds, but can never be truly enunciated publicly.
--You know--"HOBBY stuff!" It's what we tell our wives, instead of trying to actually explain. WE, and they, like that. "...That's nice, dear." Yah, Corey has a big, roomy mind for this stuff, and truly loves the subjects he works with. We are blessed. And I'm having a ball. 'D
|
|
#23
12-31-2011, 06:00 PM
|
||||
|
||||
|
You get that "...that's nice. dear." from your wife too?
Well I am glad y'all like these models. I have a lot more coming. Both ironclads and wooden gunboats, and a few oddies too. And I still have some Euro-ironclads working in the back of my mind as well. That stern on the Warrior is a hang up though! I would like a couple of good shots of this ship (maybe with the back drop!) for ecards. Thanks guys, Corey
__________________
My models are available here http://ecardmodels.com/index.php?manufacturers_id=62
|
|
#24
12-31-2011, 07:11 PM
|
||||
|
||||
|
Mos' humble thanks. Hi-Def Vanity Shot will come in time. --'D
|
|
#25
01-09-2012, 06:35 PM
|
||||
|
||||
|
First update of the New Year, and this bump is a deliberate kick in my nethers as well...been preoccupied with Real Stuff and am trying to get back to the GDF* in Life.
I'm at the point of doing the little deck appointments &c. &c., puzzling out what I want to show. The rigging is problematic, because of the small scale--I am honestly looking for stuff I can use to simulate the guys to the smokestack, the handrails, all those bits. Best I can think of so far is wire, and I can get tinned copper--tinned, so I can quickly solder handrails & stanchions up in a jig--as small as .003" which works out to 3/4" diameter in 1/250 scale. An assortment of small wires should suffice for all but the actual rigging--a flag halyard would be something like .0007" and I'm just, well, not. I have not yet worked out a sensibility for this small a model, a sense of how much the eye will see at this scale...precisely because I haven't yet built anything in this scale. I suppose this one's my learning curve, but it's made more important since I've promised a Vanity Shot to CT for his catalog! We'll all see how it turned out, I guess. 'Duster *GDF=Geeky Dumb Fun, for you non-Acronym speakers in the audience
|
| Google Adsense |
|
#26
01-09-2012, 09:20 PM
|
||||
|
||||
|
Hey, 'Duster!
Looking forward to seeing the latest updated photos! I have used a combination of materials of rigging in the smaller scales, one being fly tying silk, which is available in many different thicknesses and colors, as well as floral wire and in some instances nicad wire, which is the thinnest and strong wire I have come across, but that strength sometimes makes it difficult to work with...it can slice through your skin too darn easy if you are not careful. Coating the threads with glue, sometimes PVA sometimes CA, helps to give the threads a bit of stiffness that makes it easier to work with in some rigging applications. Can't wait to see your progress! Cheers! Jim
|
|
#27
01-14-2012, 02:22 PM
|
||||
|
||||
|
About time I got back to this--a friend of mine was fond of reminding folks: "It's a Hobby, not a Job!"--and indeed, I've had a lot going on recently, my Job being just part of it. (and for that matter, Job could've given me some patience pointers in all this...)
So, last night I started "training" myself for the really small stuff, and figured I'd start by tackling the handrails. Since I'm planning on doing a good bit of work in 1/250, it makes sense to build me some dedicated tooling for repeat work such as these and companionway ladders &c. Once again, I risk reinventing the wheel with detailed sequences like this. If there's already a "Rail" thread that I should hijack, please tell! Until then-- 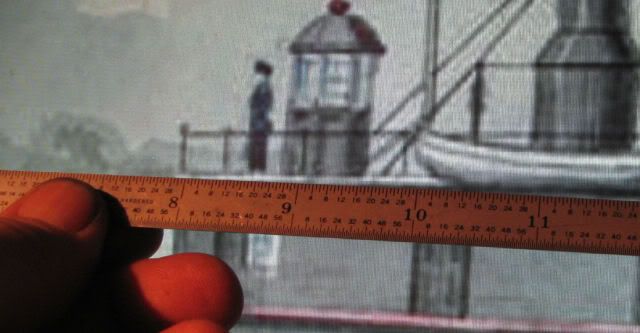 I started by working up a reasonable proportion for a handrail. Without going too geeky into it, I figure about 40" high with 54" or better between stanchions. So I need a jig to lay up the railswith those numbers. As a tool & die maker, I suppose I could pop into the shop and work up something perfectly stellar, but (remember, Hobby-not-Job!) it's more fun to do it at my desk while listening to Dr. John. Sooo... 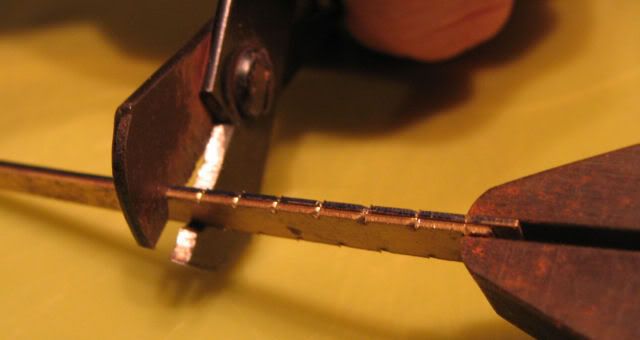 Two strips of brass (all you SLOT RACERS out there in PaperLand will follow right along here!) get clamped together, and I crimped little Vees into the edges on a regular spacing corresponding to the distance between stanchions. I did this with a cheep pair of electrician's wire strippers. 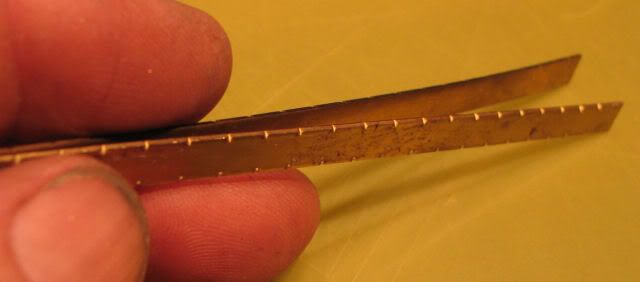 Worked great, giving me even marks on both edges of the strip and they're all lined up well enough to make two runs of rail once I get the method down. 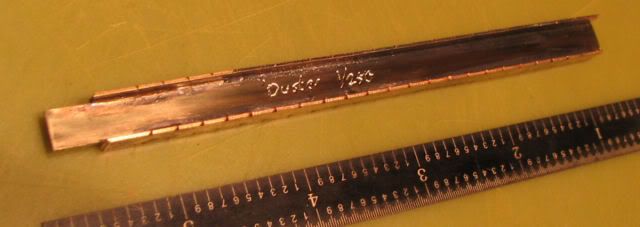 Here, I've soldered a strip to hold the two sides apart and provide working room within. In later shots, you'll see the wire "handle" I learned I would need as I wound the wire to the bottom end of the jig--just a wire rod about the size of my hand. 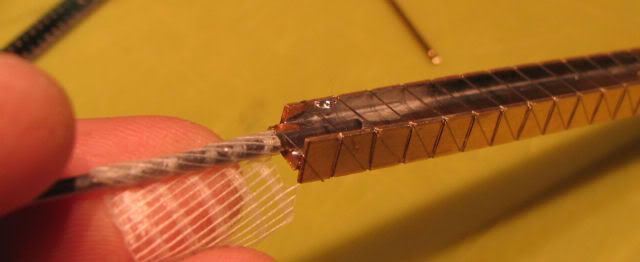 Here's the winding going on. I'm working with #38 AWG tinned copper buss-bar wire, ~.005" diameter. Well--knowing what I know now, I wouldn't start out with anything so tiny and fussy again. But, having this first run under my belt, I will probably get REAL GOOD at doing it in the future. Informed choice. Anyway, you're seeing three winds of the wire at each station to make thicker stanchions. Then I wove the rail along the length, over/under each stanchion to allow the railing's tension to help hold it in place (see below for what I'd do differently here). Then I dripped acid flux on the whole thing and hit each stanchion with the iron with just a teeny wet of solder on it--this is why I used pre-tinned wire, makes a little easier job. 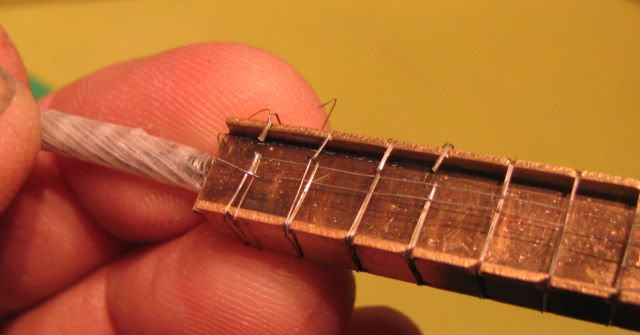 Here you see the beginning of cutting-loose, with fine edge-nippers. It's best to cut flush to the top railing in this operation, while everything's being held taut in the jig...and I just now figured out, because of that, it may be impossible to build another rail on the underside of the thing. How would that one get held taut? There may be a way. I'll see, next time. 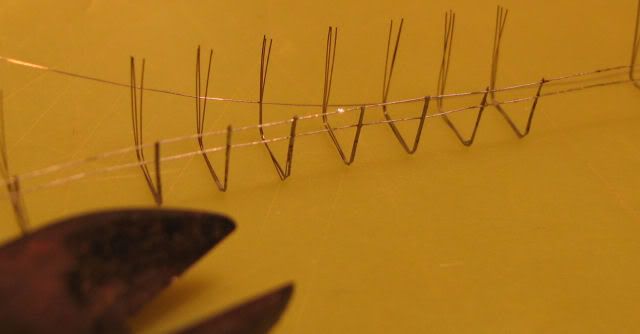 And here's the whole thing, loose. See the places where the stanchion didn't wick up to the rail, and we got a gap. So much for weaving...next time, I'll lay the rails right on top and gently press down on each station as I touch the iron to it. Might go better. 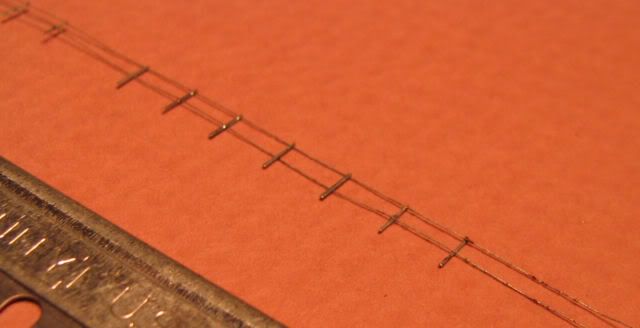 After cutting the stand-up part of the wires off, I sliced the stanchion height off neatly with a straightedge razor. The small wire cuts easily and neat as you please on a cutting mat. So, you see enough long-enough pieces here, after the gappy mistakes, to make up my scant railings on the ALEX. As you see, I've added a middle rail as well that doesn't appear on the painting, because I frankly need the structure. Maybe nobody'll notice. Yah, I'll do this again. I've already got some ideas about how to make the railing spacing easier, like making a little wire guide-comb for each end of this jig to help line everything up. If it's just lying on top of the array of stanchions, I can tension these easily. Ready to start rigging the model now. Stay tuned. 'Duster
|
|
#28
01-14-2012, 03:25 PM
|
||||
|
||||
|
Awesome!!! That there is a whole lotta work! It turned out great!
CT
__________________
My models are available here http://ecardmodels.com/index.php?manufacturers_id=62
|
|
#29
01-14-2012, 03:30 PM
|
||||
|
||||
|
Way cool, 'Duster!
Not sure if there is an actual thread out there on making rails, but there might be. I have used thread on a jig which I then use diluted acrylic paint and sometimes CA glue to attach the thread railings to the thread stanchions, and the acrylic paint/CA glue stiffen up the weave fairly well, sufficient for use on paper models. I'm sure you can see this technique used by others as well in the ship build threads. There is also laser cut and photo etched railings available commercially in 1/250 scale as well as 1/400 scale, as far as I have seen. My dear friend Barry who passed away recently used wires soldered railings on his early builds, as well as for some masting structures...you might want to check out his threads to see his technique, but this is the first time I saw someone use a jig for making soldered railings. Came out great, mate! Thanks for sharing your techniques with us! Cheers! Jim
|
|
#30
01-14-2012, 03:44 PM
|
||||
|
||||
|
Well, photoetching's just cheating, right? Some years back I got involved in a real hottied-up model of the Hall Brothers' fisheries steamer W.H. BANCROFT, and went to great lengths to have beautiful brass P/E work for the wheels and framework. --Didn't feel right. Great for plastic models, but here's we're making, not assembling...
In this and another thread (also featuring one of Corey's models), there's talk of using silk thread for this stuff. Yah, done that too, but I had the wire right there and didn't have to wait for it--and in the ridiculous sizes I'm trying for, we're getting down to the limits of what any material will do. Having had to make up a whole new toolbox for rigging at one point in my misspent youth, I know I don'e wanna try again. Once again, informed choice--and mine alone. 'D EDIT: Forgot to add this--it may have gone a lot easier if I HAD had thread! Or maybe I'll learn how to do this better. Stay tuned. Last edited by Hudsonduster; 01-14-2012 at 04:08 PM.
|
| Google Adsense |
 |
|
|


 Linear Mode

