


|
|
|
#21
 08-21-2010, 08:24 PM
|
||||
|
||||
|
Well, it's all CTs' and Knifes' fault! I have been arguing with this kit for three days now. I downloaded it and tried printing it out, a double tap of course since Knife warned of multiple printings required. When it came rolling out of the printer, it was a lovely shade of orange brown for the deck, bridge, cupola, and hull parts. The armor shutters are steel gray. Obviously some color adjustment is needed. Since I don't have Photoshop or any nice PDF conversion programs to change the plans to something I can tinker with, had to dig up a conversion program, got one, it turns the PDF into a jpeg which I can load up into Paint. So I have been merrily "painting" the deck to a color which matches the armored shutters and cleaning up a few lines as well as getting rid of the anchor chains printed on there as well, it's amazing what you can see when something is blown up to 800%. Of course, it is slow going with the amount of "painting" required in this way. But I can change the colors to something that will more resemble the ship when assembled.
I have been tinkering at some of the sub assemblies, Brookes Rifles, anchors and such. Putting the hull inner form together and trial fitting things to it to see if I will have any surprises like Knife mentioned with the stern piece. I did find the two little raised tabs that are part of parts 2 and 3, these are supposed to go into the deck under the hatch coamings in the little pink, "remove me" slots. I am going to double up the 110 pound card stock that I am printing this out on so that there will be enough thickness on the deck so that the tabs don't project too high. Changing the color of a kit was always something that I never really did before short of using an airbrush or paint brush, I now have a much greater appreciation for those who do this sort of thing after rolling my track pad around the deck of this little kit for a couple of evenings. And I haven't even started on any of the other parts yet as far as changing their colors go!
__________________
Jay Massey treadhead1952 Las Vegas, NV 
|
|
#22
08-21-2010, 08:39 PM
|
||||
|
||||
|
I tried to warn you. I used the gray color found on the back of the crew figures as close enough to use as the main casement color. See if your graphics program has a "global" function on it's "fill" feature. That will change all the color you select into another color you select. That way you can change all the brown color to gray.
While you have the kit up in your graphics program, you might want to shrink the gunport cover pivot points, they are way too big. Also, there's a small mismatch on the top right of the back of the casement, you will see it if you have the drawing blown up 800%. I fixed it by cloning the left side, flipping it, and pasting it over the right side. Computers were created to make our lives easier and more productive. 
|
|
#23
08-21-2010, 11:27 PM
|
||||
|
||||
|
Yeah, you did indeed, but I am a glutton for punishment. :D
The closest Microsoft Paint comes to a global function is the paint bucket which allows you to paint one line as far as it goes without changing colors, which is not really that far. I have the very stern section of the deck to complete then I can start working on the casemate, hull plates, stern plate and cupola to change those colors to match the armored gunport covers. I will look for that casemate mismatch when I am working over it. I did assemble the first one just to see what I might be looking at when it comes time to put the ones I will be using together but didn't seem to have a problem there. That cupola is a trip, you really have to create some tight folds to get it to snuggle down to the roof all right. Putting on those tiny half wheels to the bottoms of the carriages on the Brookes Rifles was also another "Fun" thing to deal with. All in all, it is rather a lot like some of the limited run styrene kits that I used to get once in a while. It does indeed go together to make a pretty decent model, you just have to work at it to get there. 
__________________
Jay Massey treadhead1952 Las Vegas, NV
|
|
#24
08-22-2010, 06:53 AM
|
||||
|
||||
|
Just think of it as a jigsaw puzzle where you have to cut out the pieces first. You can't see inside the casemate very well, so you can use the simplified cannons from one of CT Ertz's kit if you want to.
|
|
#25
08-22-2010, 04:13 PM
|
||||
|
||||
|
Hi Knife,
Actually I got the little beggars together, half wheels and all. Although as an after thought, I am considering just making another set up, punching out full discs in that size and using them to fill the little slots in the frames. While it is not explained in the instructions, one of the cannons is in firing position, barrel fully forward on the carriage and the other is in the loading position, all the way to the rear, a rather interesting feature that really does deserve a bit of explaination. Okay enough yakking, time to get back to the trusty old Paint program and finish up the deck and see about getting another feature or two colored. The casemate is going to be interesting as the roof needs to be one color and the sides another.
__________________
Jay Massey treadhead1952 Las Vegas, NV
|
| Google Adsense |
|
#26
08-22-2010, 05:58 PM
|
|||
|
|||
|
These are great- I plan to try some of your kits- I 've made a few ironclads from scrap wood, wire and junk- even sold a few- thanks for the downloads-
|
|
#27
08-22-2010, 09:52 PM
|
||||
|
||||
|
You might try paint.net. It's a free paint program that I use very similar to photoshop, but with a shallower learning curve and no cost. GIMP is another program that several other modelers use. Microsoft Paint is very limited, and the skills you gain learning a more complex program should pay off later in your modeling (and actual) life.
Don't forget to add photos once you get everything repainted.:D
|
|
#28
08-23-2010, 05:51 AM
|
||||
|
||||
|
Hi Knife,
I have paint.net on the 'puter, just haven't fiddled with it as much as Paint so I feel more comfortable with that one. May have to give it a go and see if I can get better with it. Got the deck completed, also the cupola and stern plate. Started working on the hull sides before I had to go take care of some other things. Will get back to work on them this afternoon and evening after my day at the salt mines.
__________________
Jay Massey treadhead1952 Las Vegas, NV
|
|
#29
08-24-2010, 07:11 PM
|
||||
|
||||
|
Hi All,
Well, I got the deck, stern plate, cupola and the forward end of one side of the hull side plating color changed over to the gray color I wanted. Using the Document Converter program that I dug up first makes a very nicely detailed JPEG Image of the PDF from the downloaded kit. I did try a couple of other freebie converters from the net but they did not have enough resolution to enable the Paint Program from Microsoft to work as it was supposed to. The only problem that I had was that the free version of the Document Converter puts a watermark in one corner of the image. So I wound up paying for it after all but I think that it was worth it. This is a downsized version of the image I have been working over. 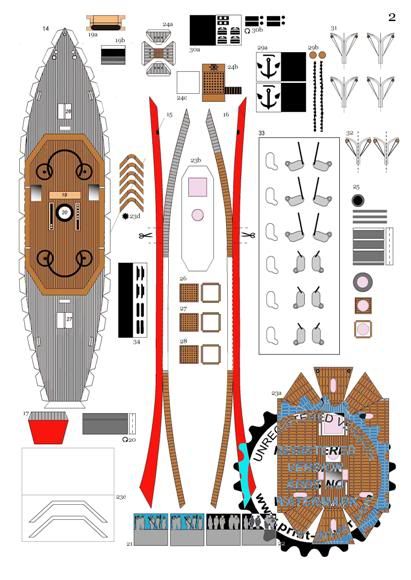 With it blown up to 800% in the Paint Program I can see where there are over runs, misplaced colors and other little errors in the original drawings. These are quite easy to correct. As you can see, I have completely removed the drawn on Anchor Chains that used to run on the bow section. I have made a second conversion of this same page so that I could work on the Armored super structure without the water mark messing with me. This may take a while working with Paint, but I am very satisfied with the out come of the print. This is what I started with before I started to change the colors. 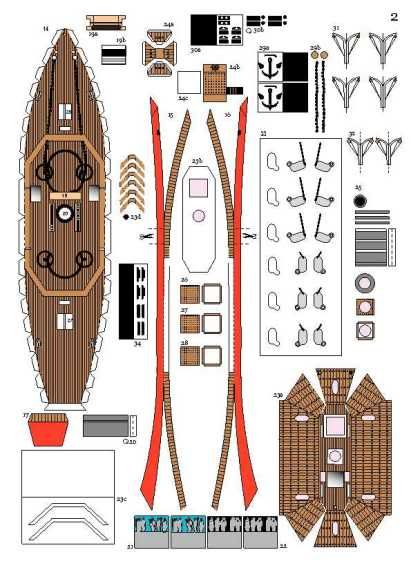
__________________
Jay Massey treadhead1952 Las Vegas, NV
|
 |
|
|


 Linear Mode

