


|
|
|
#11
 08-04-2009, 03:10 PM
|
||||
|
||||
|
Quote:
So, for general parts use, I think it's easier than GIMP. Weathering would probably be better done in GIMP. I use Inkscape exclusively for the L-5 I had designed. I can change things around VERY fast to make new details for a paint scheme. Ryan
__________________
Certified Flight Instructor in Dallas, TX Websites: www.doolittleraid.com & www.lbirds.com Papermodels at: www.scribd.com/TexasTailwheel.com 
|
|
#12
08-05-2009, 12:47 PM
|
||||
|
||||
|
Well I have all of th deck superstructures done. I do not know how great a model this will b though. All of the heavily sloped armored parts were only about a foot high. Great for keeping a low profile but makes for som shallow bnding when folding card stock.
 If this ship had ever hit water almost all navigation would of had to of been from th turret top, except when in battle. Now I see why it had so many armored spotting houses. Still visability would have suckd. The port hols are about 4 inchs in diamter, but pass through 24 inches of wood and iron, so it would be like looking through a 4 inch by 24 inch tube. Really shrinks the viewing area. Also, notice the huge blind spots in the corners do to the thick walls. With such thick walls and heavy slope, the inside would hav been cramped. Any how, all this at 1/250 scale will be an neat trick. We will see. If this ship had ever hit water almost all navigation would of had to of been from th turret top, except when in battle. Now I see why it had so many armored spotting houses. Still visability would have suckd. The port hols are about 4 inchs in diamter, but pass through 24 inches of wood and iron, so it would be like looking through a 4 inch by 24 inch tube. Really shrinks the viewing area. Also, notice the huge blind spots in the corners do to the thick walls. With such thick walls and heavy slope, the inside would hav been cramped. Any how, all this at 1/250 scale will be an neat trick. We will see.
|
|
#13
08-05-2009, 12:54 PM
|
||||
|
||||
|
I'm looking forward to seeing it completed, CT!
I think Wilmington would've been hell to take into combat, but then, most of the ironclads were. 'Needs must' was the order of the day. Wyvern
|
|
#14
08-05-2009, 02:21 PM
|
||||
|
||||
|
Here is the pilot house and front turret.
<a href="http://s727.photobucket.com/albums/ww277/ctertz/?action=view¤t=frontturretandpilot.jpg" target="_blank"><img src="http://i727.photobucket.com/albums/ww277/ctertz/frontturretandpilot.jpg" border="0" alt="Photobucket"></a>  frontturretandpilot.jpg picture by ctertz - Photobucket
|
|
#15
08-05-2009, 02:38 PM
|
||||
|
||||
|
Now I am doing the sides from the waterline up to the deck, about 4.5 feet or so. I am also attempting to lay out the inside frame work.
The dead lights measure three feet across but no details are seen in the blue print. I imagine that they would have been sunk down low and covered by a iron dick when in combat much like the small ones on the Monitor. Question for you all on scale and lay out. If I do the math right, it looks like the model will be 10.75 inches long (224 feet and 1/250 scale) What is a good way to lay it out. Can I make it regular size paper (8.5x11) or is that cutting it too close. Do I need to put the decks corner to corner? All new to me.
|
| Google Adsense |
|
#16
08-05-2009, 03:18 PM
|
||||
|
||||
|
Looks good ct. Nice detail there.
 Scaling is something I struggle with. All printers have different margins, so what I do is simply lay the parts out on an 8.5x11" sheet and then say that they should be printed with no margins along the edges in order to maintain scale. 10.75 might be a wee bit close, I think Canonicus is 10.7 or so and I thought that was about the outer limit of what could safely be fit onto a letter sheet. You could try and see, it might work. Lay it all out and print it off and see what happens. My best advice is that trial and error is the best way to figure it out. Good luck.
|
|
#17
08-05-2009, 04:18 PM
|
||||
|
||||
|
Thanks Avery.
I should have maybe three sheets of parts. Everey thing is in Sketch up. Now what? Remember, I am not th brightest bulb when it comes to computers. I have everything unfolded and groupd on a couple of pages in Sketch up. I want to put them on three pages in gimp or paint to add notes, and numbers. If I may pester all of you for one more time, what is the process? I am not using gimp to color at this point, only as a letter and number adding program.Any help? When done, I should have a cover page with drawing of the ship diagram page with numbers and direction lines a page of history nots and my own speculations, a pagee of witten instructions, and three pags of parts. But how do I get the parts from sketch up to three pags in what ever program and keep all of the parts to scale with each other? A brief step by stp for dummies would rock about now!:o (hint!) CT
|
|
#18
08-05-2009, 04:36 PM
|
||||
|
||||
|
Separate the one file into three files, one for each page. When you've done that, open the file and choose Camera>Standard Views>Top
The choose Camera>Parallel Projection Next, set the background color as white To do this go to Windows>Styles and hit the "Edit" tab at the top Next, hit the third box over, right under the currently selected "Edit" tab. This will bring up a box like this:  Uncheck the box that says "sky" and click on the colored square next to "Background" That will bring up another box. Set the third slider at 100 and the second slider at 0, so it looks like this: 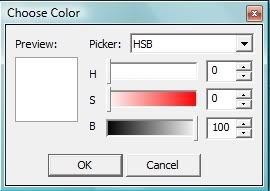 Close out these boxes. Next, go to File>Export>Export 2D Graphic Enter a file name and hit "Options" Enter a suitably high resolution-I usually do 6500 pixels in width. Mess around and see what works best for you. I like to do it very hi-res. Once you've done with that, hit "Export" and come back in five minutes. It can take a while. After that, import the complete file into GIMP and edit. Let me know how this works for you, and if you have any questions, feel free to ask.
|
|
#19
08-05-2009, 06:45 PM
|
||||
|
||||
|
OK. Big helpand much appreciated. May be you can tell me, when opening it in gimp, just go with it as is, or do I have to set "canvas size" or something to make it fit right for normal size paper?
Thank you so much for your help. CT
|
|
#20
08-05-2009, 07:51 PM
|
||||
|
||||
|
I don't know if this works in XP, but in Vista you can just right-click on the exported file and select "Edit with GIMP" this should open it right up so you can edit it. Otherwise, just open GIMP, go to File>Open and choose the file you want and this should get it for you. Any other questions just let me know.
|
| Google Adsense |
 |
|
|


 Linear Mode

