


|
|
|
#91
 11-13-2011, 08:54 PM
|
||||
|
||||
|
Dave, I know you're building the armoured car version, but the chassis, engine and drivetrain should be close to the same since I believe the XXIF is a 2 ton rated chassis. Of course I'm looking at it from the car modelers standpoint where you get all wonked out over brakes lines, cables or rods depending on the type; is the distributor wired in the proper fireing order; etc, etc. Probably way over the top for the info you're looking for.

|
|
#92
11-15-2011, 08:53 AM
|
||||
|
||||
|
In researching this Truck (Armored Car) I have seen other variations
of the Autocar Truck from this same period. I think it would cool to try one or two of those. Especially since they are all basically the same chassis. I am particularly partial to this (Army?) Truck... 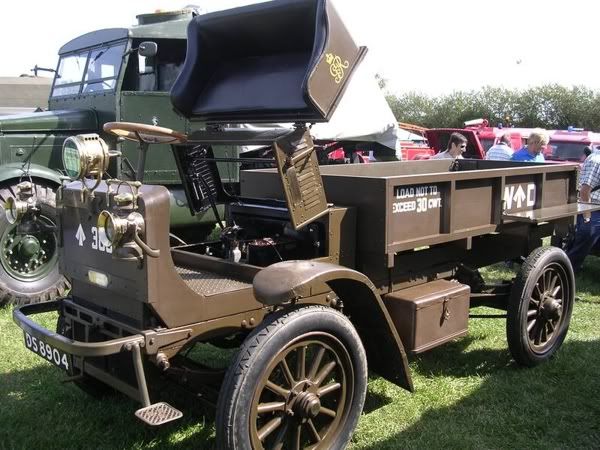 one at a time!....we'll see. .... Autocar UPDATE....The Wheel Well my first test design did not work. Parts were working well...the Spokes rolled and formed quite easily. I dropped the need for a wooden spoke or wrapping the paper around an inner part. But then I hit the outer Rim ring and found I had completely messed up on one of the measurements. This of course affects all surrounding parts, and the Wheel was unbuildable at that point. I also found a few design issues I didn't like. So, it was easier to go back to the drawing board and start again. .............. The Wheel...II (aka The Umpire Strikes Back) This one worked! Granted, I have a few tweaks to make and a couple of parts to add*. (*I will be adding some spacer strips for the outer Rim and Tire to maintain shape) Easiest for me to run you through the assembly process... First, all the parts (minus the spacers that will be added). Theres nothing too small to cut out...even the Spokes have been increased in size to 4.5mm diameter tubes. 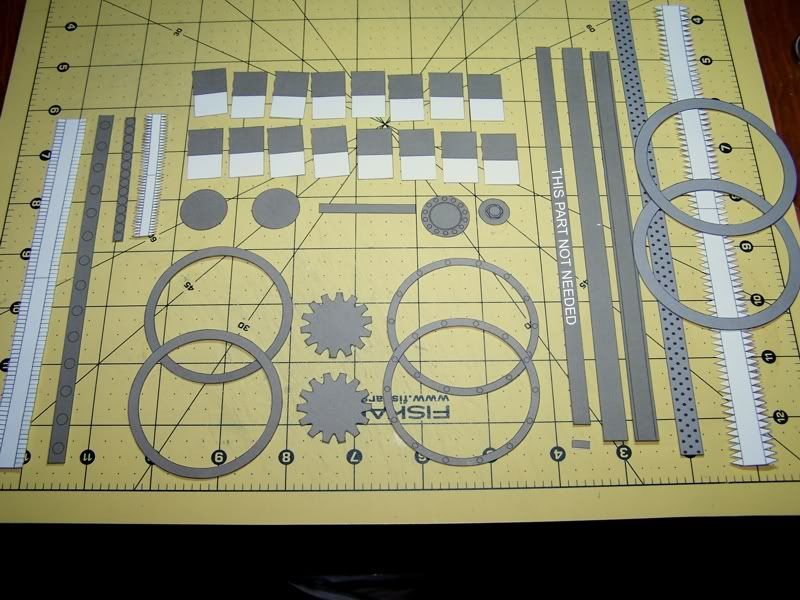 I have decided to drop the little end joiner part (for ring parts like this) and replace it with a full inner ring gluing strip. It helps avoid the bumpy creased seam at the ring join, but you don't always have enough room for it. In this case the four ringed parts you need to assemble are large enough to work with full ringed joiner and it solves the issues of glue tabs for the sides. This is assembly of the inner Hub part of the wheel. 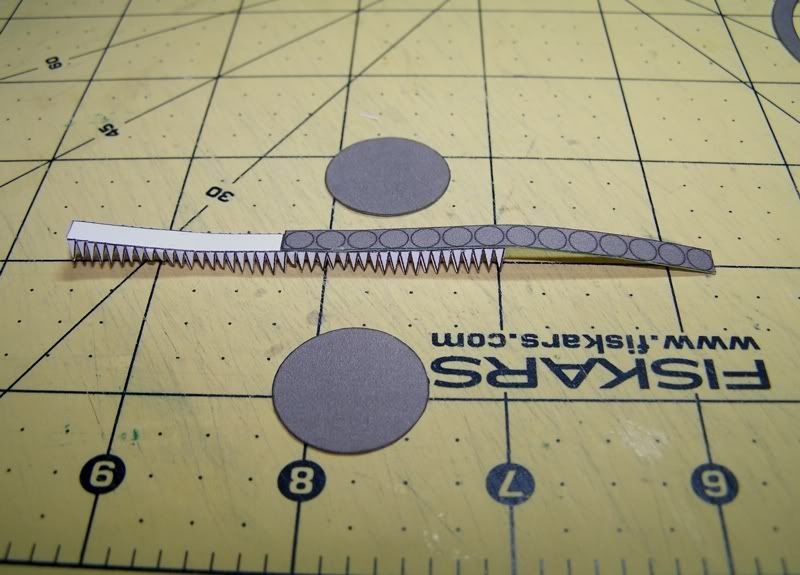 The Outer Rim (inner ring part) is assembled in the same manner, however the joiner strip uses square cut tabs which make it real quick to cut. You can see where all the Spokes go to join these two parts. 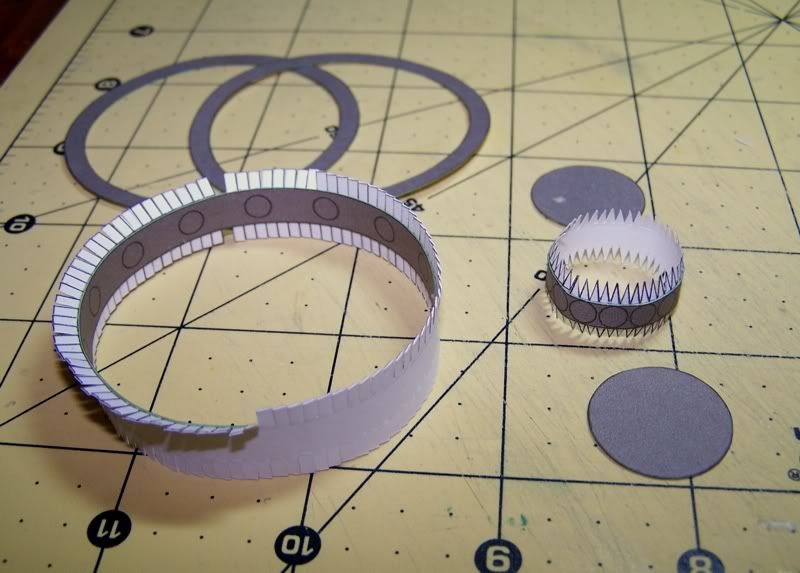 Once the Outer Rim ring is put together, it is finished by attaching the very outer rings. Two strips that fit back to back...they are wider than the rim... and this is also the Bead/Base for the Tire. You can also see the tire assembly (in this pic), which is assembled in the same manner as the Rim rings. Also in the background...all the Spokes, rolled, glued and ready for installation. The two rings on either side of the Rim are the steel strenghtening plates that are bolted to the side of the Rim. 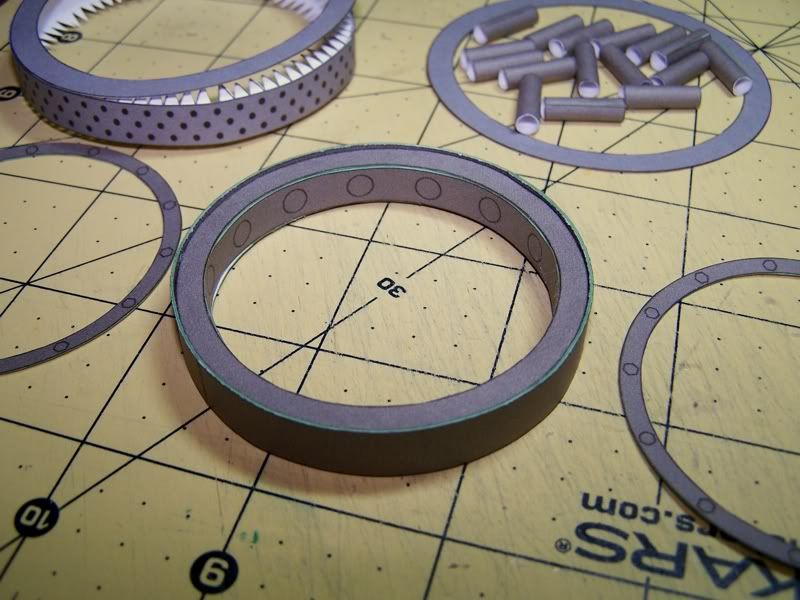 The Rear Wheel has 14 Spokes...the front has only 12. Positioning the Spokes on the rear Hub is fairly easy since they all touch. The front will require a little more care becuase of spacing on the same size Hub. Ends of each Spoke are curved slightly to fit the central Hub, but each is attached with a dollop of glue. (*dollop...a precise measurment according to the 1917 Army Assembly Manual) 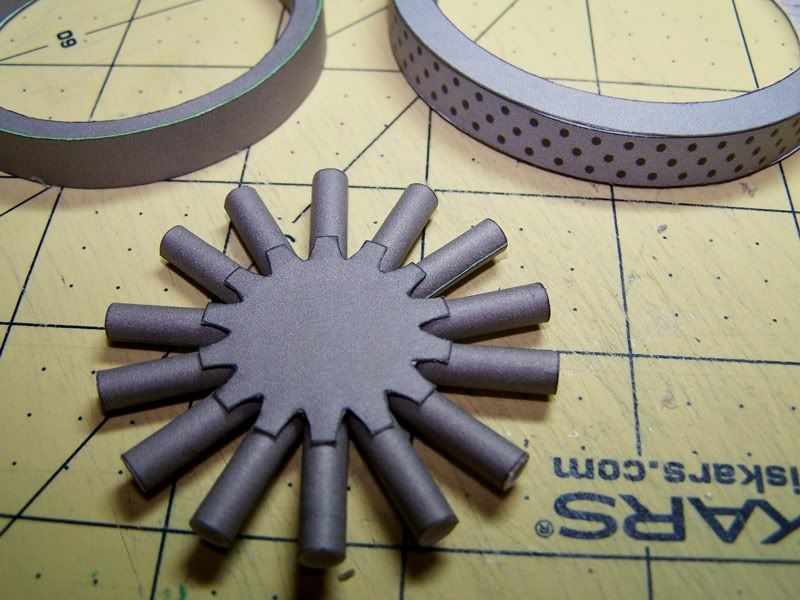 The Spokes on the real Wheels are in fact tapered, getting wider at the central Hub. They also flare out quite a bit at the base. I toyed with the idea of a tapered Spoke, but I think the added assembly difficulites outweigh the final look and so I scrapped the whole thought. In the end, I settled on an extra disc to be attached to each side of the Hub after the Spokes are installed. It simulates the slight flare to the base of each Spoke, but it also adds an extra gluing and strengthening point. In other words, it helps hold the Spokes in place a little better. (If you take some time, you could shape the little extensions to the individual Spokes for a better transition). Once the Spoked Hub is fully assembled its just a case of carefully fitting it into the outer Rim ring. I'm shortening the Spokes a little to allow for a looser fit and easier assembly. Add the Tire and center Hub Cap and the Wheel is done. 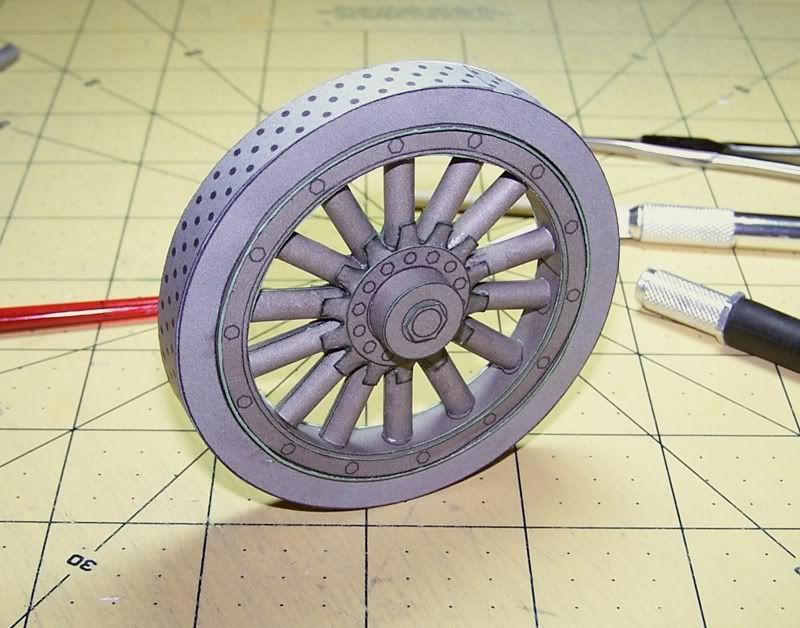 As I said, I have a few tweaks to make, so this Wheel is not exactly as the final will be however the assembly will stay the same. Final Wheel...about 39 parts...times four wheels. Not sure how I can make it any simpler and still keep it on the same detail level as the rest of the Chassis? To be honest, it wasn't that difficult to put together. (This coming from one who whines about all the tedious little assembies!) But I can include a single central disc, with graphically simulated Spokes for those who find this whole assembly too daunting.
__________________
SUPPORT ME PLEASE: PaperModelShop Or, my models at ecardmodels: Dave'sCardCreations
|
|
#93
11-15-2011, 09:07 AM
|
||||
|
||||
|
Outstanding wheel, Dave. Looks VERY nice.
|
|
#94
11-15-2011, 09:40 AM
|
||||
|
||||
|
My personal feeling on fiddly bits is that if the instructions are good, which your build guide above is, I will tackle it. I think having a flat option will be a good thing, because you know that more than one person here will be shrinking it down to a 1/72 model at which point the detailed wheel will be probably unbuildable. But I've been amazed before and it will happen again.
Excellent wheel design and tutorial.
|
|
#95
11-15-2011, 11:02 AM
|
||||
|
||||
|
That wheel is looking good. I saw some photos of the military truck also. Which is my idea of wanting a good and detailed chassis designed. Then just like the real truck builders, you come up with different bodies for it.
|
| Google Adsense |
|
#97
11-15-2011, 05:38 PM
|
||||
|
||||
|
Armored Car is the goal...but I will definitely consider some variants after that.
If you hold me to it...I'll deny ever saying that. .......... a little disappointed again about the colour in all my photos. Without flash, the images are just not bright enough to see and with flash, it washes out the green really badly. The colour is a grayish green, sampled from actual frame colour. But most of the photos have a strong grey/blue washout to all the green parts. So I apologize about that. I might get someone to test print some parts for me. Just to check printer colour variation. If I need to adjust the colour, its best to do it now before i go any further. Anyone want to try assembling a Wheel?
__________________
SUPPORT ME PLEASE: PaperModelShop Or, my models at ecardmodels: Dave'sCardCreations
|
|
#98
11-15-2011, 06:12 PM
|
||||
|
||||
|
I'd love to, but I should leave it to someone with better skills and a camera to take pics ...
|
|
#99
11-16-2011, 08:06 AM
|
||||
|
||||
|
The offer is still open for anyone who would like to assemble a Wheel and give me a report.
........................ Construction and Design continues... Fitting the Drivetrain components...just flushing out basic shapes and sizes. Not sure just how far I will go with detail. I'm mainly interested in getting the basic shapes of the major Drivetrain components installed so that the finished model can be viewed from underneath and appear to be somewhat complete and representative of the actual vehicle. I'm also trying to simplify some of the components for a simpler and quicker build. I can leave it up to the builder if they want to detail it more. Since I am not familiar with the original names of these Autocar Drivetrain components, I will just guess?...thats usually what I do in times of uncertainty. Heres the Engine Block, with Intake Box, Cylinders and Cylinder Heads, Oil Case and front Flywheel all installed in a new Sub-Frame* (*the old Sub-Frame was a little too wide, I couldn't fit the Cylinder Heads in, so I had to redesign this part last night). 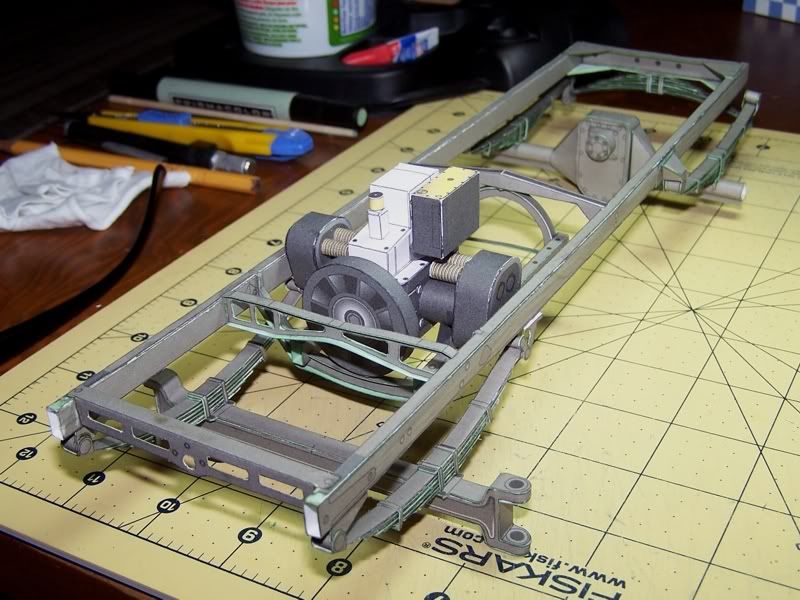 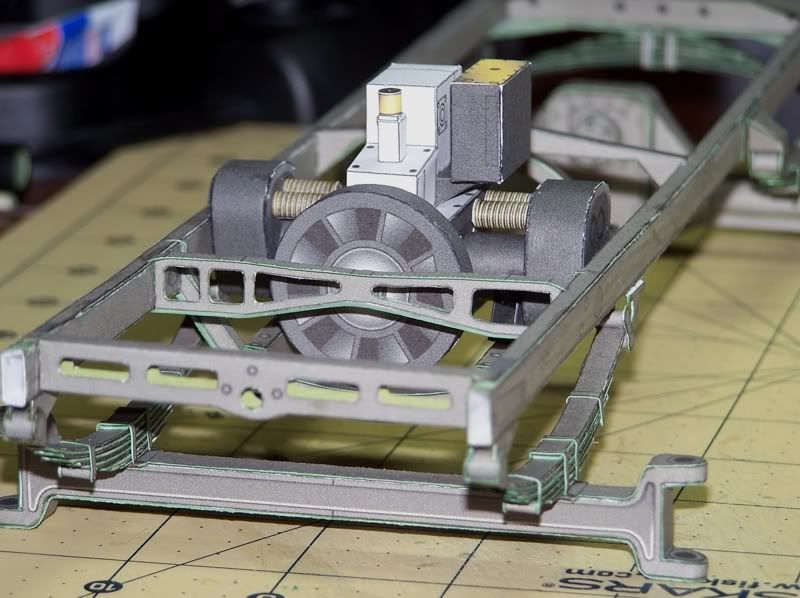
__________________
SUPPORT ME PLEASE: PaperModelShop Or, my models at ecardmodels: Dave'sCardCreations
|
 |
|
|


 Linear Mode

