


|
|
|
#102
 11-19-2011, 06:24 PM
|
||||
|
||||
|
Haven't done too much over the last few days, so I don't have too much to report.
I needed to tweak the fit of the gearbox in the new subframe. And refit the the mounting brackets for the gearbox also. Next project was to sort out the Prop Shaft and its connections to the Rear End. I am hoping to see some photos of the actual Truck drivetrain but in the meantime (working from an original blueprint style diagram) I have gone ahead and designed the Drivetrain parts from Gearbox to Rear Axle. I think this is pretty close to what I want, with only minor changes (if any) to come. One thing I do have to alter is the diameter of the connecting Prop Shaft. This one is a little too narrow...I just put it in to illustarte the connection. I still have to add a few more parts and details to the engine but first I want to get the Wheel Hubs and attachments finished. That way I can fit the four wheels to the Chassis. 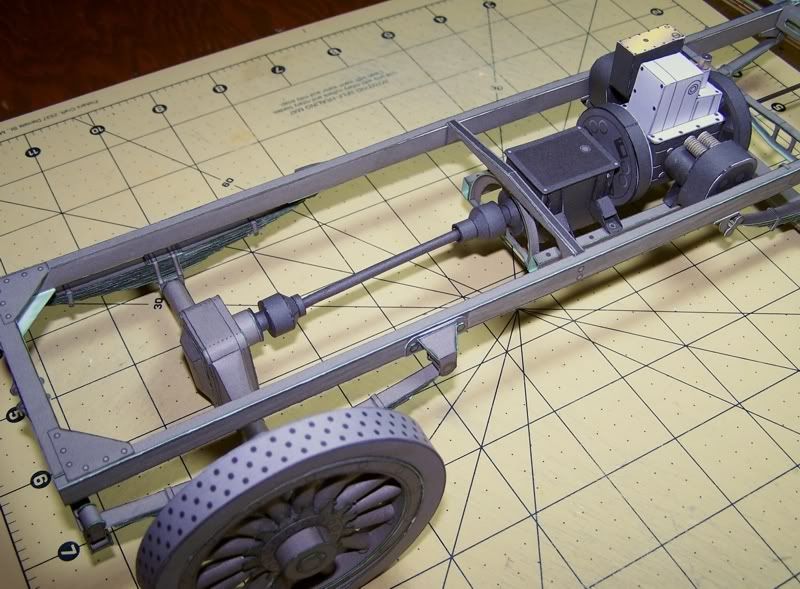
__________________
SUPPORT ME PLEASE: PaperModelShop Or, my models at ecardmodels: Dave'sCardCreations 
|
|
#105
11-19-2011, 10:41 PM
|
||||
|
||||
|
It really is coming to life. I can see why you would consider doing more Autocar trucks. After all the effort getting the chassis right ...
|
| Google Adsense |
|
#106
11-20-2011, 06:30 PM
|
||||
|
||||
|
Dave asked me to build one of his wheels. It is going well although I have not had much time to spend on it I have found no problems.
He also asked me to comment on the colour. I believe a closer match for the overall vehicle colour would be 'Bronze Green' according to According to David Klaus's "IPMS Colour Cross-Reference Guide". More Canadian Army WWI paint colours Cdn Army (Vehicle) Colours
|
|
#107
11-20-2011, 10:46 PM
|
||||
|
||||
|
Quote:
I did not know anything about the Cdn Army Colours. But...I am a little perplexed. Before I gave out this Wheel to test, I was rethinking the colour. And I decided to resample my photos of the Autocar in the Ottawa War Museum. I came up with a slightly different colour, and I decided to use it on the Wheels and all the outer Armored panels ...replacing the present colour, which I will leave on the Chassis for some contrast. So, the Wheel parts I sent out are in the new colour. Heres a screen shot of the Wheel parts, with your Colour Swatch inserted so you can see the similarity. these are almost exactly the same colour! Look at the RGB numbers. I have made no colour alterations...just inserted the colour swatch and then used the Colour sampler to see the RGB numbers. So, we both have the same judgement on colour...great. But why are you suggesting the colour change, if the wheel parts I sent you are already that colour (or very close to it)? That must mean your parts did not print this colour...? 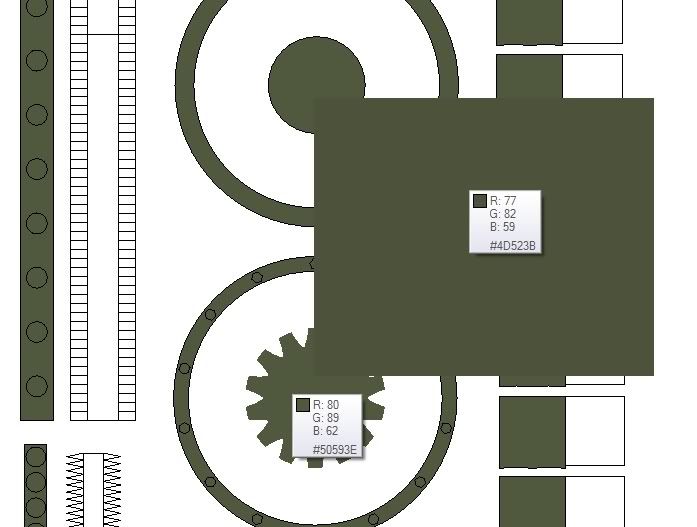
__________________
SUPPORT ME PLEASE: PaperModelShop Or, my models at ecardmodels: Dave'sCardCreations
|
|
#108
11-21-2011, 08:52 AM
|
||||
|
||||
|
You are right Dave, they look the same onscreen. It originally printed out much lighter and a littler bluer on my printer (HP C3180).
I had to change the colour cartridge last night and a test print shows the colour as much darker and the blue tint is gone. I actually can't tell the difference between the two colours now. Just another excuse to replace this old printer  . .Keep up the good work - you have a winner here. cheers ~ Doug
|
|
#109
11-21-2011, 09:04 AM
|
||||
|
||||
|
great...I figured it might have just been a print issue.
thanks for the Cdn Army Colours...it does confirm that my revamped colour is a good option. As I said, I think I will leave the Chassis in my first colour choice...which is a more washed out grayish browny green. It just looks a little weathered and adds some contrast to the wheel and body panels. I am also starting on the Wheels...need to assemble all four so I can design and test the attachments (Hubs, Brake Drums, Steering Knuckle). I've been toying with the idea of having "free to rotate" wheels, but I think I have given up on that idea. Not only does it mean altering some of my design work to suit extra parts for the freely rotating wheels...it also creates the possibilty of having sloppy wobbly fitting wheels. I have also wondered about making the front Knuckles steerable. But these are both things that a Builder could redesign into the model. And I think I will continue with fixed, non-steerable, non-rotating wheels. ... I am also wrestling with a new Drivetrain issue. The current design (shown in the latest photos above) is based on an original "blueprint" diagram of the Armored Car chassis. A nice "Oiling Diagram" shows the chassis from above, and although its not super clear, you can clearly the shape of the driveshaft and its Universal Joint couplings. They actually look like "bell housed" constant velocity style joints. Anyway, Tim at Landships, who has restored a 1917 Autocar Truck has shown me what the driveshaft couplings looked like on his vehicle. And they are quite different. So, now I am trying to track down more info to see if I have to alter my design.
__________________
SUPPORT ME PLEASE: PaperModelShop Or, my models at ecardmodels: Dave'sCardCreations
|
|
#110
11-24-2011, 08:01 AM
|
||||
|
||||
|
Autocar Prototype Build continues...
Not much advancement in the design just recently (I'm actually working on an Aircraft model instead) but I have been able to assemble the Rear Wheels and I am now working on the Front pair. I wanted to get the Chassis off the Scale Cubes and onto its own feet! So I not only had to build four Wheels but I also had to get the attachments designed. In this case, a Brake Drum style setup for the rears and a Knuckle King Pin Hub for the fronts. Rear worked okay although I think I will include a couple of stiffening discs for extra support. Front knuckles work fine, except mine are a tad large (.5mm). I have reduced the size of the part (in the kit) to compensate but for this build I will just squeeze the oversize parts into place. (I'm too lazy to print and cut new ones! lol) Anyway. here she is with Rears attached....really starting to look like something now! 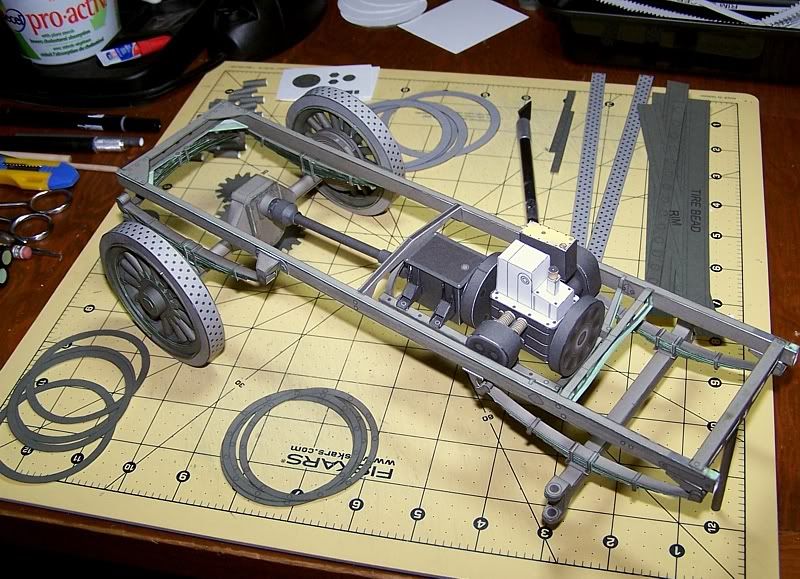
__________________
SUPPORT ME PLEASE: PaperModelShop Or, my models at ecardmodels: Dave'sCardCreations
|
| Google Adsense |
 |
|
|


 Linear Mode

