


|
|
|
#1
 02-12-2014, 11:30 AM
|
||||
|
||||
|
Cessna 150/152 (from Ken and Dave)
This is a new collaborative project I have just started with Ken Uhrig.
Ken is already well known for his "old school" designs...handbuilt, hand drawn paper models. I will be helping to update and bring one Ken's models into the digital age and we will both be releasing models based on this design. The Cessna 150 (scratchbuilt prototype model) shown here as built by Ken Uhrig. 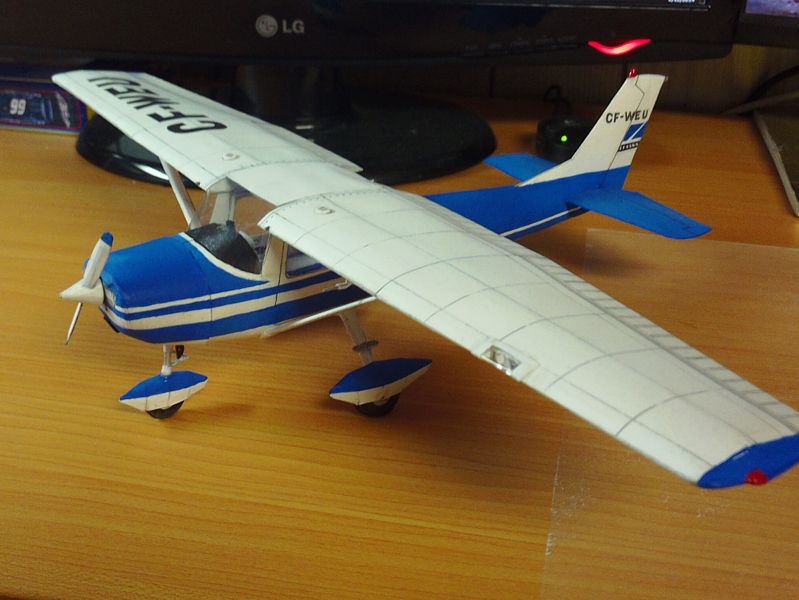 My goal is to help Ken get this 150 available as a printed and digital model and then I will be making the necessary modifications to produce a 152 version which I will be adding to my own paper model catalog. First, a little background... this model, as you see in the photos, is Ken's original design, and the prototype kit is what we will be working from. This model has never been published before and so we be creating the first templates for printed and downloadable digital versions. A second set of parts has already been created, which has been scanned and I am now in the process of creating a vector drawing of all parts. From this, a test built will be performed, all necessary adjustments made, and then repaints and packaging will happen. 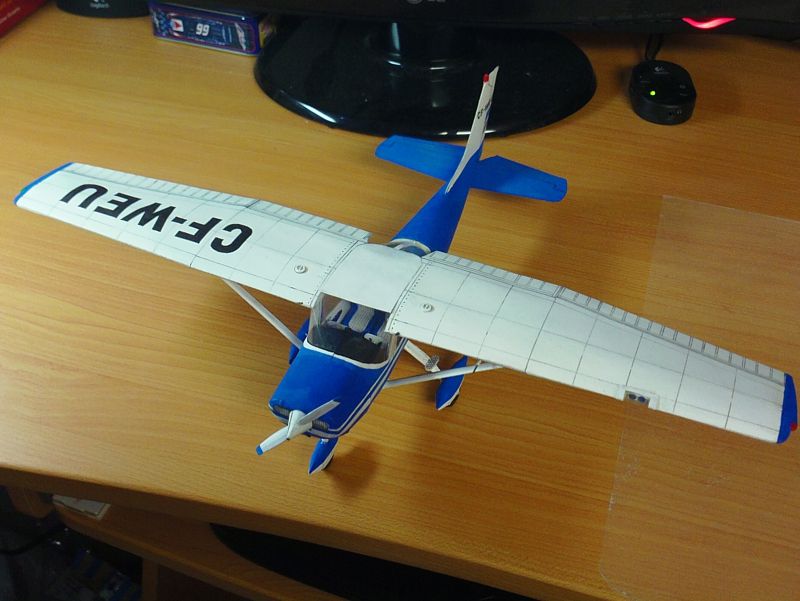 The current model is 1/24 scale...big, you might think...but since the Cessna 150/152 has only a 33 foot wingspan (smaller than P51 Mustang!), the model is an attractive size and big enough to allow inclusion of a fully detailed interior.   This built model has been handpainted with a distinct striping package that Ken has asked me to duplicate. What appears a little rough at the moment will be nice crisp digital artwork by the time we are done. As I mentioned, in return for doing the work on this model, Ken has given me permission to use the final template to create some of my own models. I am actually only interested in the 152 modified version and I'll probably offer up a couple of different factory paint schemes (or whatever I find that looks cool). This will also allow me to create custom requested versions of the 152 for those who request it ...however I will be limiting that to only paint scheme variations, and nothing too drastically complicated. I thought it might be fun to follow along with the redraw work and see how it all comes together. This will all take a few months until a final model hots the shops, so it should be an interesting thread. Stay tuned. 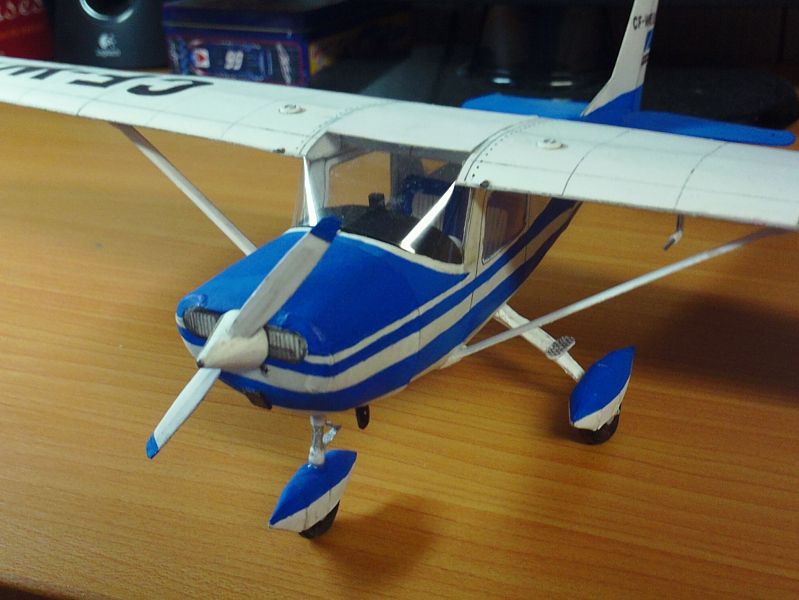 Just so ya know...these will be reposted posts from www.cutandfoldforum.com Feel free to follow along, and post comments, at either location.
__________________
SUPPORT ME PLEASE: PaperModelShop Or, my models at ecardmodels: Dave'sCardCreations 
|
| Google Adsense |
|
#2
02-12-2014, 11:31 AM
|
||||
|
||||
|
I'm not in a big rush to redraw this model...
I have a thousand other projects on the go as usual and Ken is on vacation (jammy dodger) but I have already completed a couple of parts. No details yet...not necessary until a test build is done. Vector redrawing a model like this is perfect for cleaning up the "hand drawn inaccuracies". No matter how good the model design, or how skilled the designer, certain inaccuracies will be present in a hand-drawn model that can affect its assembly. Sure, all modellers have their preference for look and artwork in a model. Some love the look of a hand-drawn model, whereas some prefer the precision of digitally designed kit. (I prefer a bit of both actually, I like an artistic approach) But vector or digital design allows for perfectly straight lines, smooth arcs and curves, consistent line thicknesses and measures, mirrored parts (right and left things) that properly match. Thats the part I like about digital design. But all that perfection, means nothing if two parts don't mate up properly...if the original design was flawed...or if the digital redraw creates flaws and errors. Thats why a test build of all major components will be done before we start adding the details and textures. 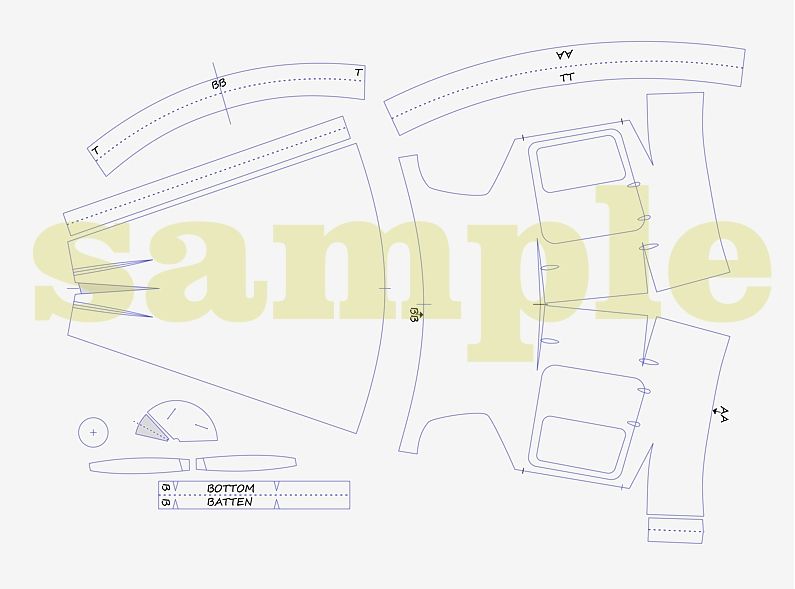
__________________
SUPPORT ME PLEASE: PaperModelShop Or, my models at ecardmodels: Dave'sCardCreations
|
|
#3
02-12-2014, 01:40 PM
|
||||
|
||||
|
I think 1/24 scale is perfect for the 150/152. I'll be getting one as soon as it's available. Solo'ed on one back when I was a young wipper snapper of 15. Thanks for doing the update.
|
|
#4
02-12-2014, 01:42 PM
|
|||
|
|||
|
Looking great. high level of workmanship
|
|
#5
02-12-2014, 07:56 PM
|
|||
|
|||
|
Love the smaller private aircraft. Following this for sure.
Ryan
|
| Google Adsense |
|
#7
02-25-2014, 08:17 AM
|
||||
|
||||
|
So, work continues redrawing the Cessna.
Whenever I want to get away from other work, I do a little more work on the Cessna model. I am running into more and more artwork discrepancies. This is expected and part of the reason why the vector redraw is a good thing. Some right and left part (mirrored) don't match. Some parts that must connect or overlap, aren't exactly the same shape. This is a by product of a hand drawn model and is not uncommon. Most discrepancies are pretty minor, but some are a little worse than others. One of the problems with the redraw is that I can eliminate those differences...make curves smoother, make straight lines straight, make right and left parts mirror exactly...but when drawing something like a mirrored part, I have to decide which side of the uneven part is more accurate than the other side. Sometimes I can split the difference. Sometimes a part will be a little large on one side, a little small on the other side (of the center line)...so I will just split the difference, make the overall size correct and adjust each side to be properly mirrored. But sometimes a part just doesn't match and I am unsure of exactly where to make the adjustments. In this case I am doing one of two things... I am using the uneven right and left sides of a part to create two new parts, using mirrored right and left elements. I'll try both parts and see which one fits better. The other option is drawing a new part based on the design, but almost from scratch, using the necessary references. Both of these options work with a test build of the part. A test build will confirm if a part has been properly redrawn or what further adjustments need to be made. In the sample below...pay attention to the wall/door panel parts. This is part of the Interior of the plane...and these wall panels should match and fit the inside of the cockpit. However it does not match the shape of the outside fuselage parts...the rear window cutout, for example, has a very different shape to it. I have redrawn the parts as they have been handdrawn, since we already know they can be manipulated into shape...but I've also drawn a new set of panels (at the top of the image) that more closely match the fuselage exterior parts. A test build will confirm which part fits better and requires the least amount of adjustment. Just a side note...when I am designing parts, I always think about the less experienced modeller. Its easy to say "well it can be manipulated into shape quite easily"...but I think a better fitting part, will make the assembly of the model more enjoyable and less intimidating for the novice modeller. Thats why I tend to put a lot of emphasis on the redraw process and adjusting things like mirrored parts. 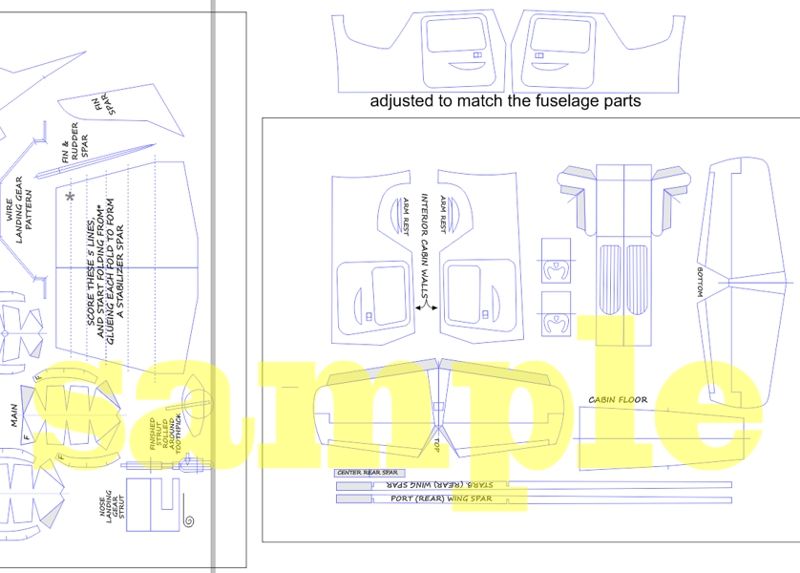
__________________
SUPPORT ME PLEASE: PaperModelShop Or, my models at ecardmodels: Dave'sCardCreations
|
|
#8
02-25-2014, 10:04 AM
|
||||
|
||||
|
This is a very worthy project. The original model is excellent, and the redraw to become available as a download is very good news. It is most interesting to watch you as you turn a hand-drawn model into an executable (buildable) computer graphic model.
Don
|
|
#9
03-21-2014, 01:24 PM
|
||||
|
||||
|
Got an email from Ken Uhrig ...hes back from vacation...
and I have the vector redraw of the Cessna finished. (well...most of it) I still need to get together with him and discuss a couple of areas before I finalize the set of vector parts. There are some areas with small discrepancies and I need to know if Ken wants to keep the original design on those parts or allow the vector adjusted parts. Things like right and left mirrored parts, and such. *Its his model, and he has to be happy with the final artwork. So, once the vector artwork is approved I will give him a full set of plans to do a test build. This will be the final verification of all the artwork and allow for any final adjustments before we start applying textures and colouring. I can post some pics when we get to that point.
__________________
SUPPORT ME PLEASE: PaperModelShop Or, my models at ecardmodels: Dave'sCardCreations
|
|
#10
05-21-2014, 05:41 PM
|
||||
|
||||
|
For those interested...
had a big sit down recently with Ken Uhrig. And went over the redraw of the Cessna model. Its in his hands right now. I produced a "white" model for him to test build. He should get back to me (at his leisure) with a list of any fixes and necessary changes along with a built model with some reference markings. These will help me establish all the crossover points between parts to make sure striping and graphics are properly aligned. He's already established one part that needs a redraw due to an artwork error in the original model...so once I get that sorted, he can continue with the build. He's taking photos of the white build, so I will be able to post a couple for your entertainment. Stay tuned.
__________________
SUPPORT ME PLEASE: PaperModelShop Or, my models at ecardmodels: Dave'sCardCreations
|
| Google Adsense |
 |
| Thread Tools | |
| Display Modes | |
|
|


 Linear Mode

