


|
|
|
#11
 11-13-2015, 10:15 AM
|
||||
|
||||
|
hold momentito por favor
I think we can make that happen Edit: and it seems we successed
__________________
"Rock is Dead, Long Live Paper and Scissors" International Paper Model Convention Blog http://paperdakar.blogspot.com/ "The weak point of the modern car is the squidgy organic bit behind the wheel." Jeremy Clarkson, Top Gear's Race to Oslo 
|
|
#12
11-13-2015, 11:15 AM
|
||||
|
||||
|
oh thats better...great...thanks
kind of pointless having a whole chunk of instruction missing out of the middle. lol ... So, continuing on... attach the third section of the front fuselage in the same manner. [Test fit, make sure you understand how it lines up, then glue over the tabbed strip.] It makes sense to line up the top or bottom of the sections and glue no more than one third. Work that area to get the best connection... and after its nice and secure, glue another third. And so on. Then install the snug fitting (but not too tight) former. Position it inside the joiner strip and glue it in place. I sometimes transfer a reference line (pencil) inside the parts to know exaclty where centerlines, top and bottom, are. The fourth section of the fuselage is only half round...so line it up and glue one side, then wrap it around and glue the other side (making sure graphics line up as you do it). 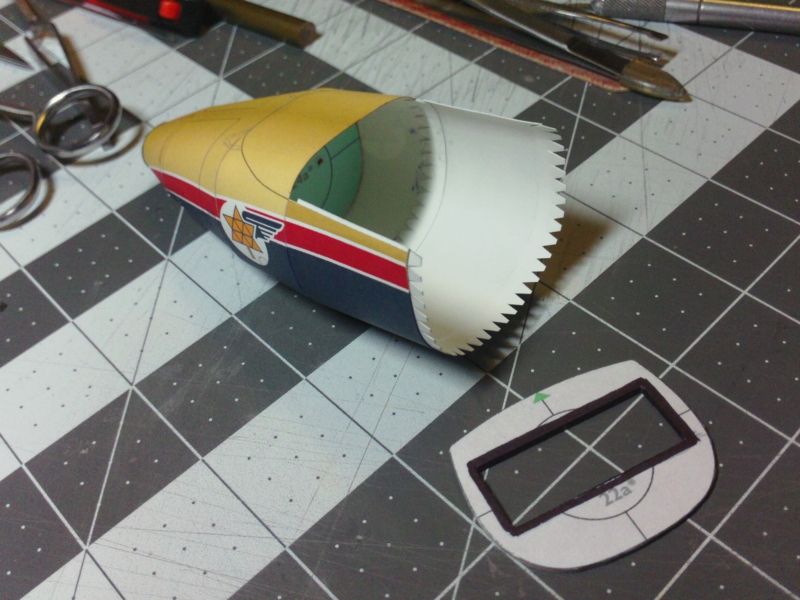 ... Fitting the instrument panel/ cockpit former is pretty straightforward (but a little tricky because of the squared off top corners). Make sure to black out the edges of the cutout. Once again, a snug fit is all that is needed, so sand the part until it just slips in. Make sure it is aligned vertically! 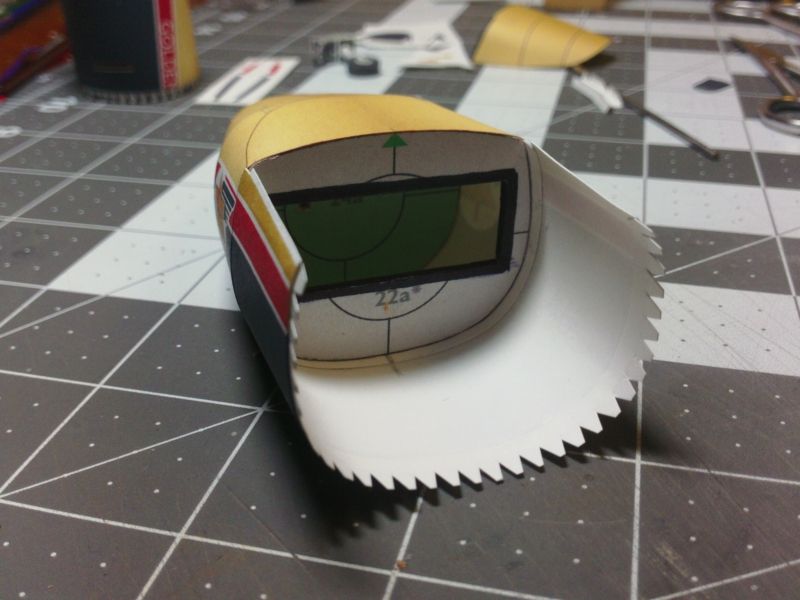 ... At this point I started assembling the rear half of the fuselage. The goal being to join both halves in the middle somewhere. I should have added one more section to the front half of the fuselage ...I'll come back to this and explain later. Assemble the fuselage sections (from the tail end) in the same manner as you did the front hal. You also need to install the inner liner in the last section and then install the exhaust tube. These are simple rolled tubes... liner is installed flush with the end of the last fuselage section and the other two tubes are assembled together to form the exhaust tube. (Theres also a flat end to the exhaust tube) 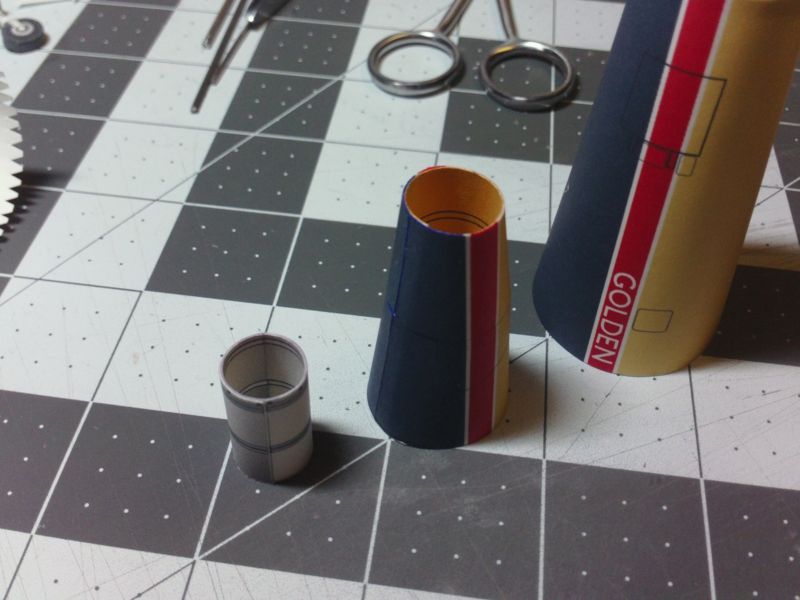 ... The Formers are fitted the same way. Note that the last former is also the support for the exhaust tube. The exhaust tube should be glued to that last former, and should stick out past the end of the fuselage about 1-2mm. 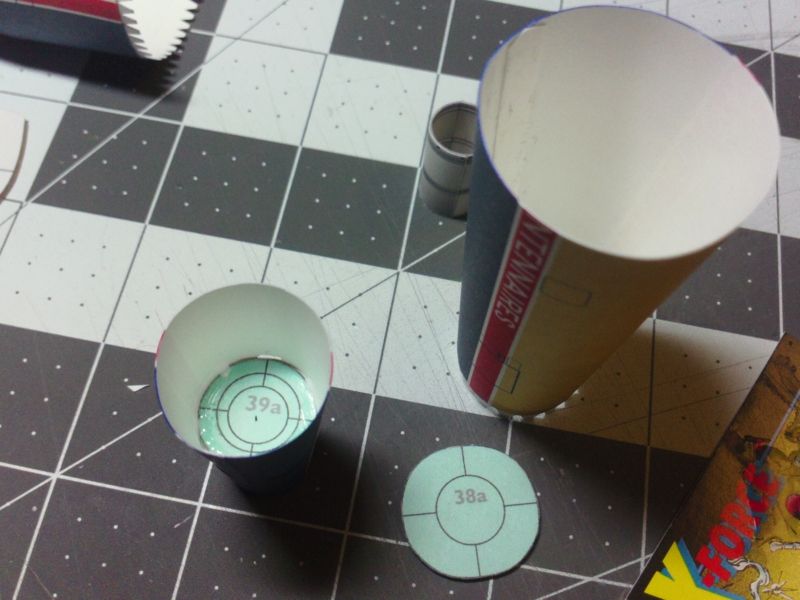 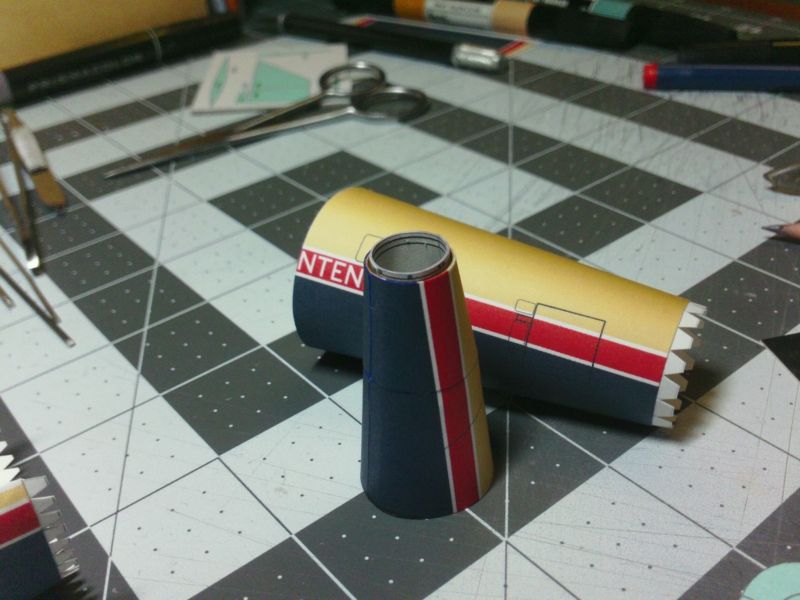
__________________
SUPPORT ME PLEASE: PaperModelShop Or, my models at ecardmodels: Dave'sCardCreations
|
|
#13
11-13-2015, 11:39 AM
|
||||
|
||||
|
When finished, you should halve a complete fuselage in two halves.
This is where I made a small mistake with this build. Its my recommendation that the last connection is where it is shown by the arrow in this photo... 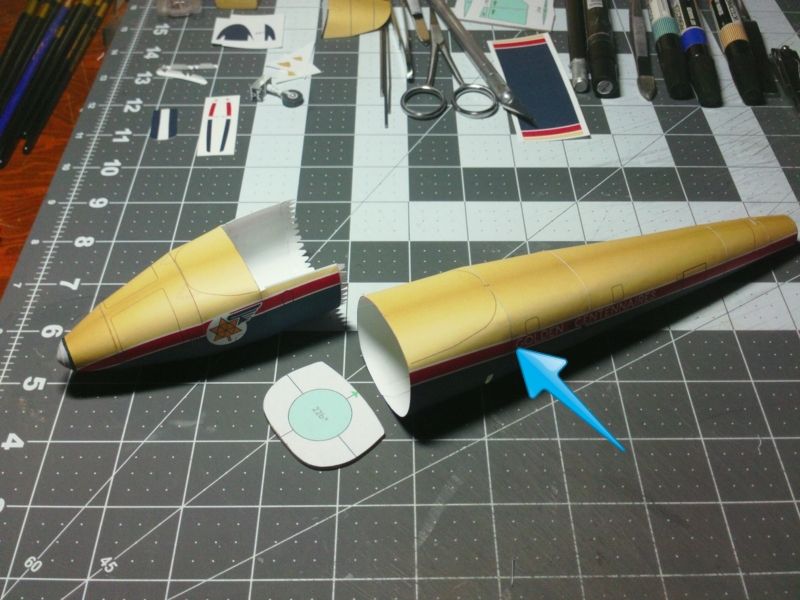 ... Using my first "white" build as an example... attach one more section to the front half of the Fuselage. The section at the rear of the cockpit opening. Preshape this section to match the formers...note the almost square corners. 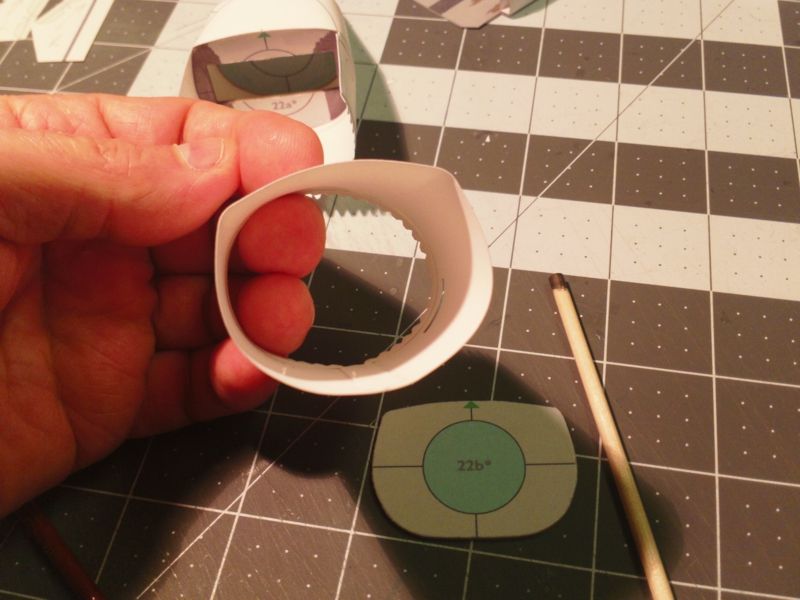 ... This gives you five sections in the front half of the fuselage. And it makes it easier to fit the rear cockpit former in place. You can reach inside from the rear to assist with the install. Its very important that this former is flush with the rear of the cockpit opening and is perfectly vertically flat (so the cockpit tub mounts properly). 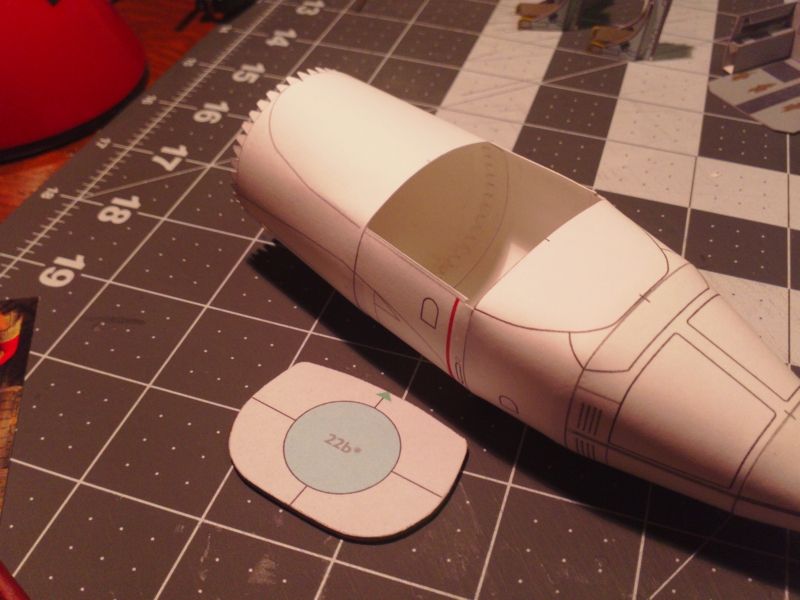 ... It is possible to start installing the cockpit parts at this point, but it might be smarter to finish the fuselage assembly so as not to damage any cockpit parts. This is only a recommended assembly procedure. You might find your own method that works for you. The end result is all that matters. 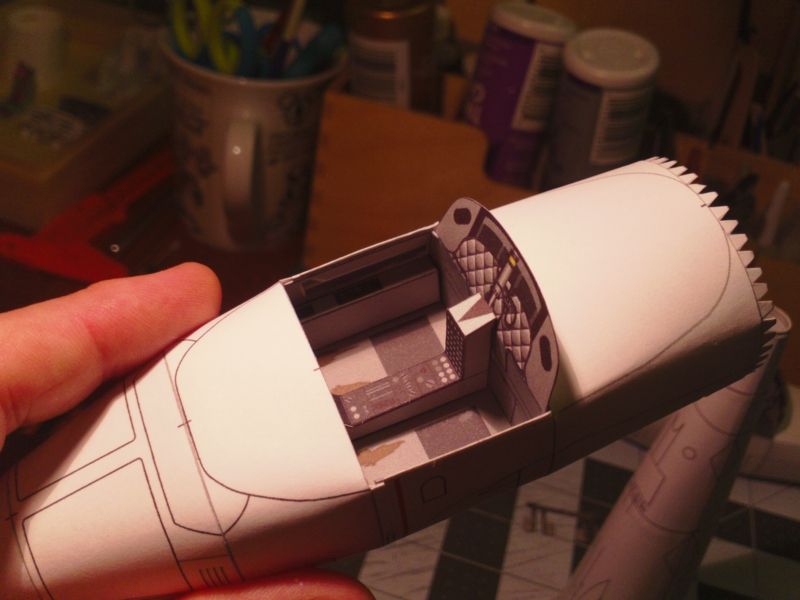 ... Once the two halves of the Fuselage are complete, you need to install one last former and connect the two halves. This is probably the trickiest part of the assembly because you cannot reach inside to assist with the connection. Take your time...line up the two halves and familiarize yourself with the connection... then apply glue and push the halves together. If that last former is fitted properly, it will greatly simplify the connection. 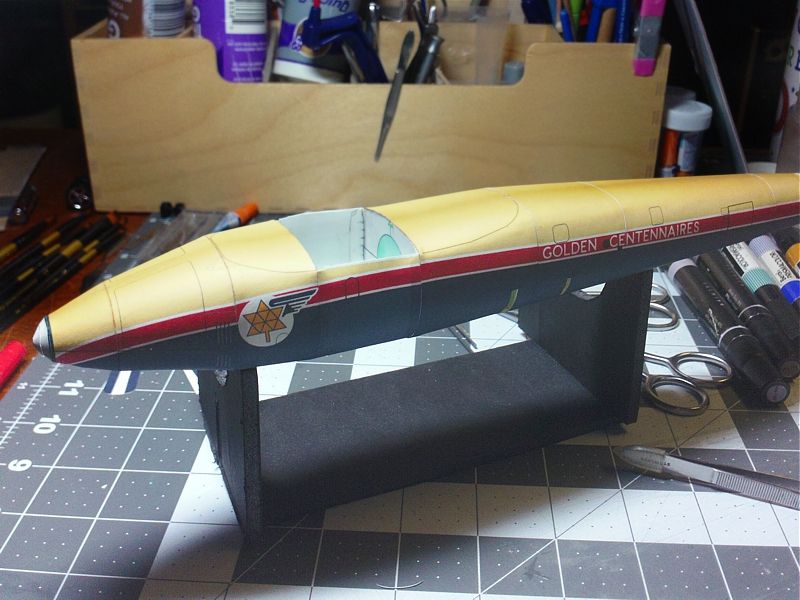
__________________
SUPPORT ME PLEASE: PaperModelShop Or, my models at ecardmodels: Dave'sCardCreations
|
|
#14
11-13-2015, 02:43 PM
|
|||
|
|||
|
This is one incredible project, two great paint jobs on this project. I am in awe as a noob. Dave I can't wait to purchase this kit from you and the instructions are on line and in colour!!
|
|
#15
11-13-2015, 04:47 PM
|
||||
|
||||
|
Oh don't be that impressed...its all just paper and glue.
No great talent. Just a few learned skills. A trained Monkey can do it. 
__________________
SUPPORT ME PLEASE: PaperModelShop Or, my models at ecardmodels: Dave'sCardCreations
|
| Google Adsense |
|
#16
11-13-2015, 05:06 PM
|
||||
|
||||
|
Super D. you always make it look so easy. Beautiful aircraft. This is a great tutorial. I'm really enjoying it. Thank you Dave. wc
|
|
#17
11-14-2015, 07:01 PM
|
||||
|
||||
|
Lets keep it going...
remember that rear upper cockpit extension thingy? Well, it fits here. Hopefully should fit into the marked area and lines up, at the front, with the cockpit former. There are two tabbed attachment strips provided but to be honest, edge gluing is the way to go. Carefully apply a very thin bead of glue to the edges - just to the inside - and position the assembly. Takes a few minutes to get it all to stay down nice and tight to the fuselage.  ... Now you can start installing the cockpit parts...or leave it until later, its up to you. The tub of the cockpit is separated into two parts for easy installation. You need to score and fold the parts accordingly. 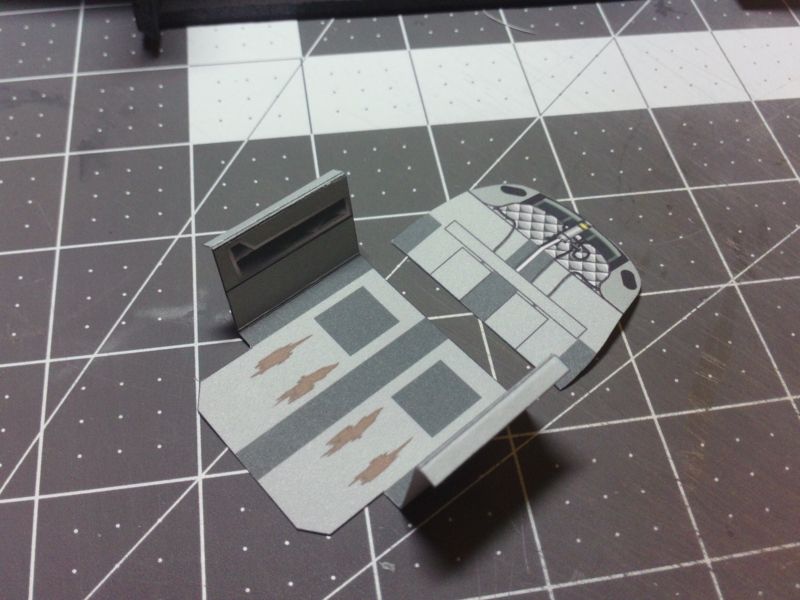 ... Place the rear cockpit wall in first and glue it to the formers. Don't know what else to say at this point... 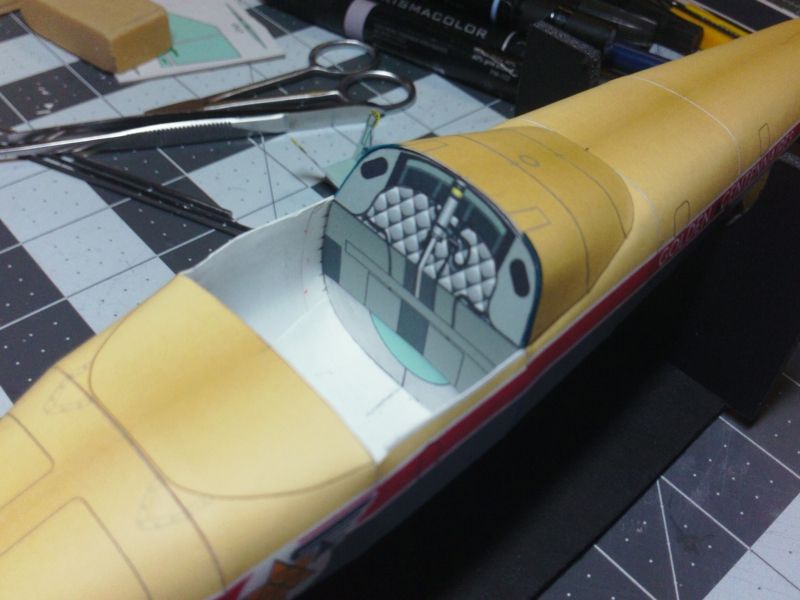 ... The main cockpit part will slip and flex and slide into the opening quite easily. 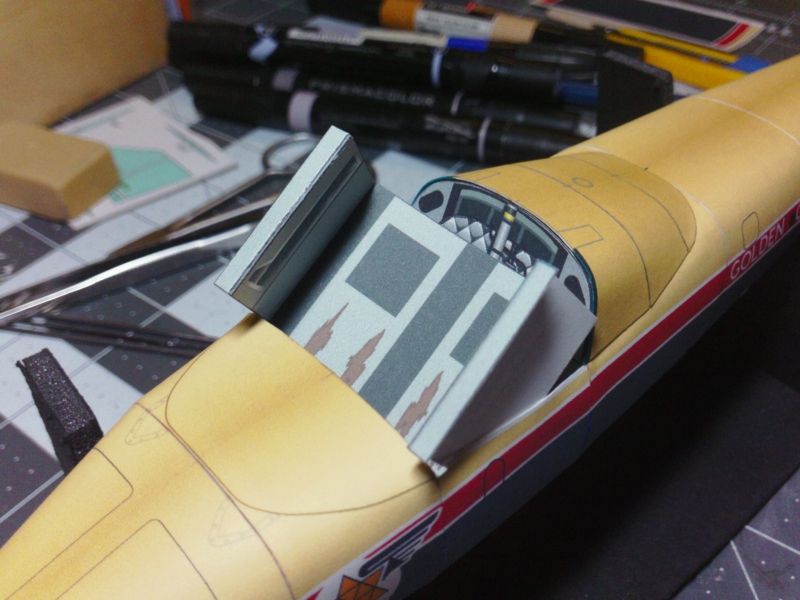 ... But first, you need to fold the edges of the cockpit and glue them down. Cut two thin strips of cardstock and add some layers to the folded down areas. This rigid thicker "side rail" will be your attaching point to the fuselage. 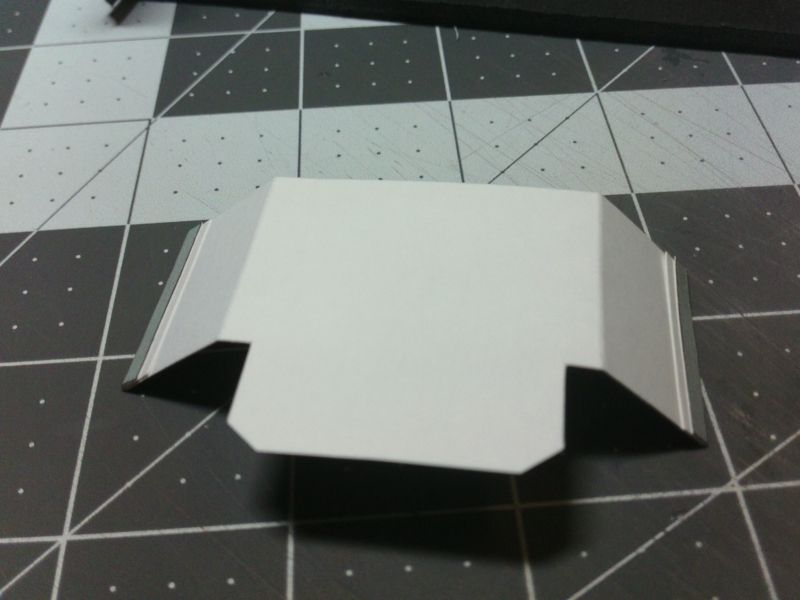 ... Pop the cockpit tub back into the fuselage and glue those side rails to the fuselage sides, flush at the tops. Note, there is a little strip on the fuselage that should eextend beyond the cockpit tub. This is an attachment strip for the canopy. You can actually cut this off if you are creating an open canopy. Make sure to push the cockpit tub backwards, and tight against the rear wall. 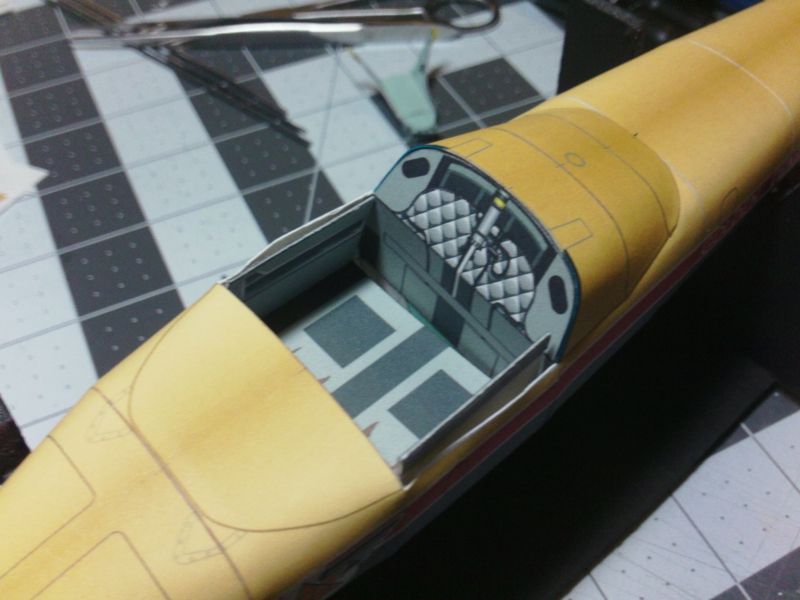 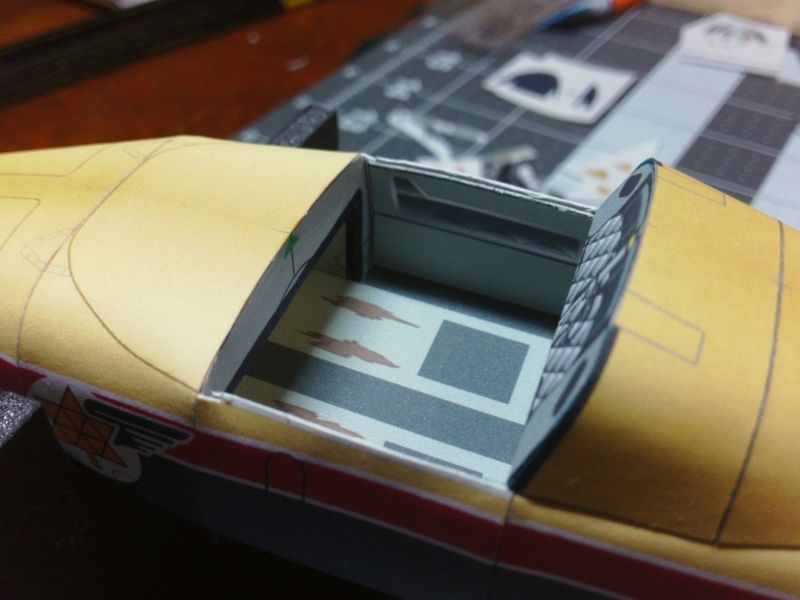
__________________
SUPPORT ME PLEASE: PaperModelShop Or, my models at ecardmodels: Dave'sCardCreations
|
|
#18
11-15-2015, 06:42 AM
|
||||
|
||||
|
...continuing with Cockpit...
installing cockpit components is really very straightforward and theres plenty of room for the builder to add more detail if they like. Layering parts (print multiples, cut out surface elements and details, add more 3D effect) is a quick way to add more realistic detail. Or just leave things as they are. I created a simplified version of the Tutor Ejection Seat... and everything is doubled for the right and left seats. We start with the seat part itself which is scored and folded, and two outer sides are attached. The Seat attaches to the front of the ejection slide...which is simple boxed tube construction. (Theres a little insert piece that closes the top of the ejection slide. 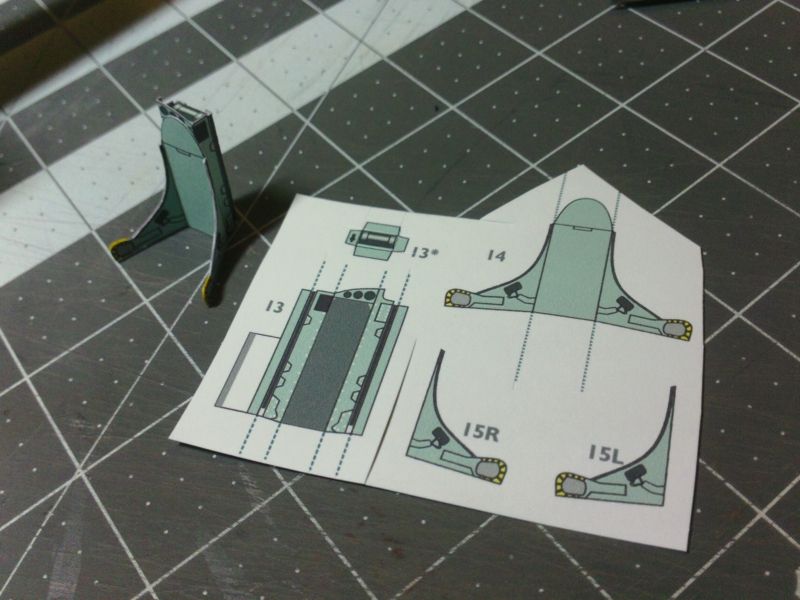 ... Next, assemble the side and center consoles. Once again, fairly simple construction: cut out, fold the pre-scored spots, and glue as needed. The trick is taking your time and paying attention to keeping everything square. You don't want the finished part to have twists in it. If you fail...throw out the part, print another and try again. Its worth the wasted ink and card to gain the experience. You'll save in the future. 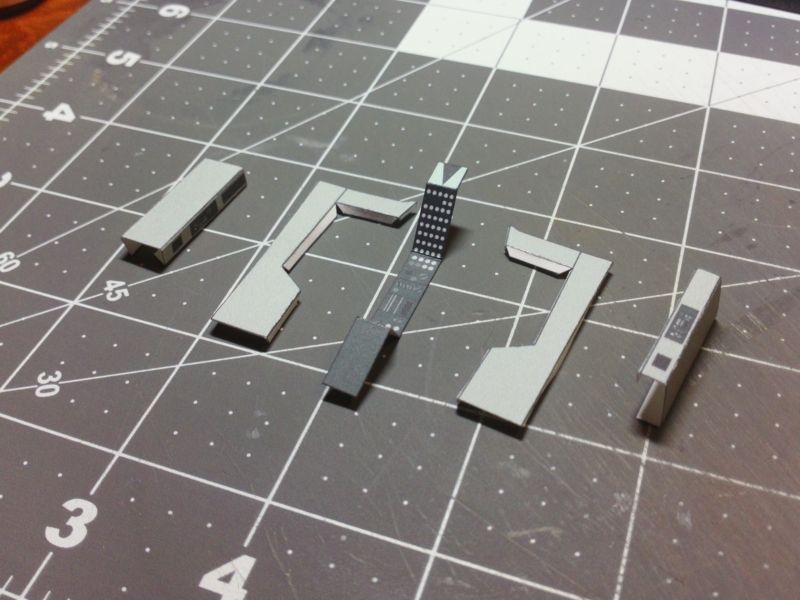 ... Jumping to the Instrument Panel... there are three main parts and a backing part. Once again, prescore everything and carefully cut out. 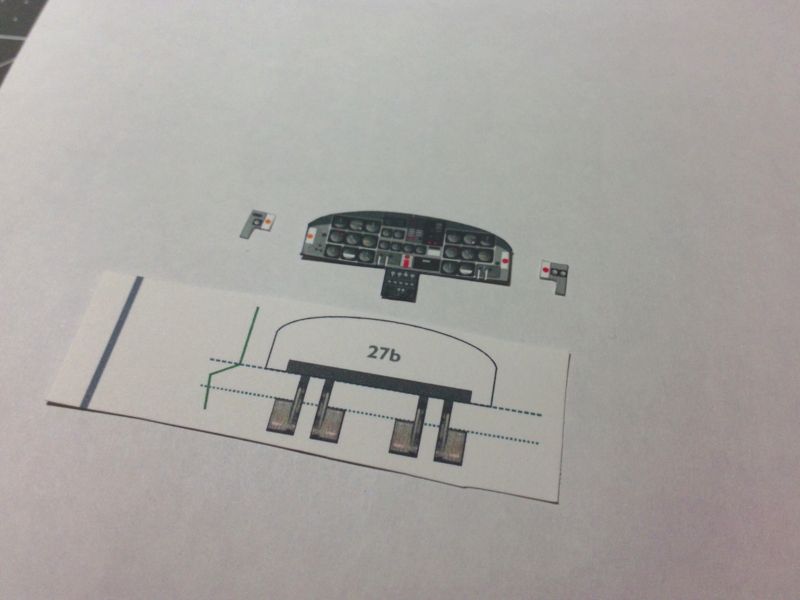 ... Two small side panel extensions are folded and attached to the Instrument panel and these will also help hide the gaps at the sides of the fuselage. The Instrument panel has been carefully positioned and glued to the backing part and now both are carefully cut out once more. 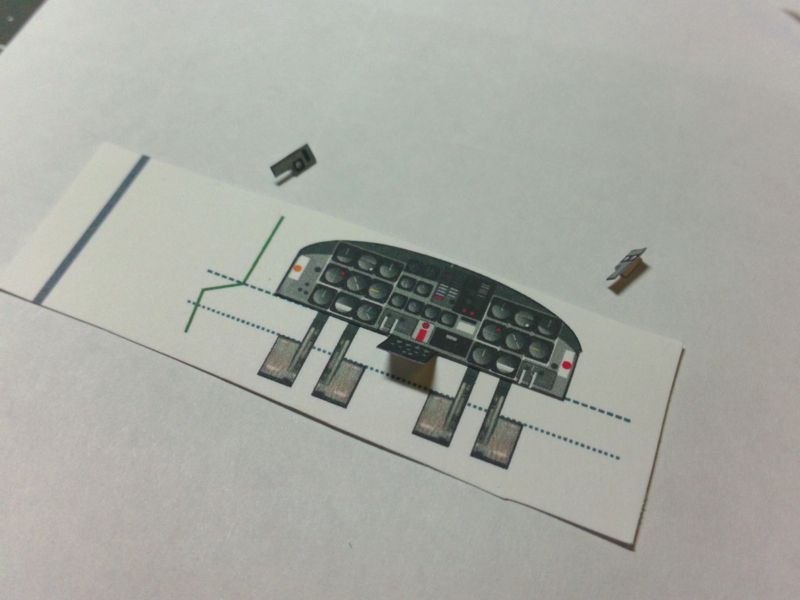 ... Now the Rudder Pedals can be bent into postion as shown, and the lower instrument panel extension can be bent forward to fit over the center console. 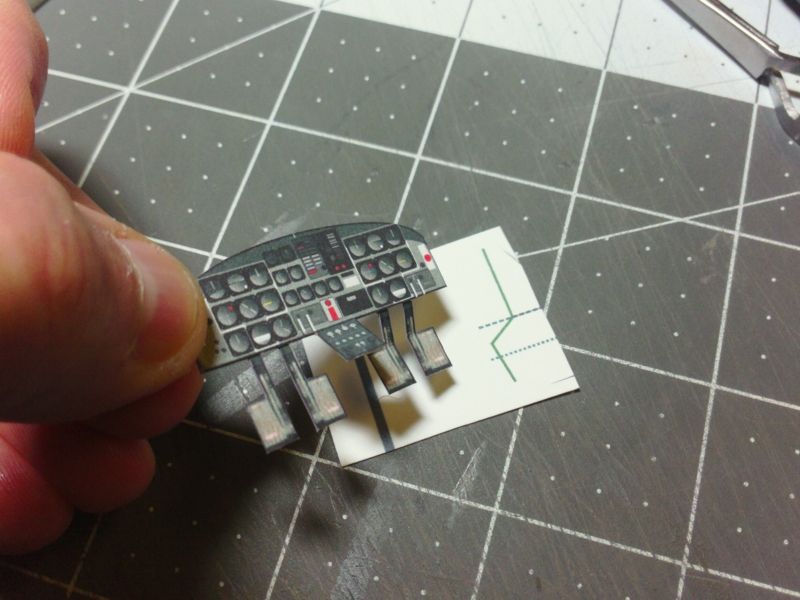
__________________
SUPPORT ME PLEASE: PaperModelShop Or, my models at ecardmodels: Dave'sCardCreations
|
|
#19
11-16-2015, 09:23 AM
|
||||
|
||||
|
Seats again...
Score, fold and assemble the lower seat/cushion. Its important that folds are square and the whole assembly is squared off properly otherwise it won't fit into the seat frame properly. Both seats are the same. 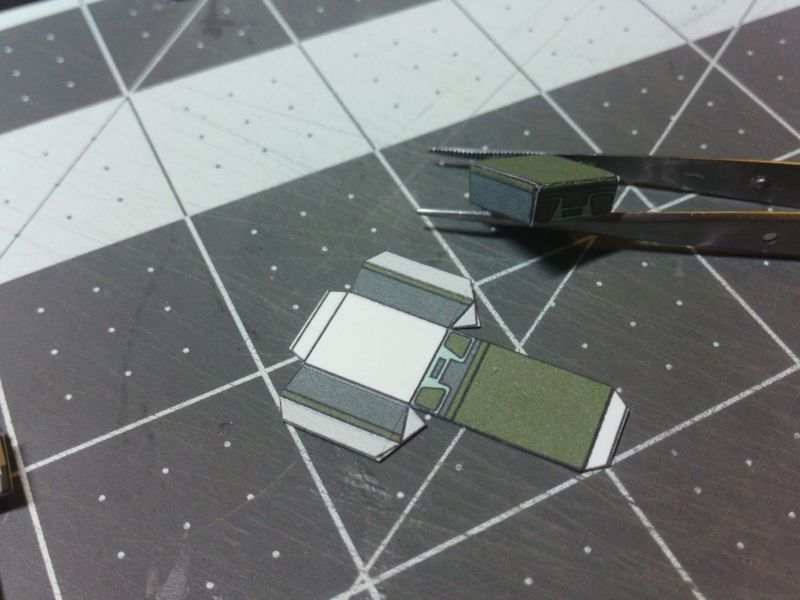 ... a second layer to the seat back is installed already into the seat frame and in front of that will go the two seat cushions (back and headrest). The seat cushion parts are laminated to two or three layers of card to create some visual depth. Just glue the part to multiple layers and then cut them out. Don't forget to edge colour! 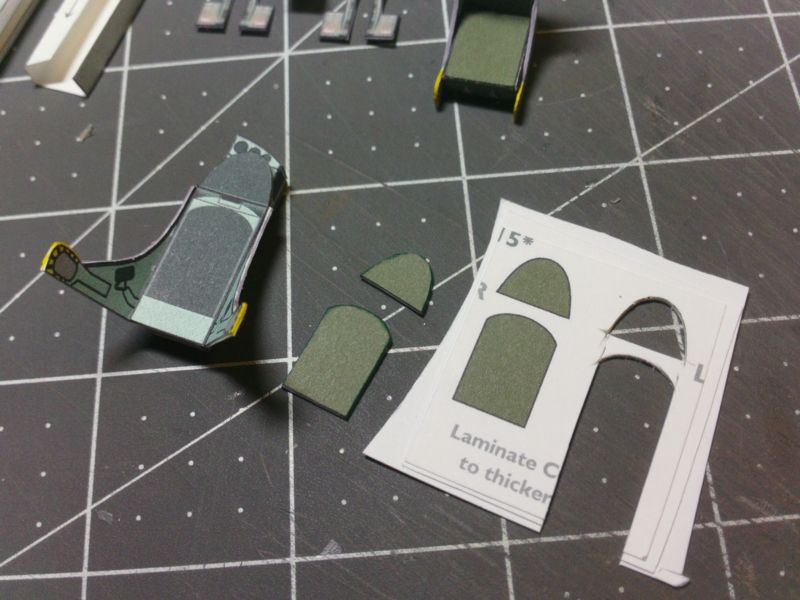 ... The completed ejection seats are ready to install. Note how they lean backwards a little...if you assembled all the parts correctly. I also touched up all the edge colouring, including the yellow ejection handles. 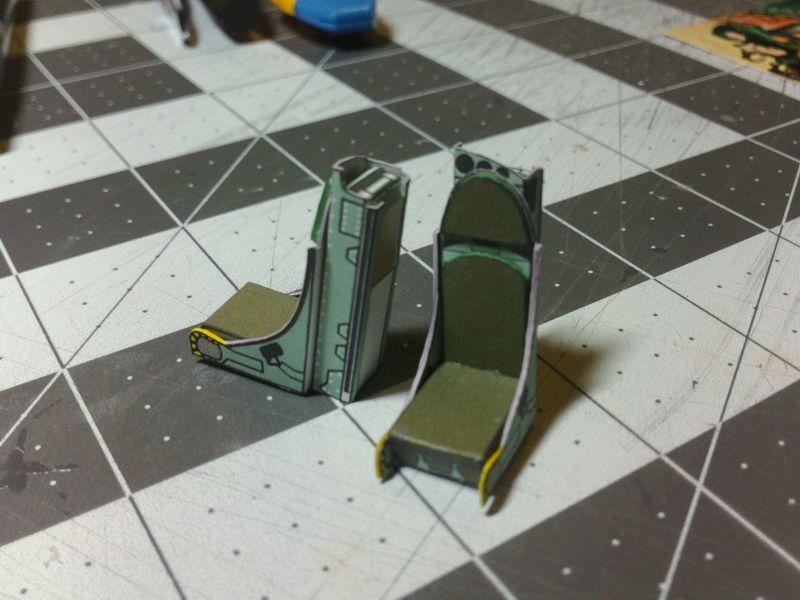 ... Last part needed is the cowling over the Instrument Panel. This also covers the fusleage ahead of the cockpit and defines where the front canopy/windscreen will fit. Two parts, connected by a tabbed joiner strip. Preforming the part makes assembly much easier...using the instrument panel as your guide. Shape the main part of the cowling and then shape the smaller front part to match. Once glued together, you can trim the edges. Cut off just as much needed to smooth the connection between the two parts. Test fit to the fusleage...curve as necessary for the best fit... make sure it fits within the marked location. 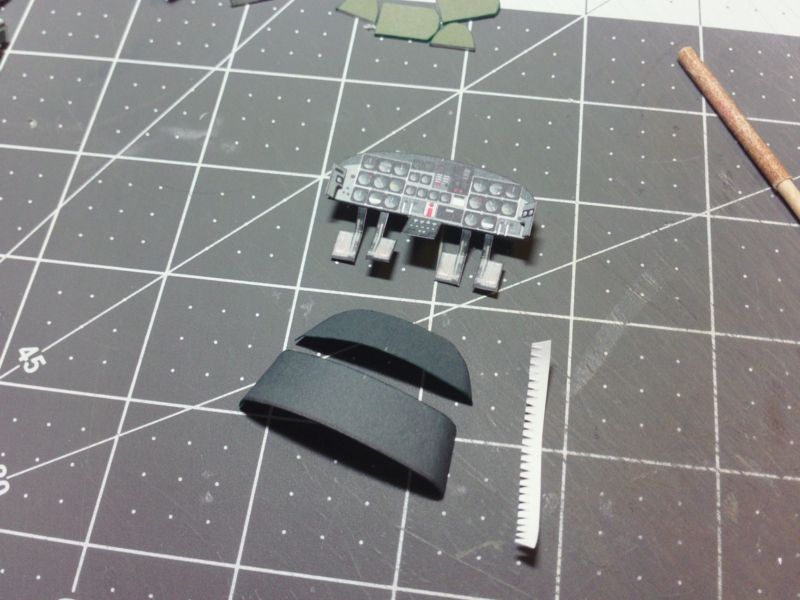
__________________
SUPPORT ME PLEASE: PaperModelShop Or, my models at ecardmodels: Dave'sCardCreations
|
|
#20
11-16-2015, 09:42 AM
|
||||
|
||||
|
Okay, lets put the rest of the cockpit together.
As I mentioned before, you can install the cockpit components later if you wish but it does make a nice break from the fuselage assembly. Fit the side and center consoles. Pretty straightforward, the cockpit floor is marked where to place them. All three consoles must fit to the back wall of the cockpit. Keep them contained to the marked areas so the Seats will still fit into the spaces between. 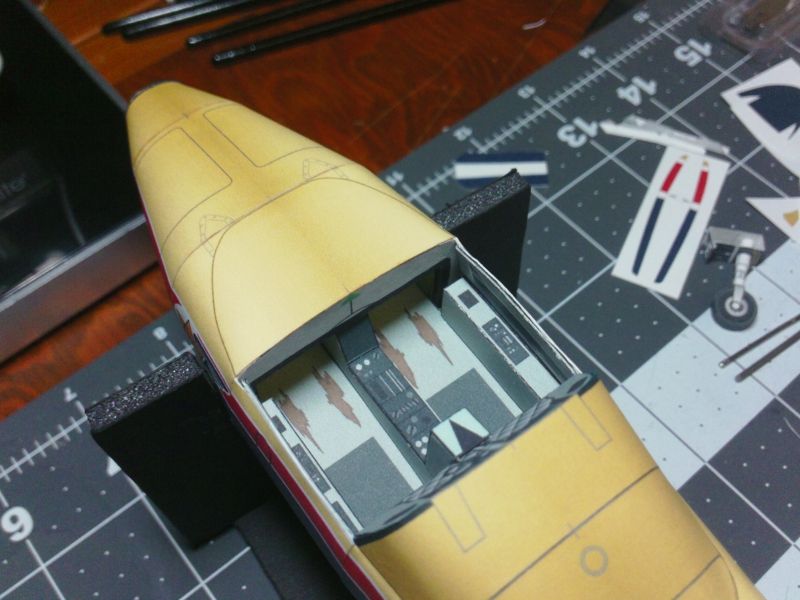 ... Next install the Instrument panel by gluing it flat to the front cockpit former. The shoulders of the panel align with the top edges of the cockpit sides. Make sure to position the center console overlap part and glue to the center console. Then attach the Instrument panel Cowling (within the marked area on the fuselage. Edge glue to the fuselage as flush as possible. Try not to make a mess with glue, but don't worry too much since the edges of the cowling will be hidden behind the front Canopy/Windscreen. Make sure the overhang of the cowling (over the instrument panel) is about 1-2mm (max.). 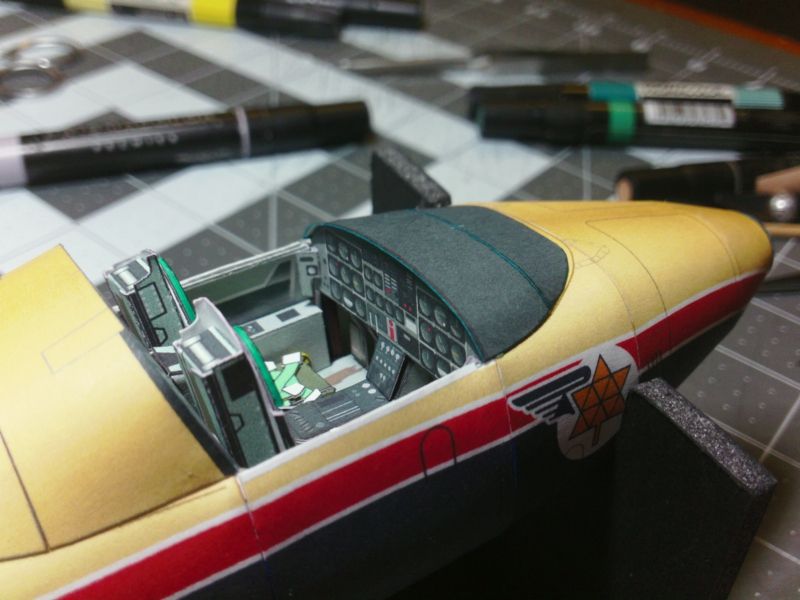 ... Go ahead and fit the Ejection Seats in place. Make sure they sit flat on the cockpit floor...which means they sit on a slight angle, with only the upper part of the ejection rails touching the back wall of the cockpit. 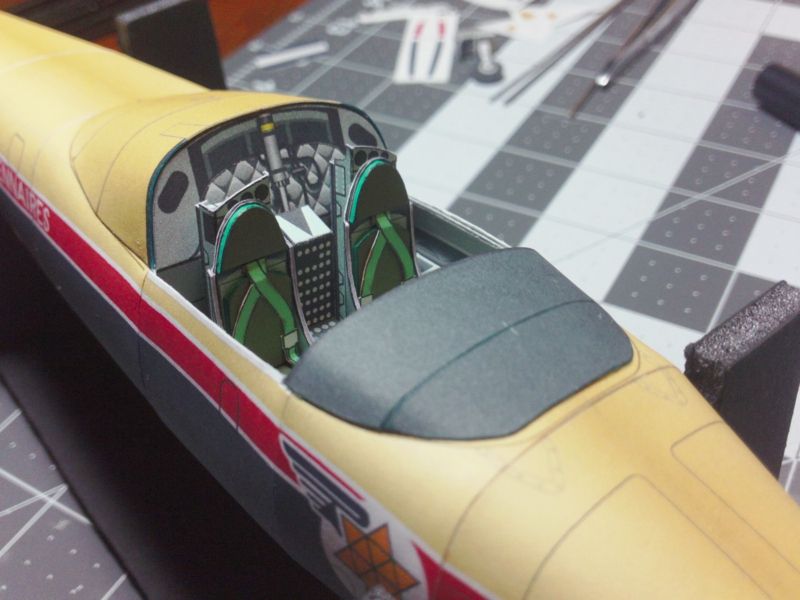 ... While we are here (at the front of the aircraft) lets attach the side strakes to the nose. The Strakes are made by folding and gluing the parts to create double sided and stiffer parts. Once the glue has set up, carefully cut out the strakes as defined. Make sure to edge colour these parts since they are very visble against the fuselage. For this aircraft, you will need three colours to match the paint scheme. Edge glue the parts carefully and tightly into place against the fuselage. There is a solid line indicating their position on the nose of the aircraft. And the paint scheme should match up. 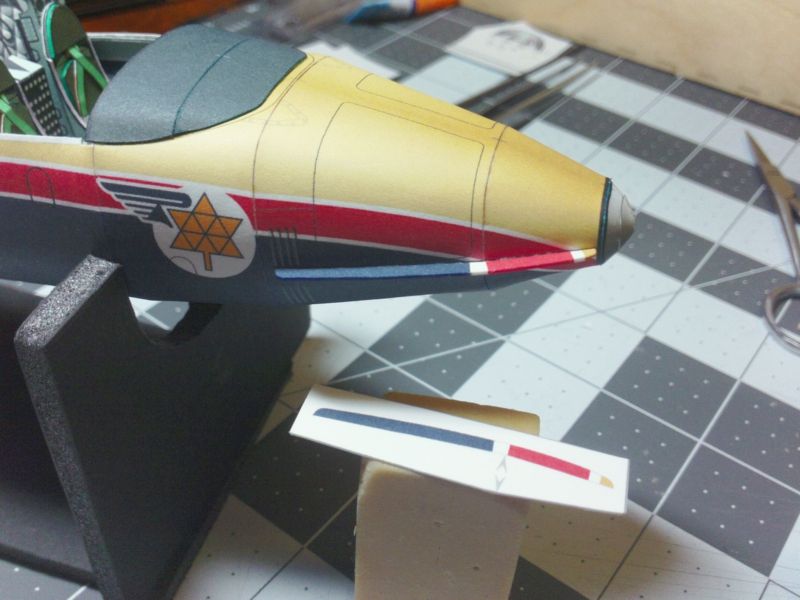
__________________
SUPPORT ME PLEASE: PaperModelShop Or, my models at ecardmodels: Dave'sCardCreations
|
| Google Adsense |
 |
|
|


 Linear Mode

