


|
|
|
|||||||
| View Poll Results: Please vote for up to 2 models (ONLY!) you wish to see released first. | |||
| Model #1 |
|
21 | 35.00% |
| Model #2 |
|
3 | 5.00% |
| Model #3 |
|
26 | 43.33% |
| Model #4 |
|
11 | 18.33% |
| Model #5 |
|
21 | 35.00% |
| Model #6 |
|
12 | 20.00% |
| Model #7 |
|
8 | 13.33% |
| Model #8 |
|
8 | 13.33% |
| Model #9 |
|
14 | 23.33% |
| Multiple Choice Poll. Voters: 60. You may not vote on this poll | |||
 |
|
|
Thread Tools | Display Modes |
|
#51
 10-10-2017, 08:24 AM
|
||||
|
||||
|
Quote:

__________________
Recent builds: RMS Queen Mary 2, Paris Opera House In the shipyard: USS Missouri, DKM Graf Zeppelin, RV Calypso. Future builds: IJN Akagi, SS United States, HMVS Cerberus, and lots more! 
|
|
#52
10-10-2017, 09:40 AM
|
||||
|
||||
|
Quote:
__________________
Keep on snippin' ... Johnny Last edited by JohnM; 10-10-2017 at 10:29 AM.
|
|
#53
10-10-2017, 12:38 PM
|
||||
|
||||
|
That was my joke....
I was gonna correct it to loco, but I thought Ray would get it. It doesn't make sense the way I said it... because I was also writing it in a politically incorrect Mexican accent. You all got that right? Joo cawl me local?
__________________
SUPPORT ME PLEASE: PaperModelShop Or, my models at ecardmodels: Dave'sCardCreations
|
|
#54
10-10-2017, 03:58 PM
|
||||
|
||||
|
I just finished my build of the Piranha spy car.
Printed in on 360 gsm cardstock, at 200% scale. The assembly is easy. There were no major problems. Just had to be a bit careful with the front fenders, and patient with the lower rear end. I used the optional pieces provided to have complete wheels. I made a glaring mistake, and it was when attaching the rear vertical window. A (huge) drop of glue ended inside the rear roof, and the attempt to clean it resulted in the bump you see. The mistake is mine, and not a fault of the kit, which fits nicely everywhere. It is an unusual subject. And the result is very attractive. Graphics are great, and weren't affected with the enlargement. Thank you for making this available, Dave!
__________________
Rubén Andrés Martínez A.
|
|
#55
10-10-2017, 04:12 PM
|
||||
|
||||
|
Nice job Ruben!
Something I should have illustrated in the assembly diagrams (on the model sheet)... To avoid that inwards buckle you really need to curve the back fender before you attach it to the lower pan. This way it helps push out the fender and the wheel well. 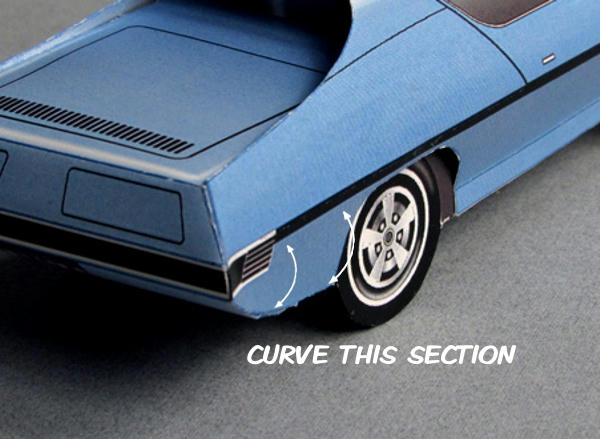
__________________
SUPPORT ME PLEASE: PaperModelShop Or, my models at ecardmodels: Dave'sCardCreations
|
| Google Adsense |
|
#56
10-10-2017, 04:47 PM
|
||||
|
||||
|
Hmmm... I had to check on mine. I did try to get it curved before hand, but I have the inwards buckle on one side but not the other. In trying to hold tabs to dry, I ended up with an upper fender crease on the same side as the lower inward buckle. Not sure if it is connected.
A helpful hint for those who still plan on building this gem. The body side molding crease is easier to get a crisp line if you do the fold before cutting out the wheel openings. You don't have to follow my hint, but you have to be more careful if you cut out the wheel openings first. There just isn't much body between the wheel opening and the crease
__________________
A fine is a tax when you do wrong. A tax is a fine when you do well.
|
|
#58
10-10-2017, 05:28 PM
|
||||
|
||||
|
You did a much better job of getting the headlight covers to line up than I did. I shouldn't have rushed it
__________________
A fine is a tax when you do wrong. A tax is a fine when you do well. Last edited by Vermin_King; 10-10-2017 at 06:23 PM.
|
|
#59
10-10-2017, 10:26 PM
|
||||
|
||||
|
Quote:
Will keep it in mind. Quote:
Written down for a future re-build of this nice kit. Vermin King: those figures add a lot to the scene. Nice! Thanks Don!
__________________
Rubén Andrés Martínez A.
|
|
|
|


 Linear Mode

