


|
|
|
#91
 10-22-2019, 09:48 AM
|
||||
|
||||
|
My apologies...I did not take enough photos at this stage.
I modified the design a few times, and rebuilt parts multiple times...and I forgot to document everything. After adjusting the Frame length, I was able to proceed with the Swivel Base thingy. Basically a big circular track, that the Wheels of the Carriage can sit upon. By swinging the tail end of the Carriage, the Gun rotates around the Base. The main track of the base is just a flat ring fitted with scalloped edge. Each point is reinforced with a small plate, creating cleats that can dig into the earth. I kept this as a single layer of card, the edge strip and the hidden glue tabs add enough strength and rigidity. A second underside flat ring hides all tabs and connections. The central ring section is multiple layers of 8 strips...overlapped, and joined together, to build up a thicker column. And then capped with a very thin ring which was too narrow for glue tabs and difficult to edge glue into place. The thicker walls of that central ring give you something to attach it too.  ... At first I thought the "spokes" of the base were square tubing...but turned out to be angled iron pieces. So each is made from two layers...two individual parts that must be scored, cut out, folded and joined together. 12 spokes...24 parts...a bit tedious...but if you take your time... Each spoke is glued to the center disc...either top or bottom disc...then capped with the opposite disc. 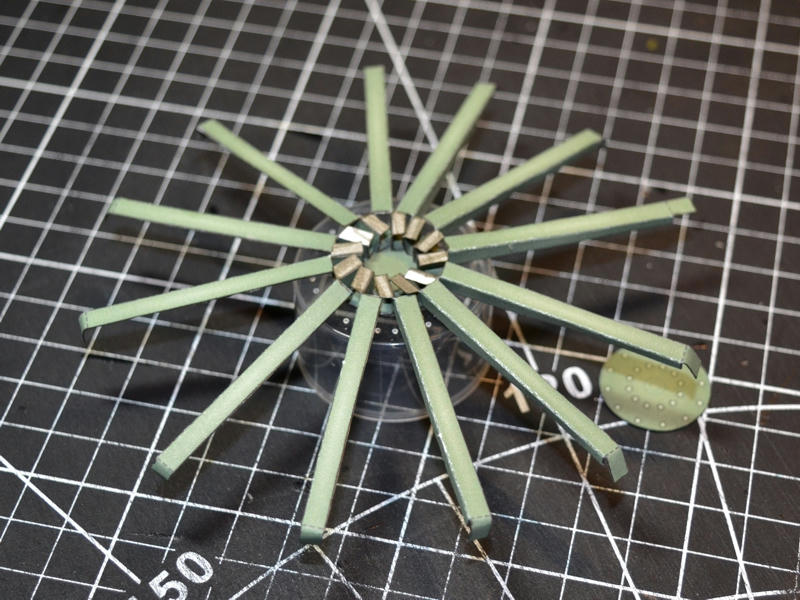 ... Once completed, the Spoke assembly is fitted into the base ring. There is a small extension to each spoke that is bent downwards...this is the gluing tab. Align each spoke with the cleats of the outer ring and glue into place.  ... The biggest headache so far has been the articulated frame that aligns the Base. The entire base is lifted up to the frame by levers and chains. It is aligned to the frame with small brackets and secured in place with clamping mechanisms. But when it is lowered, the articulated frame keeps it aligned with the carriage and wheels and controls how far it moves forward into place (as the carriage and wheels roll backwards on to it). The frame has too many bends and angles to make it from only one or two parts. I had to make all the individual square tubes and join them with dowels and brackets. Its a tricky build...very small parts...frustrating. I have no better solution at this time.  ... I've seen the swivel base carried on the back of the Quad Tractor...but maybe thats an earlier design? The Mark 2 Carriage (which is what this is) has brackets and supporting mechanisms to carry the base underneath. I haven't figured all that out yet... but this is basically how it sits under the Frame: 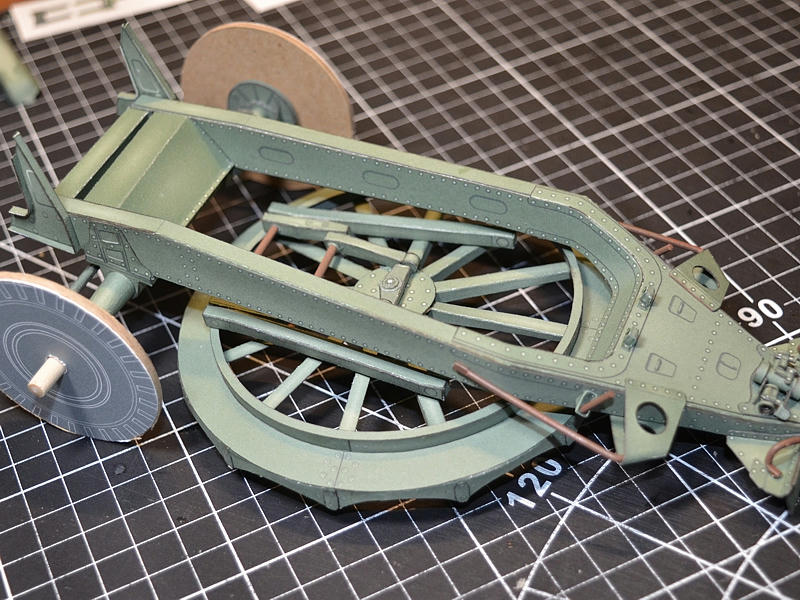
__________________
SUPPORT ME PLEASE: PaperModelShop Or, my models at ecardmodels: Dave'sCardCreations 
|
|
#92
10-22-2019, 12:41 PM
|
||||
|
||||
|
Looking good.
Watching Dave’s work reminds me of one of the things we all learn when we begin doing scratch work: We need to be "engineers". It certainly shows in these photos. When I was a kid and I built plastic models, no engineering was required. Just assembly and maybe a little paint. The “engineering” part of it was one of the biggest surprises and lessons when I began building paper/card. At first it was tedious and annoying and at times almost impossible. But with practice it becomes a source of satisfaction.
|
|
#93
10-22-2019, 02:28 PM
|
||||
|
||||
|
The engineering of a project can be quite enjoyable.
Whether it be the engineering of the design...or the engineering process in general. Its very satisfying when I dream it all up in my head...put it down on paper (CorelDraw) ...print and assemble...and marvel at the finished product. But too often its: struggle to picture it...give up after hours of stressing over it... open Corel and draw it seventeen times...print...build...reprint...rebuild...wash and rinse... go to bed...get up...do it all again...switch to another project...download and watch a movie...go to bed... go shopping...play World of Warships...do the laundry...feed the fish...have dinner... download and watch another movie...go to bed ...get up and remember theres a project I am supposed to be finishing...open CorelDraw...and wish I had never started! Then...start from scratch again!
__________________
SUPPORT ME PLEASE: PaperModelShop Or, my models at ecardmodels: Dave'sCardCreations
|
|
#94
10-23-2019, 04:45 AM
|
||||
|
||||
|
That swivel base is really great - I thought that was really going to pose a major challenge!
I find if I am working on a graphics project and I leave it too long I struggle to carry on. I keep things like custom settings and colours in my head and then I struggle to remember how I was doing stuff! Suppose I must keep notes.
__________________
The SD40 is 55 now!
|
|
#95
10-28-2019, 08:51 AM
|
||||
|
||||
|
A little further ahead...
I have decided to set aside the swivel base, since it is a big object that might be in my way. It can be attached at a later time (I think). I think the rear half of the Carriage/Frame is mostly done, so its time to move up front to the Gun mount and Gun itself. This is the start of my design ideas for the cradle that supports the entire gun. I guess this would be the main support and elevating swivel. 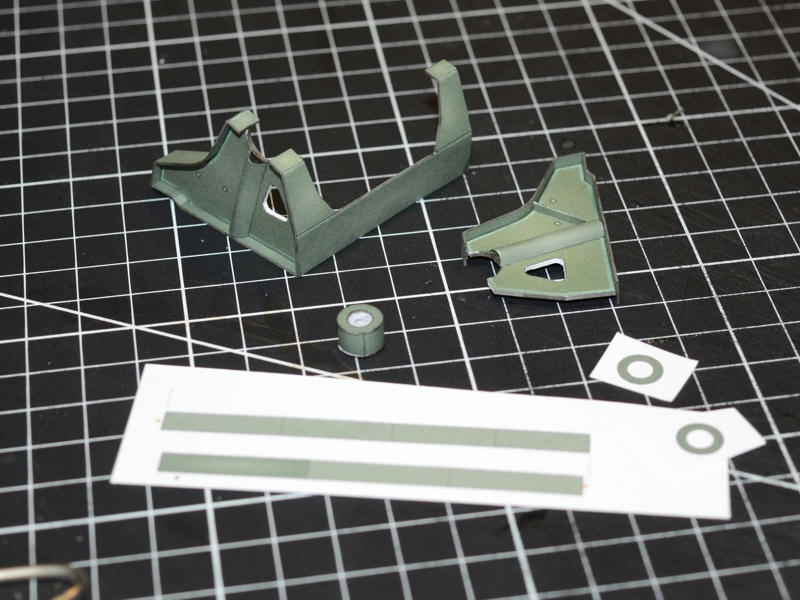 ... Up to now I have been referring to my large collection of photos of the two 25pdrs displayed at my local Museum, but although they are both Mark 2 Carriages, the Gun Mounts are quite different. The mounts are basically the same shape and function the same, but the construction is quite different. (They appear to be different types of the same Gun, so maybe that explains the mounting and construction differences?)  ... Anyway, I prefer the top design, for its look, and I think its a lot more straightforward to build. Plus...I have found more photos of the same style Gun mount from other angles. The parts are mostly double layered card and most things are flat...scored, shaped, and glued together as you see. Heres the completed cradle sitting on the Frame...I won't attach it until I figure out the swivel parts, etc.  ... Another angle of the cradle (not glued to the Frame). Also, note the Gunners Seat and the Storage Bin. I already had these completed, but I held off gluing them to the Frame while I worked on the Swivel Base. 
__________________
SUPPORT ME PLEASE: PaperModelShop Or, my models at ecardmodels: Dave'sCardCreations
|
| Google Adsense |
|
#96
10-28-2019, 08:57 AM
|
||||
|
||||
|
Quote:
Sometimes I will force myself to keep working on something because I have settings, preferences, and procedure in place and I want to finish the work before I forget what I am doing! I have been known to write little notes on my work, to remember things. And yes, coming back after a hiatus, always results in forgotten things! And it can be difficult to get back into the swing. But to be honest, it doesn't usually take much to get back on track. And the break is sometimes needed to refresh your mind. Especially when you are stuck on something that isn't working properly. Leave it alone...forget what you were doing...come back with a fresh approach.
__________________
SUPPORT ME PLEASE: PaperModelShop Or, my models at ecardmodels: Dave'sCardCreations
|
|
#97
10-28-2019, 10:26 AM
|
||||
|
||||
|
I am struck by the difference in the paint between the two gun mount images.
The second appears to be a high gloss paint, while the other looks like a flat finish. I will hazzard a guess here: The flat finish would have been preferable for equipment in the field. Perhaps when the piece in the second photo became a museum piece, not much regard was given to whether it was flat or gloss?
|
|
#98
10-28-2019, 11:09 AM
|
||||
|
||||
|
Even the paint on the Gun varies...different parts, painted at different times, with slightly different colours...maybe from different sources?
Look at the difference between the Frame rail (bottom) and the Swivel Base parts.  The glossy green is more British Parade colour extreme...modern paint...not entirely accurate or original... The grayed out green is on the gun sitting outside the Museum ...and its been out there in the blistering sun for 20 years! It probably started out more like the FAT and Limber...its a low sheen finish, and darker green. 
__________________
SUPPORT ME PLEASE: PaperModelShop Or, my models at ecardmodels: Dave'sCardCreations
|
|
#99
11-06-2019, 01:47 PM
|
||||
|
||||
|
Work has continued, but not without a lot of indecision and frustration.
I decided to redesign and rebuild the cradle support for the Gun assembly, because it was (overall) too large. My first rebuild was way too small...my second was still too short (gun position height). Then I redesigned the brackets on the front of the Frame Rails, and had to redesign the cradle to move the gun swivel forward. Then....I ran into problems with the gun swivel itself! lol Okay, I'm tired of working upwards, from the Cradle...lets start with the Gun Barrel and work down. The Barrel itself is wrapped...with a couple of stepped layers, creating the thicker rear section near the breech. Since I usually try to wrap a barrel tube around a dowel, thats what I looked for. Unfortunately my stock of dowels is depleted, and so I went to my "Pencil" drawer. I found a few unused round/smooth pencils with a near enough same diameter, and did a quick sand to get them to the correct size. I start by gluing the edge of the paper part to the pencil/dowel...aligning it perfectly. (Just check by wrapping the paper part to see if it tracks properly).  ... I carefully wrap the paper part around the dowel, gluing about 10cm at a time, and making sure to maintain the track around the dowel. -I forgot to mention edge colouring the part before attaching it. 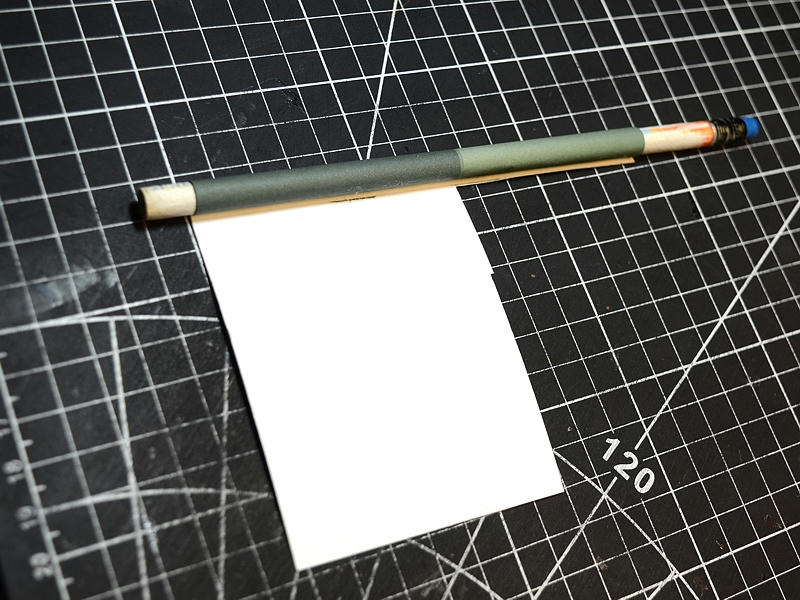 ... Once the first wrap is glued in place, I burnished the exposed edge a little and prepare the second wrap. This part completes the thicker base section of the barrel. The end is aligned tightly to the first wrap, and the wrapping continues.  ... Once the barrel is wrapped, I burnish the edge/seam as smooth as possible. Then, all that is needed is to cut the excess dowel. With a snapBlade Knife, I carefully cut through the dowel, using the paper part as reference. Its important to cut straight and flush with the paper part. Both ends will be hidden, so theres no need for colouring or paper ends. 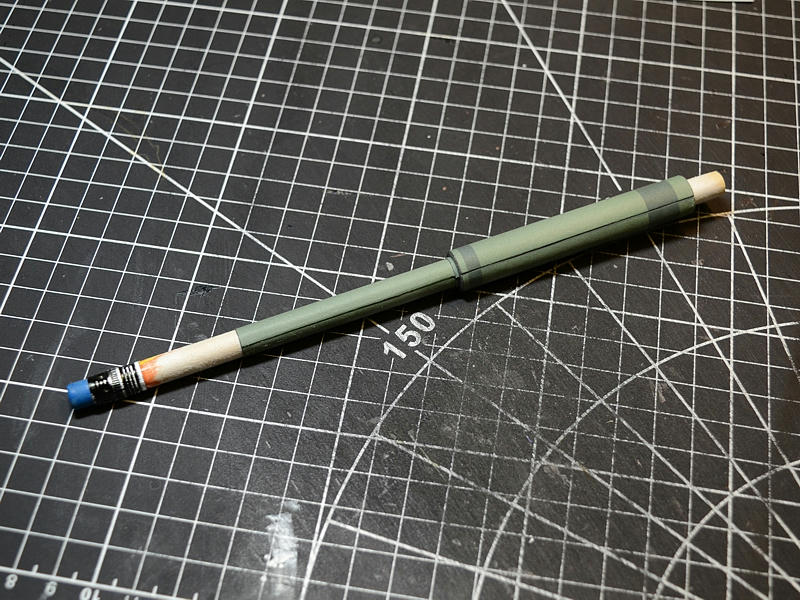 ...
__________________
SUPPORT ME PLEASE: PaperModelShop Or, my models at ecardmodels: Dave'sCardCreations
|
|
#100
11-06-2019, 01:47 PM
|
||||
|
||||
|
Now, I assemble the large box thing that is under the barrel.
(I wish I had a manual for the gun, so I could use the proper terms.) This would be the Recoil Mechanism...inside this track and box, are rods and springs that control gun recoil. Adjusters at the front (I'm thinking). Anyway, heres all the paper parts that make up the basic thing.  ... Once assembled, the front cap needs to be added. This is the hardest part of the construction, since it needs to be rounded, and has some very small details. I have decided to include a simpler angled/boxey version for beginners. You'll note two other details in this photo... the lower wrap around plate that supports the swivel mount for the Gun (in complete at this stage). And, the beginnings of the forward Gun Barrel mounting brackets. I have wrapped the Barrel with a 1mm thick strip, and then added some side elements that have since been redesigned. 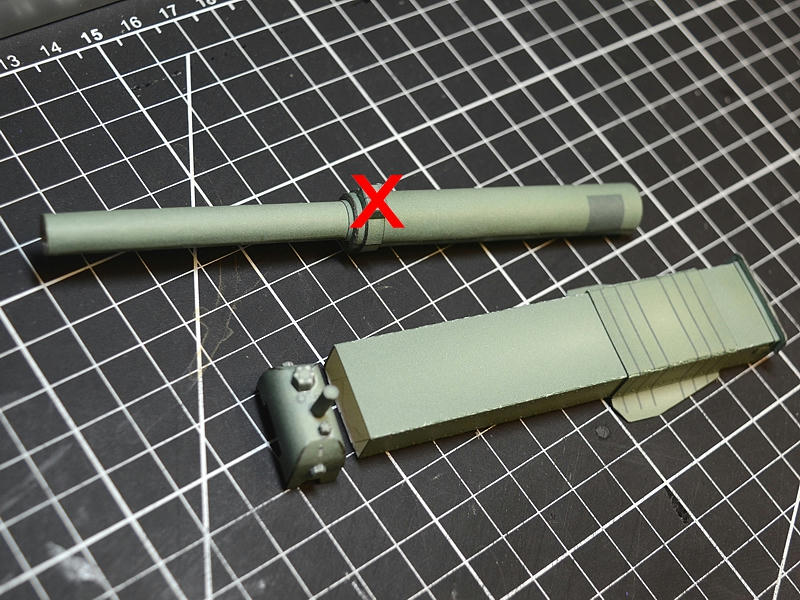 ... The Recoil box turned over (right side up) showing the recoil track. Just about to glue the front cap in place.  ... This is the rear Barrel support...it will be glued to the Recoil Track and to the underside of the Barrel. 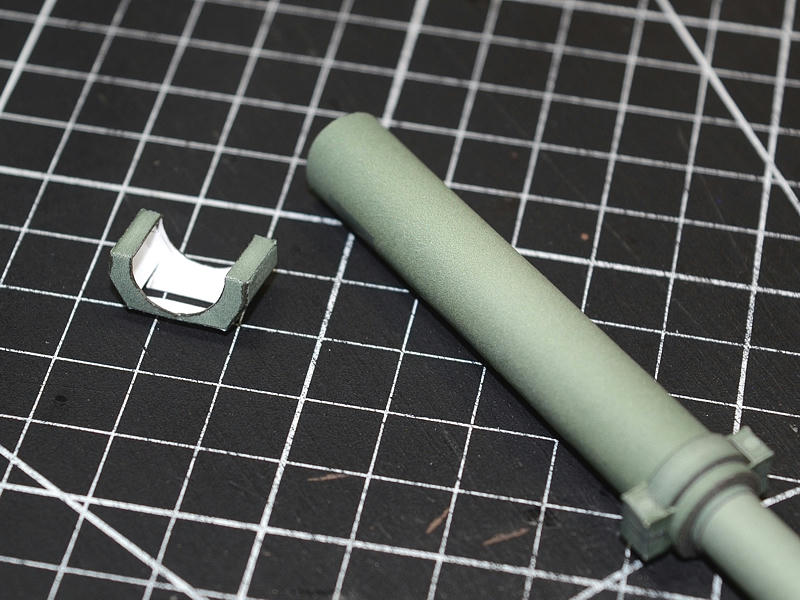 ... And, heres the Barrel sitting in place on its two supports, on top of the Recoil Track. At this stage you would probably glue everything together, but since I have more design work, I won't. 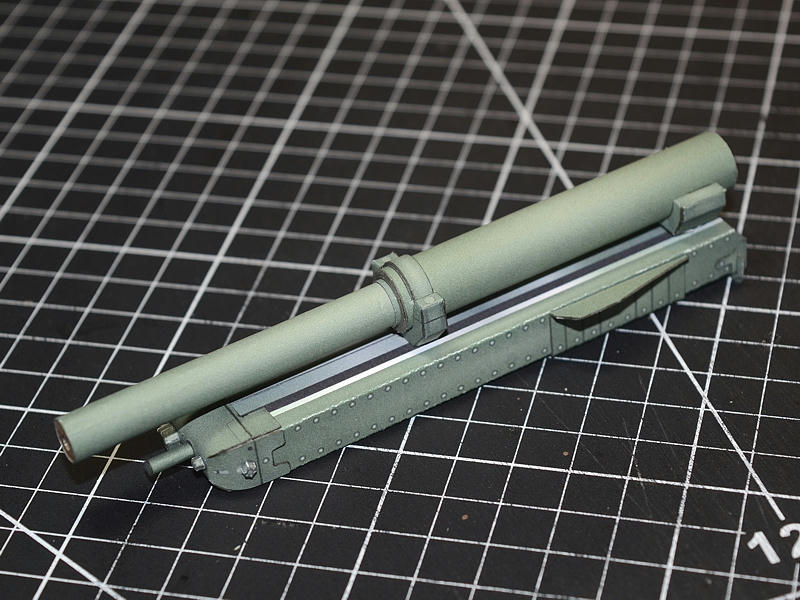 ...
__________________
SUPPORT ME PLEASE: PaperModelShop Or, my models at ecardmodels: Dave'sCardCreations
|
| Google Adsense |
 |
|
|


 Linear Mode

