


|
|
|
#11
 09-02-2009, 05:54 PM
|
||||
|
||||
|
I heard that flying a Spitfire was like riding a well trained Horse
whereas the Mustang was like grabbing a Bull by the horns!
__________________
SUPPORT ME PLEASE: PaperModelShop Or, my models at ecardmodels: Dave'sCardCreations 
|
|
#12
09-02-2009, 05:56 PM
|
||||
|
||||
|
My experience with joining strips
Hi Dave,
One one the first card models I ever built that I had downloaded was the wonderful HEMS Virgin Atlantic helicopter. The designer incorporated a very clever way to join the sections of the fuselage together using joining strips and a single forming bulkhead to shape the section. This was built by me when I had no experience in this type of model and having very little building experience in card models at all. I was able to build a very good looking model quite easily given my limited experience. The only thing that I had to be careful of was to make sure I cut out the parts accurately (like you do in any model). I had NO problems joining sections together and getting them to fit perfectly. I have attached a portion of the instructions to illustrate this. Basically, there is only 1 former to each section (the exception to this was the middle section A that had a former on each end- and the others joined to this starting part). You first glue the skin together (item 2 in the example) using a joining strip (item 2a), shaping it roughly to the desired finished cross-section. Then you insert the former (item 2b) and glue it into place. The former and joining strip will join to the next section you will build after this. Then you glue this section (parts 2, 2a, and 2c) onto previously built section A. Since the edges of the joined section have only 1 former, there is no problem of matching the two cross-sections. Something to consider IMHO. Best Regards!
__________________
Ron Caudillo PM me if you need my email address.
|
|
#14
09-02-2009, 07:23 PM
|
|||
|
|||
|
Nice job so far.
Here's my opinion regarding "butt joints"... They only work when the model is designed with a very precision fit. They also require that BOTH adjoining segments share identical bulkeads. If only one segment has a bulkhead, you are in for some real fun getting the joint to come out OK. All of the models I have designed use the butt joint method. I really prefer them because you can build the model one segment at a time. Many people prefer joining strips... I hate them! I guess it's a matter of personal preference. Ken
|
|
#15
09-03-2009, 04:39 AM
|
||||
|
||||
|
Looking great dave! I think the butt joins are turnign out better than you realize
 Chris
__________________
Want to buy some models from independent designers? http://www.ecardmodels.com and visit the shop!
|
| Google Adsense |
|
#16
09-03-2009, 06:08 AM
|
||||
|
||||
|
Ron, this has to be Post of the Week.
You absolutely MUST make an illustrated tutorial on this technique! Brilliant! :D Quote:
|
|
#17
09-03-2009, 06:55 AM
|
||||
|
||||
|
Thanks Ron!!
yes...that sounds exactly like the method I already used for the Blue Angels Fat Albert C-130! I installed a rigid former near the end of each fuselage section with enough room left for glueing tabs. This is a much larger model, so theres lots of room to put the formers slightly ahead of where they should be. To the next section, I attached a tabbed joining strip. Then joined the sections reaching inside and securing the glueing tabs to the previous section.  What I haven't revealed so far, is the fact that I am so unhappy with my butt joints, that I went ahead and reprinted the fuselage sections and have been attempting to assemble a second fuselage... using the same joiner strip method I used on Fat Albert. Heres my method so far: First I lay out the fuselage pieces on some paper and trace the shapes. For the trailing edge of each section I sketch out the joining strip (I will cut notches/tabs later) I also mark a joiner for the rolled section of the fuselage.  Then I start assembling each section with the end joiners. (I have already printed out some more formers and glued these to thick material - in this case, I had some foamcore board handy) For the nose cone section, I will butt joint the nosecone, since it is small, rigid and well formed...so I went ahead and installed the end former. 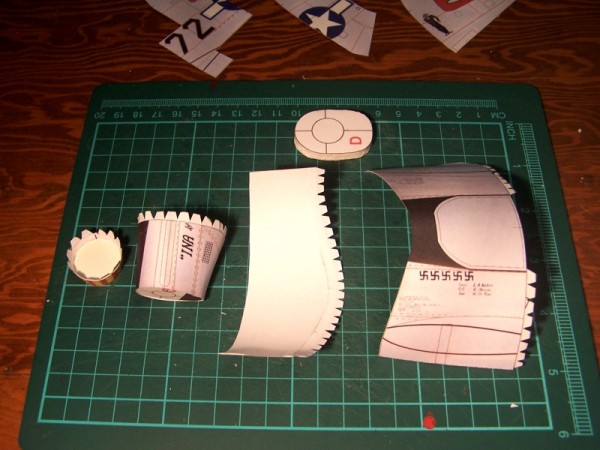 Heres the first two section attached together using the new joiner strip of paper. (I recommend using paper of some weight for the joiners. I tried using regular 20lb paper (although the fuselage is card stock) but the joiners were too soft and flexible once wet with glue.  Once the joined section and joining strip are glued in place and have dried enough so you cant push things apart, I insert the correct former and push it into place at the previous join. The shape of the thick former forces the fuselage sections into the correct shape, but I give it a little bit of help by massaging it into shape until the glue sets up. If the joiner is a little too tight or loose (maybe it hasn't been cut perfectly) this method allows you to move the former slightly forward or backward to get the best fit.  I have about half the new fuselage assembled this way... the cockpit section has some different formers, so this will be the tricky test of this method. If things don't work, I'll go back to my butt jointed fuselage but everything is looking good so far!
__________________
SUPPORT ME PLEASE: PaperModelShop Or, my models at ecardmodels: Dave'sCardCreations
|
|
#18
09-03-2009, 07:48 AM
|
||||
|
||||
|
Nice work Dave. I think I prefer your latter method too. Are you creating joining strips, or are you creating whole internal fuselage sections, with the tabs just extended off the end? Your third pic looks like your internal section is the whole length of the fuselage section.
__________________
Put on hold build (someday I'll finish): F-35A Lightning II 1:72 Previous builds: cMags' Card Model Builds
|
|
#19
09-03-2009, 09:37 AM
|
||||
|
||||
|
Quote:
No, see the first pic. I traced the parts on regular paper (too thin actually) with a pencil. Then I used a fine black marker to draw the outline of the joiner strips. You can see the first one, on the far left, I actually drew in the tabs. Then I just cut out these strips of paper and glued the solid (no tab) side into the part that I traced from. The strips intrude about 1/4"-3/8" into the fuselage section. The first couple i did with regular paper, next ones I will cut from card stock.
__________________
SUPPORT ME PLEASE: PaperModelShop Or, my models at ecardmodels: Dave'sCardCreations
|
|
#20
09-03-2009, 01:53 PM
|
||||
|
||||
|
I gave up on the butt join because I could never find a way to prevent the seam from creasing, crunching, overlapping, leaving gaps. So, I do what the RC guys do even though it adds to the build time.
I cut out the bulkheads from LetraMax 2000 illustration board (matte board works just fine and can be had for free as scraps from a framer) and laminate closed-cell styrofoam to one side. I use a width of about 1 inch so that it inserts well into the mating half of the fuselage. I cut the foam with a foam cutter to the exact dimension of the bulkhead and shape as needed so that it matches the taper of the following fuselage section. The foam gives me a large area to match seams and provides a very solid foundation for eliminating overlaps and gaps. You can see how smooth the seams are. What is even better, I can shape the foam to follow a compound curve, roll the paper, and virtually eliminate the look of simple conical sections. When they built prototype aluminum aircraft, metal workers would take flat sheet and roll it to give it a compound curve.
__________________
Maj Charles Davenport, USAF (Ret) Last edited by cdavenport; 09-03-2009 at 02:37 PM.
|
| Google Adsense |
 |
| Thread Tools | |
| Display Modes | |
|
|


 Linear Mode

