


|
|
|
#41
 04-16-2012, 08:34 PM
|
||||
|
||||
|
I'm going to side with Yogi on the color issue. I watched the video of the loading of the combat Little Man and was struck by the lack of any surface imperfections on the weapon. I have been around military OD and burnished steel enough to know that OD is going to be smudged or nicked easily and show it. Furthermore, if it had been painted OD, it seems likely that with all the pre-launch handling that the bomb must have undergone, there might be evidence of paint wear down to the primer.
Dropping Little Boy amounted to a "rush job." The design wasn't even tested at full scale because the designers knew it was so simple that it would work. It was Fat Boy that had them scratching their heads. The absolute key element that had to work on FB was the trigger. Each section of precisely molded chemical explosive surrounding the plutonium sphere had to explode within nanoseconds of each other in order achieve super critical mass. In terms of pure science, that in itself was a technological triumph! Nando, your work and research is inspiring. I'm looking forward to building and detailing this model. There is a nice speculative cutaway on Wikipedia that would make a great looking cutaway model. If you decide to make the model burnished steel, you should take a look at some real burnished steel. It almost has a translucent bluish cast to it. BTW, burnishing the steel would have been a quick and easy way to protect it against short term corrosion AND improve its aerodynamics. That's what the NASM did to get Enola Gay looking like it does today. They used a special polish to burnish the aluminum which, they have discovered through testing, provides higher corrosion resistance than any chemical coating! Steel is much easier to burnish than aluminum because you don't have to worry about overheating the steel. Best guesses for you to use or loose. The model's going to be great either way you do it!
__________________
Maj Charles Davenport, USAF (Ret) 
|
|
#42
04-17-2012, 01:56 PM
|
||||
|
||||
|
I agree with You that burnished steel is the more likely color for the combat bomb, for the reasons you highlighted but especially if you look at the picture below.
 However I try first to complete the model painted with the FS34087 tone, also because, at the present, i'm not able to reproduce a matt metal burnished texture in a satisfactory manner and I have to deepen more my skill in digital graphic painting. Here below the first steps into building process model and I'm quite satisfied for the overall result.   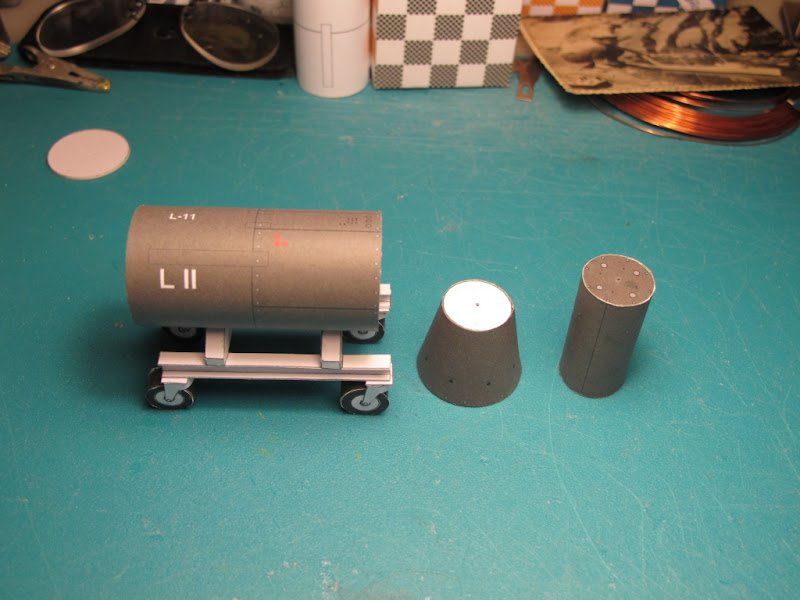 Best, Nando
__________________
My builds Last Udon's LM @ 1/96;Colliers Ferry Rocket (1952);Gundam Sinanju MS-06S Current Apollo CM 1-24 Fat Man & Little Boy available here
|
|
#43
04-17-2012, 05:31 PM
|
||||
|
||||
|
Right on the money, Nando! It looks beautiful!~
__________________
Maj Charles Davenport, USAF (Ret)
|
|
#44
04-18-2012, 05:15 PM
|
|||
|
|||
|
That color looks great to me! Are you planning to release the model when you are finished?
I'm going to have to disagree with the "rush job" argument. It took them around four years to produce the bombs. The front of the Little Boy case, the "target" was first tested at Los Alamos in December 16, 1944 (I haven't found the date of manufacture). So it was kicking around for at least 8 months before it was dropped in Japan. It must have had a protective coating of some kind. I did find a memo from General Groves dated Dec 5 (no year) requesting that the Navy Department manufacture and deliver 29 Little Boy case assemblies and 35 dummy cases to the Manhattan Project. So it wasn't a one-off production. I'm not arguing that they didn't burnish it, I'm just suggesting that they had time to apply whatever surface protection they wanted. I tracked down a few more pictures. Little Boy in Bomb Pit It looks like there are a few dings around the nose of the bomb. Possible paint chips on the antenna boxes (but they also look like a different color) Also visible are some signatures and a few odd smudges on top of the bomb and around the L11 label. The green arming plugs look lighter in color than the rest of the bomb. Scorch marks from welding visible on bomb rack. Does mean that the bomb rack was not painted after its construction? If it is bare metal it is a much lighter color than the bomb compared to the bomb. Little Boy in bomb bay Light colored scuffs on the tail (is the damage on the photo or the bomb?). Dark colored blotches on tail (discoloration from welding?) The bomb looks darker than the bomb bay (what color is the bomb bay?) Little Boy with panel removed Dark blotches around screw holes on removed panel (paint chips? Why would it be darker under the paint?) Gun barrel is shinier than the rest of the bomb (what kind of finish did it have? bare metal?) What do you guys think? (P.S. Not to get too far off topic but I found out that Fat Man was painted mustard colored zinc chromate. They also covered all the openings and cracks in the case with tape and then sprayed red M-190 Pliobond over the tape. They then sprayed blue O.S. 3602 strippable plastic film (Glyptol) over the red.)
|
|
#45
04-19-2012, 04:51 PM
|
||||
|
||||
|
Just a quick update tonight
")    Best, Nando
__________________
My builds Last Udon's LM @ 1/96;Colliers Ferry Rocket (1952);Gundam Sinanju MS-06S Current Apollo CM 1-24 Fat Man & Little Boy available here
|
| Google Adsense |
|
#46
04-22-2012, 03:30 PM
|
||||
|
||||
|
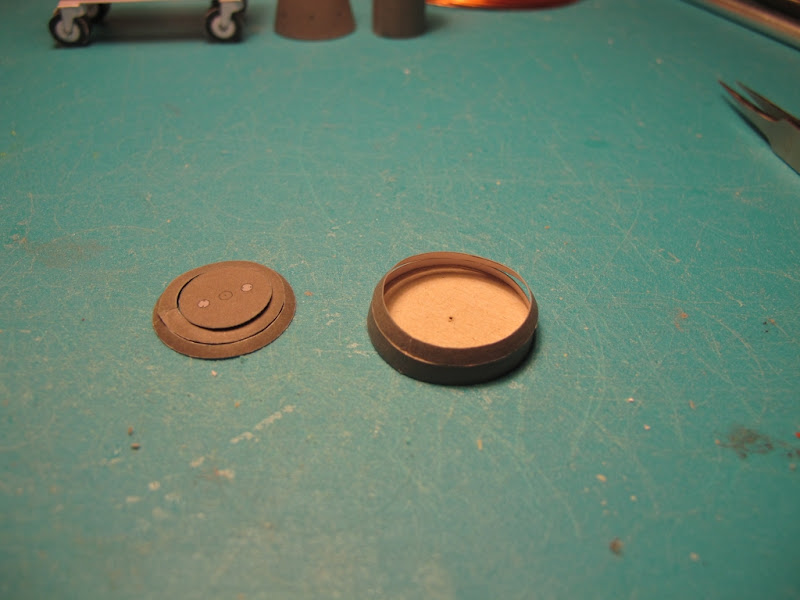
Another little progress.
This is the way I found to glue the rings of the nose  A little bit of weight to balance the tail 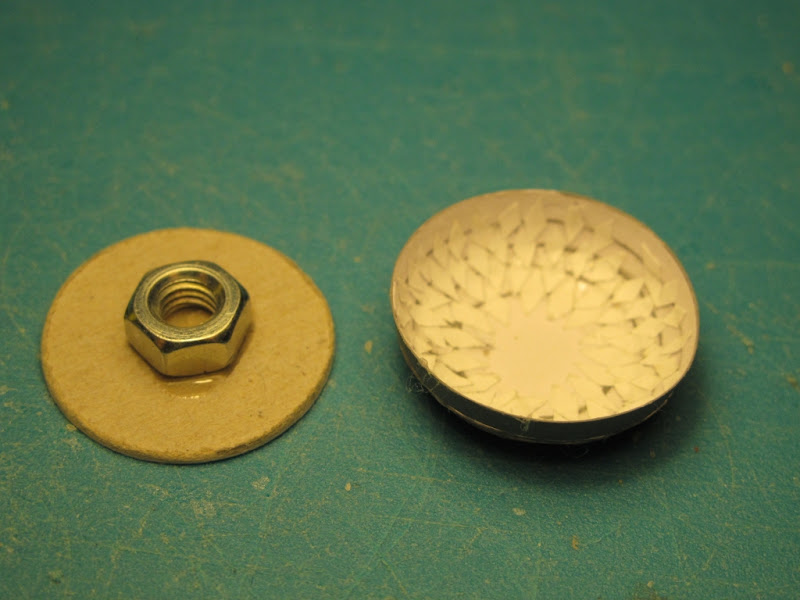 Components of the body now are completed  Next step: the Tail Best, Nando
__________________
My builds Last Udon's LM @ 1/96;Colliers Ferry Rocket (1952);Gundam Sinanju MS-06S Current Apollo CM 1-24 Fat Man & Little Boy available here
|
|
#47
04-22-2012, 04:37 PM
|
||||
|
||||
|
Components glued togheter

__________________
My builds Last Udon's LM @ 1/96;Colliers Ferry Rocket (1952);Gundam Sinanju MS-06S Current Apollo CM 1-24 Fat Man & Little Boy available here
|
|
#49
04-24-2012, 03:42 PM
|
||||
|
||||
|
Thank You Tappi. Every model I'm designing and building is a challenge to improve the model but my skill also.
 Some step ahead. I preferred to verify the Yagi antennas before the tail. So I cut and glued the parts,  I used the template of the wire to form the antennas, I silver painted them,  and the result was good enough, but It was too difficult to assemble the parts.  So I revised the way I unfolded the parts, and with the new design (the two on the right) the result is better and easier to build.   In the mean time I found a good resource of photos, many of wich I never saw elsewhere. This inspired me to try to design the original trailer used at Tinian to carry both the first bombs. The design is at the very primitive stage and I don't know if it is worth to continue or not, but the view of a crude "Fat Man" is intriguing   It's interesting also the comparison among the bombs. 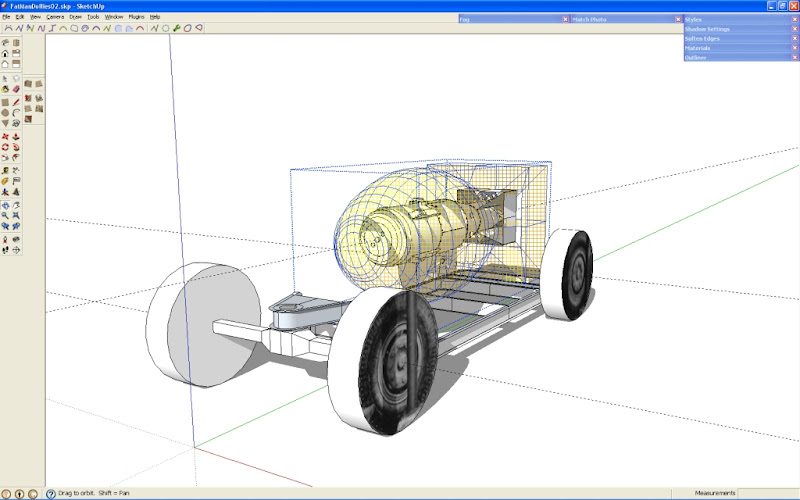 Best Nando
__________________
My builds Last Udon's LM @ 1/96;Colliers Ferry Rocket (1952);Gundam Sinanju MS-06S Current Apollo CM 1-24 Fat Man & Little Boy available here
|
|
#50
04-24-2012, 05:30 PM
|
|||
|
|||
|
Looking good, so much detail! I suppose you will be adding the arming plugs and the nose nut?
 Thanks for sharing those other pictures, there were some I haven't seen either. If you are planing to make a fat man bomb in the future there is a blueprint here you might find useful- https://www.lanl.gov/history/admin/f...R-08-06288.jpg Taken from this site- https://www.lanl.gov/history/images.php
|
| Google Adsense |
 |
|
|


 Linear Mode

