


|
|
|
#1
 05-15-2012, 05:29 PM
|
||||
|
||||
|
Chenard & Walcker "Mistral"
Here is a really nice vintage streamlined auto model from the 30's, newly added to Agence eureka.
Agence eureka 4 pages, 3D tires. A really nice model. Enjoy!
__________________
Regards, Don I don't always build models, but when I do... I prefer paper. Keep your scissors sharp, my friends. 
|
| Google Adsense |
|
#2
05-16-2012, 09:36 AM
|
|||
|
|||
|
Has anyone figured out the relative placement of the pieces to put this model together yet?
It looks straight forward but the lack of finished photos is giving me fits...LOL
|
|
#4
05-16-2012, 10:48 AM
|
||||
|
||||
|
I have a backlog of projects that HAVE to get done. I probably won't start this one until June. Sorry
|
|
#5
05-16-2012, 01:55 PM
|
||||
|
||||
|
Perhaps a rudimentary translation from French to English would help.
Here we go in no particular order: droite -- right\starboard gauche -- left\port aile -- wing\fender avant -- front arriere -- rear dessus -- cover (dessus d'aile arriere gauche -- top of left rear fender) capot -- hood radiateur -- radiator (duh) carroserie -- car body chassis -- chassis (car bottom) toit -- roof (I'll build it when I get around toit) pare-brise -- windshield essieu -- axle. I would start by gluing the roof together and then glue the car body to the roof. That way you'll have the weird part out of the way first. This car has no trunk/back. The two side panels of the car body come together to form a tail/rudder. BTW, I do not speak French, I just plug-n-chugged words and phrases into google translate. Though this did remind me of my 1983 Paris-Brest-Paris adventure. For that epic bike ride, knowing a-droite from a-gauche was very helpful. Curt
|
| Google Adsense |
|
#6
05-16-2012, 02:50 PM
|
||||
|
||||
|
I'm thinking I may build it, Don. Many thanks for the translations, Curt. Your order of assembly thoughts seem right to me. This is actually a pretty accurate (although simple) model of the real car. Certainly was bizarre looking.
__________________
Regards, Don I don't always build models, but when I do... I prefer paper. Keep your scissors sharp, my friends.
|
|
#7
05-17-2012, 04:35 AM
|
|||
|
|||
|
Thanks guys that may just do the trick!
|
|
#8
05-17-2012, 01:35 PM
|
||||
|
||||
|
I have it printed and intend on building it. Shall I post photos here or on a new thread?
Curt
|
|
#9
05-18-2012, 06:35 AM
|
||||
|
||||
|
I don't mind you piggy backing, Curt. Whatever you want to do is fine with me.
__________________
Regards, Don I don't always build models, but when I do... I prefer paper. Keep your scissors sharp, my friends.
|
|
#10
05-18-2012, 06:46 PM
|
||||
|
||||
|
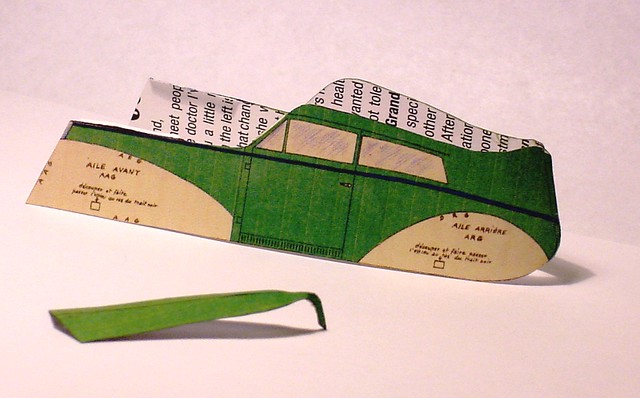
Ok Don, So last night I printed the model and cut out all of four pieces. Here they are; the car body and the roof. You can see how the car body comes together at the rear and how the roof will need to be swept upward at the rear to attach to it. Before I do that though, I'll need to punch out the openings for the front and rear axles. They show as squares on the model but I'm going to use my hole punch which should be easier since the axles are round, n'estce pas?
 Curt
|
| Google Adsense |
 |
|
|


 Linear Mode

