


|
|
|
#1
 01-02-2014, 03:38 PM
|
||||
|
||||
|
Found on eBay
I found these on auction at eBay over the Xmas holiday. I believe they may now be out of print, and I've never seen any of them made up, so I put in bids for a couple of quid each. There were no other bids, so I got them all for 90p each. Plus postage, but they were all just local post.
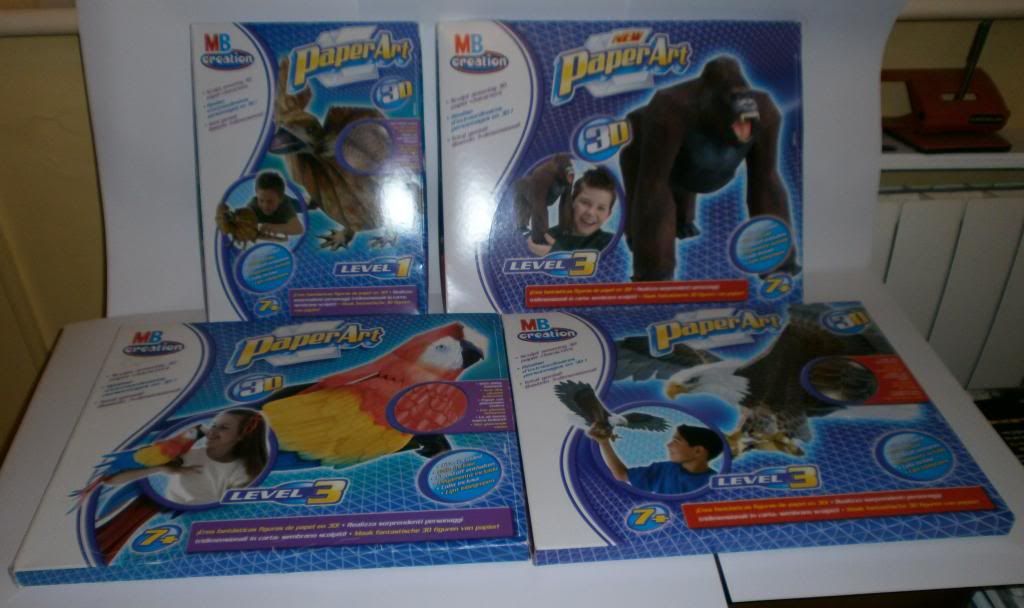 They are all two sided printing with an impressed texture and die cut press-out numbered parts. Printing also overlaps the die-cuts quite a bit, so photocopies were not really of any use ... so don't bother asking.  Instructions are simply photos in numbered steps. Following these numbered steps, and using parts in numbered order, works very well. The die cuts were reasonably accurate and very little trimming was required. A little bit of snipping around the toes and of course plenty of edge colouring, but that's all. So I won't bore you with step by step builds. The Frilled lizard was marked 'Level 1' so I started with him ... 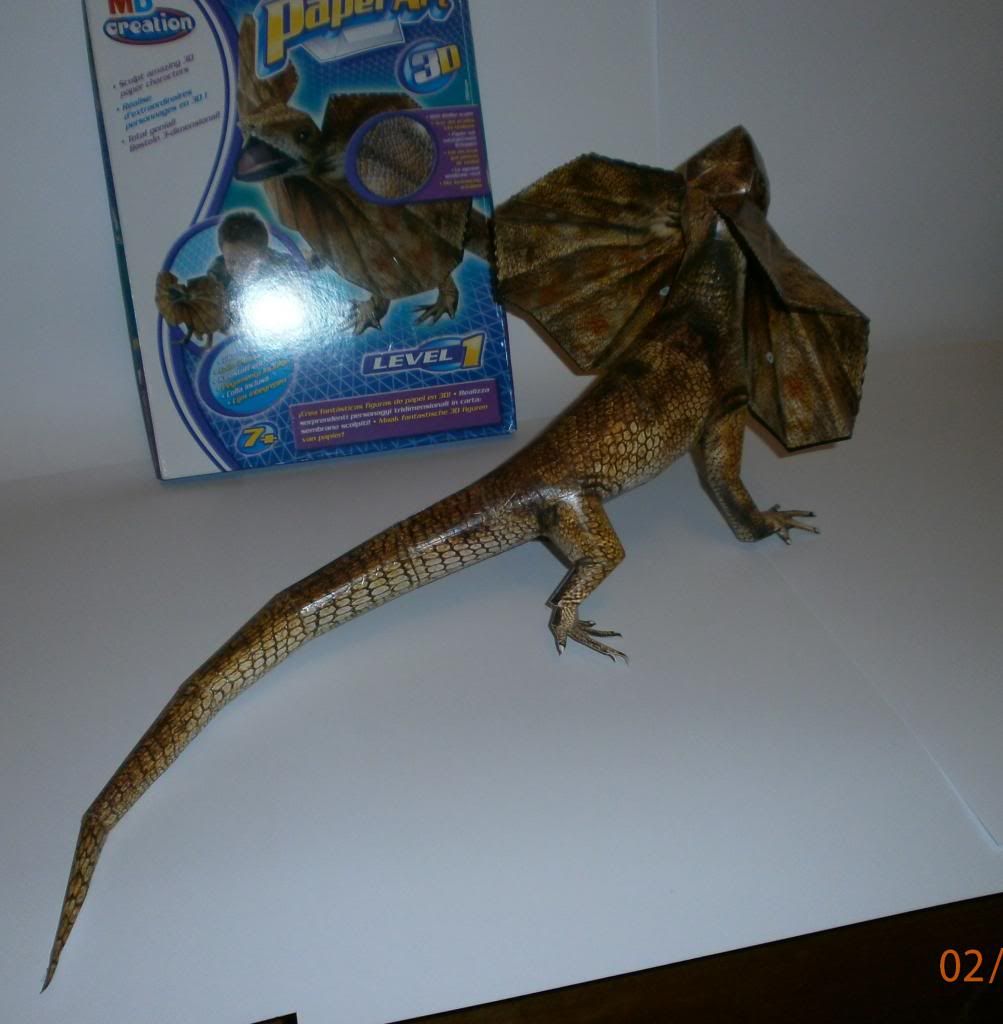 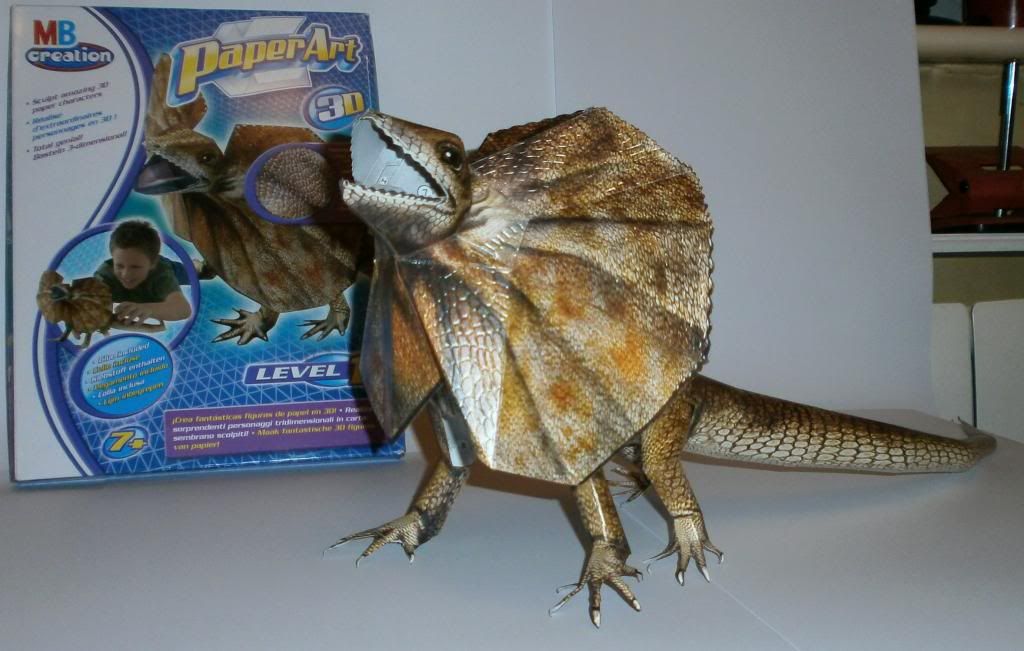 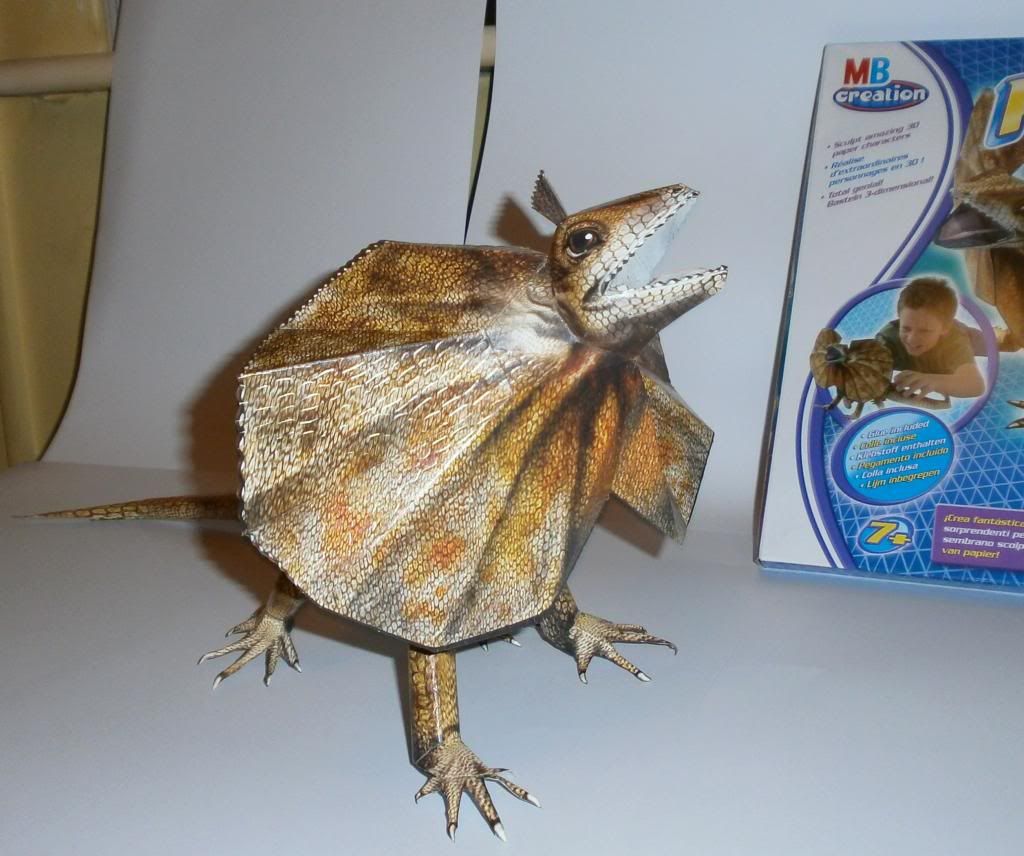 Not an easy subject to photograph, as that frill hides most of his body, but the whole thing looks quite realistic. As I've learned from .pdo builds, ignoring most of the fold lines, curving the card, and gently pulling the tabs into place and clamping ... produces a much more natural skin surface ... but there's very little you can do to smooth out the bends in the tail. Probably start the next one tomorrow. Keep on snippin' ... Johnny. 
|
| Google Adsense |
|
#2
01-02-2014, 04:02 PM
|
||||
|
||||
|
90p each. That is quite a bargain.
I found some models from the same line of models in the discount aisle of a chain store in the USA back in 2009. There was a husky puppy, a kitten, a cobra snake, an elephant, a horse, and a t-rex dinosaur. The puppy, kitten, and snake were $1.99 each, the others were $3.99 each plus the sales tax of 8.6%. They do build up easy, although when I gave a horse kit to someone they stated that is was too hard to make. Guess they need cheat codes and walkthroughs for it. ")
__________________
~Doug~ AC010505 EAMUS CATULI! Audere est Facere THFC 19**-20** R.I.P. it up, Tear it up, Have a Ball
|
|
#3
01-02-2014, 05:51 PM
|
||||
|
||||
|
wow, I missed these?
I want that Gorilla! My Daughter bought the Husky years ago...she must have been around 10 years old when she got it...and she built it, all by herself. No problem. So, they're not hard models to build. You can still order these from Amazon, but they cost about $20 with shipping. Too much for me. But I would really like to get another copy of the Husky for her.
__________________
SUPPORT ME PLEASE: PaperModelShop Or, my models at ecardmodels: Dave'sCardCreations
|
|
#4
01-02-2014, 06:12 PM
|
||||
|
||||
|
http://www.tapapercraft.com/complete...ng-arts-t-rex/
I have built the T-Rex from that serie, only issue I had with is that there was not enough glue shipped with it! The mouth is a little too wide though.
__________________
print, cut, score, fold, glue, gloat. Total Annihilation paper models Current wip: Scaldis De Ruyter, Sword Impulse [PR]
|
|
#5
01-02-2014, 06:28 PM
|
||||
|
||||
|
Currently on ebay.co.uk there's an elephant, panda, Homer Simpson, T-rex, Cat, Rabbit and a penguin. But they've learned their lesson and are putting up higher starting prices now.
Sorry Dave, I can't see a Husky or a Gorilla around. Keep on snippin' ... Johnny.
|
| Google Adsense |
|
#6
01-02-2014, 09:01 PM
|
||||
|
||||
|
Hi Johnny,
Great looking build. Did you spray anything on the paper to protect/make shiny or is that the way the printing is sold? Cool looking model! Mike
__________________
Cardstock Property Tables and Terms Flying Cardstock Models http://www.papermodelers.com/forum/m...uers-projects/
|
|
#7
01-03-2014, 04:40 PM
|
||||
|
||||
|
Quote:
I started the Parrot today, and the head is an even shinier, almost metallic finish, but having learned the lesson on the lizard, I'm scraping the surface on all tabs on this one. Having to go carefully though as I don't have any metallic touch up paints. It's looking quite good so far though. Keep on snippin' ... Johnny.
|
|
#8
01-07-2014, 04:19 PM
|
||||
|
||||
|
And here's the Parrot ...
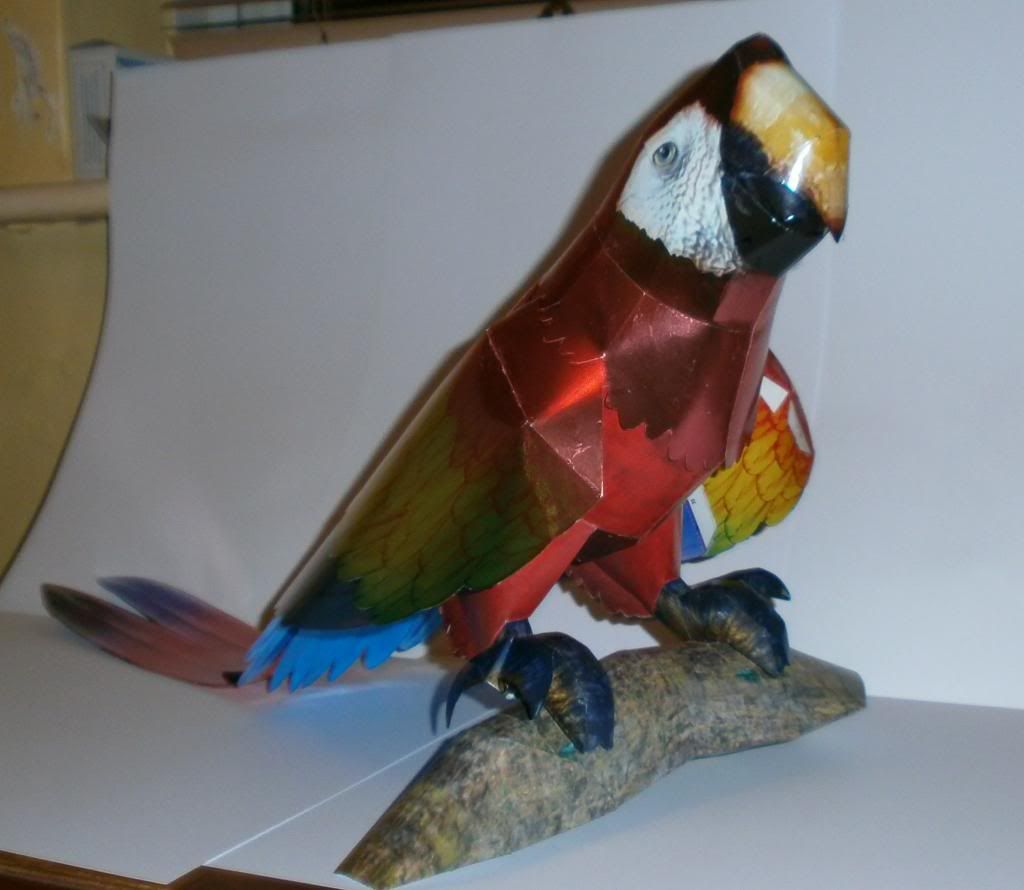 Hmmm! I see I need to aim off a bit more (Or do a bit of under-wing painting.). Most of it is in a metalic finish print, but it's really too reflective to look very life-like. 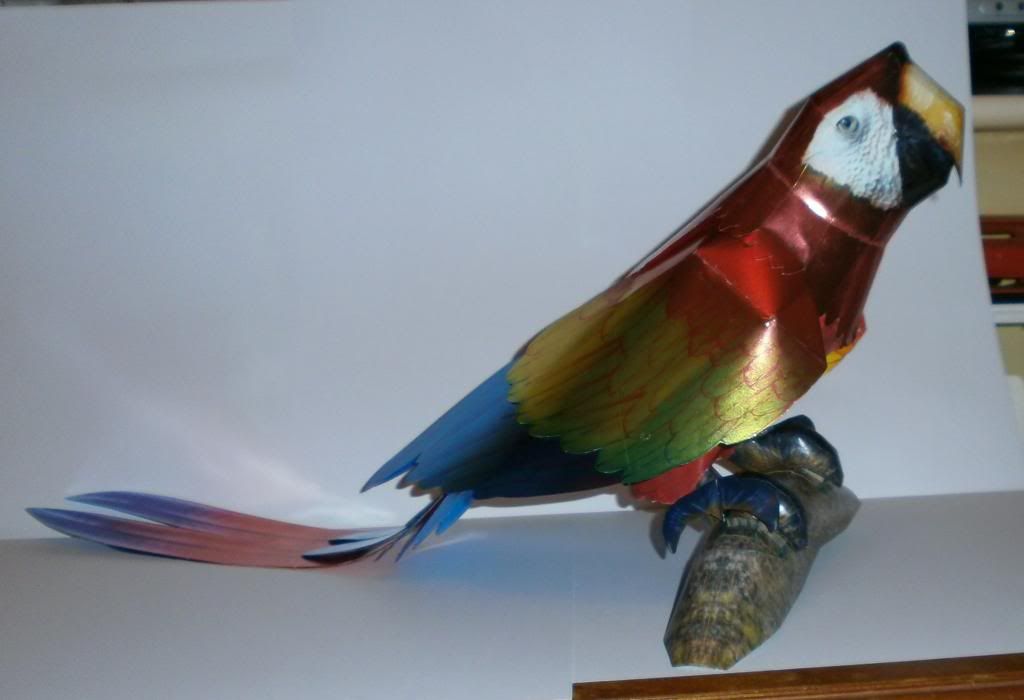 This thing is BIG. (26" long) It absolutely swamped my little build table, and the tail swept all the tools and stuff onto the floor regularly. It's raining (again) so I had to lay up the kitchen table to get the pics. Dunno where the heck this is gonna live now though. I just might have to build a proper parrot stand for it. The kit gives no indication of what bird it is. I've just called it a Parrot, but whether it's a Macaw, or a Gallah, I wouldn't know. Now, do I do the Eagle or the Gorilla next? Keep on snippin' ... Johnny.
|
|
#9
01-16-2014, 05:49 PM
|
||||
|
||||
|
The Gorilla won, but I have to admit I did not enjoy building this one ...
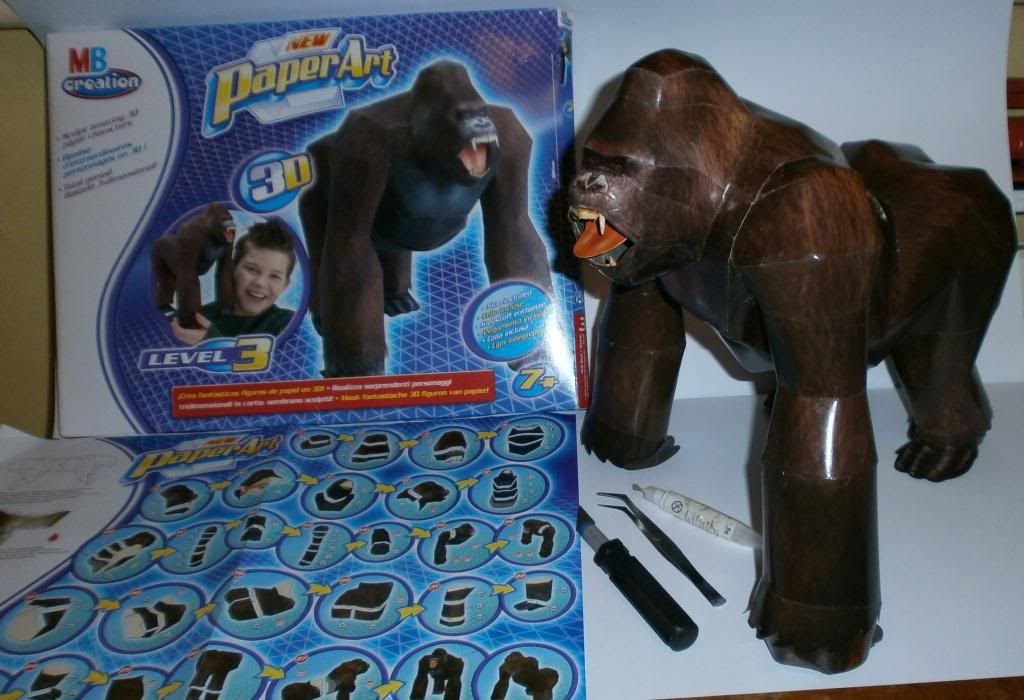 It is Laser printed on semi-gloss card stock. Which makes for very slippy and slow to stick tabs. The glue supplied seems to be more like Copydex (a Rubber solution), and does give a better 'grab' than white craft glue, but it takes forever to set hard. The card is printed both sides, so it is quite stiff and almost waterproof (Definitely spit proof). Thus damping and burnishing peaks and seams is pretty ineffective. The designer has actually done a good job here. He has even thoughtfully printed all the dotted fold lines on the reverse side, so they shouldn't show on the finished model, but in manufacture, who ever set up the die-cut machine, thought it was a good idea to imprint the fold lines into the outer surface. Good idea I suppose if you're gonna use them, but when adopting the Pepakura technique of ignoring the fold lines and pulling the parts into shape to form smoother curved surfaces, these indented lines are still quite visible. Especially on a glossy surface. This, along with the inability to smooth the peaks, ruined the the model for me, and I kept pushing it aside to work on other things. If anyone else is thinking of making one of these, I strongly recommend that you first punch out all the parts and photocopy them onto normal cardstock. The part numbers and fold lines are all on the back, but as long as you've got the originals to refer to as a guide, it is not necessary to print the reverse sides. Probably a good idea to note the part numbers onto the scans though. Now you will be able to make the model as before in part number order, but you'll just have to cut the parts out first. A dull print surface will look better for this model anyway (you ever seen a glossy Gorilla?), and the imprinted fold lines should now be minimal. Very few of these folds are necessary anyway as it looks better with the curved surfaces. Using normal card stock will allow normal craft glue to be used effectively, and should also allow a bit of spit and burnishing to smooth out all the peaks and seams. Cardstock will also allow water-colour paint to soak in better for the edge colouring too. So, consensus of my opinion is a very well designed model, but horribly let down by the choice of materials. Yes I'll build it again if I can find another one at a reasonable price (and beat Dave to it). Mind you, If I scan it and build from the scans, I could probably flog the original to Dave. Keep on snippin' ... Johnny. PS: And now for the Eagle ... First job is to suss it out for a scan, but this really is a two sided print. Might have to go for a double thickness build on the wings, but that will strengthen them anyway.
|
|
#10
01-16-2014, 06:57 PM
|
||||
|
||||
|
Besides the extreme glossiness, and what you have already mentioned, it looks like he had open heart surgery and the doctor forgot to close him up. You might see if you could Gimp something to cover the hole in his chest.
Did the others have access ports? If they do, it isn't as obvious as on Kong
__________________
A fine is a tax when you do wrong. A tax is a fine when you do well.
|
| Google Adsense |
 |
|
|


 Linear Mode

