


|
|
|
#1
 05-28-2009, 06:11 AM
|
||||
|
||||
|
1/72 LVG Roland D.XVI
Here are a few photos of a 1/72 scale Roland D.XVI from der Kampflieger that I completed recently. This was my first WWI bird, and I chose it simply it because it's a monoplane. I find the bi/tri planes kind of intimidating with all those flimsy struts and rigging. I thought the Roland would be a relatively easy introduction to old-timey model airplane building.
Construction went very smoothly until I glued on the struts for the parasol wing. For some reason the port side strut wound up being over a mm higher than the starboard one, and the problem just got more obvious when I dry fitted the wing. This was just the kind of problem I was afraid of. My poor excuse for a solution was to sand the down the strut a bit on the high side, and add shims to the low side until the tips of the wing looked level when placed on top. The repair is very obvious to me, (you can see it in the first photo) but hopefully at 1X the viewer will be so dazzled by the lozenge camouflage that it won't be noticed To display the finished model I chose my small base, textured with a black walnut woodgrain this time. The groundwork is made of brown mat board with Woodland Scenics turf and Heki static grass glued on. Since the photo, the mat board has warped and lifted from the base, so I won't use it again for this purpose. I wanted the base to be glossy so, as an experiment, I applied a couple of coats of old fashioned Minwax brand finishing paste wax, and buffed it with a soft cloth. It came out with just the right amount of gloss. It sure fooled my wife - she thought it was real wood. I'll probably do this to all my bases from now on, it looks so purty! 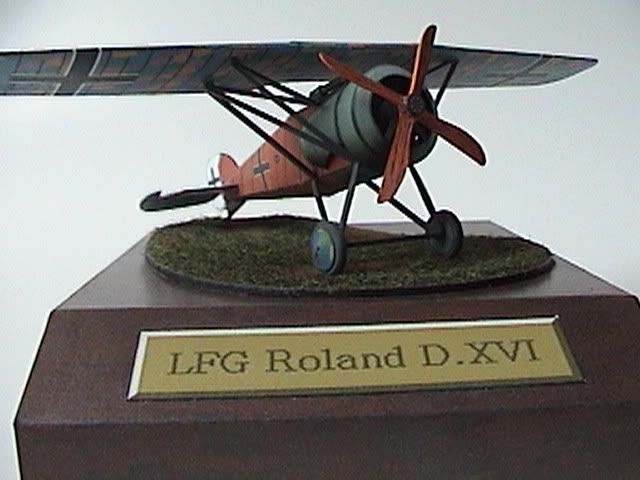 The view from the front 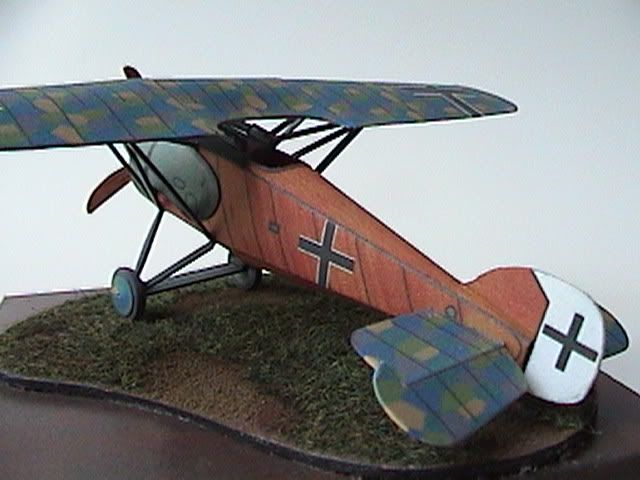 The view from the rear 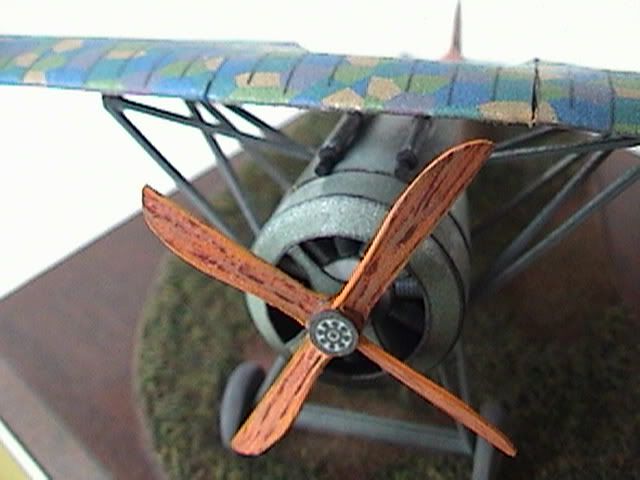 Closeup of nose. That giant gash on the leading edge of the wing isnt even visible at 1X! It's amazing how tiny little defects look absolutely horrendous in closeups. Regards, Don 
|
| Google Adsense |
|
#3
05-28-2009, 06:23 AM
|
||||
|
||||
|
I like that very much. I have notice also with my models that the slightest, most invisible flaw in real life, it looks horrid in the photograph! So I understand when I see your fine model it is not the same in person. Plus in real life I am partially blind so I do not see such things any way!
So the base it is made from card board? Or veneer? It is very attractive for the model. On some of my Micromodels, the card bases have lift from the wood base. It was worse when I had use spray glue.
|
|
#5
05-28-2009, 06:43 AM
|
||||
|
||||
|
The base is made of paper, KGLaLa. 110 lb stock. I glue 1mm card to the underside to strengthen the sections where the model and name plate are to be attached. I also glue a small plate on the back of the base with my name and date - a habit I carried over from my other hobby - painting and/or sculpting connoisseur military miniatures.
|
| Google Adsense |
|
#6
05-28-2009, 08:21 AM
|
||||
|
||||
|
very nice and clean also.
__________________
My commercial models
|
|
#7
05-28-2009, 09:11 AM
|
||||
|
||||
|
Looks very nice, Don!
As to the struts, I don't think any model (paper or plastic) is perfect. They all need a little work. With the planes in battle, getting holed, the stress, the rips and tears and repairs - a little cut-down here, a little shim there makes it look more realistic! I don't want to sound like an idiot, but did you wax the "wood" base before gluing down the mat board base? The mat board would probably work fine if you used a heavy cadrboard or piece of Foam-Cor board glue to the inside of the "wood" base and allowed to dry before glueing on the mat board base with the plane.
|
|
#8
05-28-2009, 09:26 AM
|
||||
|
||||
|
I waxed the base after gluing down the mat board, J. I also reinforced the underside with 1mm cardboard before assembly. I used the same groundwork technique about a year earlier on the Piper Cub that is pictured in my other active thread, using 0.5mm cardboard in place of mat board. It still shows no tendency to warp or pull away from the base, so I think it's just a mat board thing. Perhaps it absorbs moisture from the air more readily. Although from the way it's warping, the side that is/was glued down is the side that is expanding, not the topside.
|
|
#10
08-30-2009, 01:47 AM
|
|||
|
|||
|
RPS,
Beautiful build. As for the gap in the wing there's an easy fix. Apply a tiny bit of white glue into the gap with a toothpick. When it's mostly set and not too wet roll the seam with another toothpick lightly till the seam comes together. It may not close completly but if that happens fill the gap with a bit more glue. The nice thing is the ink may color the glue "filler" making the gap mostly if not completly disappear. Try it  G1
|
| Google Adsense |
 |
| Thread Tools | |
| Display Modes | |
|
|


 Linear Mode

