


|
|
|
#181
 09-01-2009, 05:30 AM
|
||||
|
||||
|
Quote:
__________________
Mohammed Aly Current Projects LUT, Pad 39A 
|
|
#183
09-01-2009, 05:27 PM
|
||||
|
||||
|
Thank you Paul. I don't think I've ever seen bigger text at an Internet Forum before!
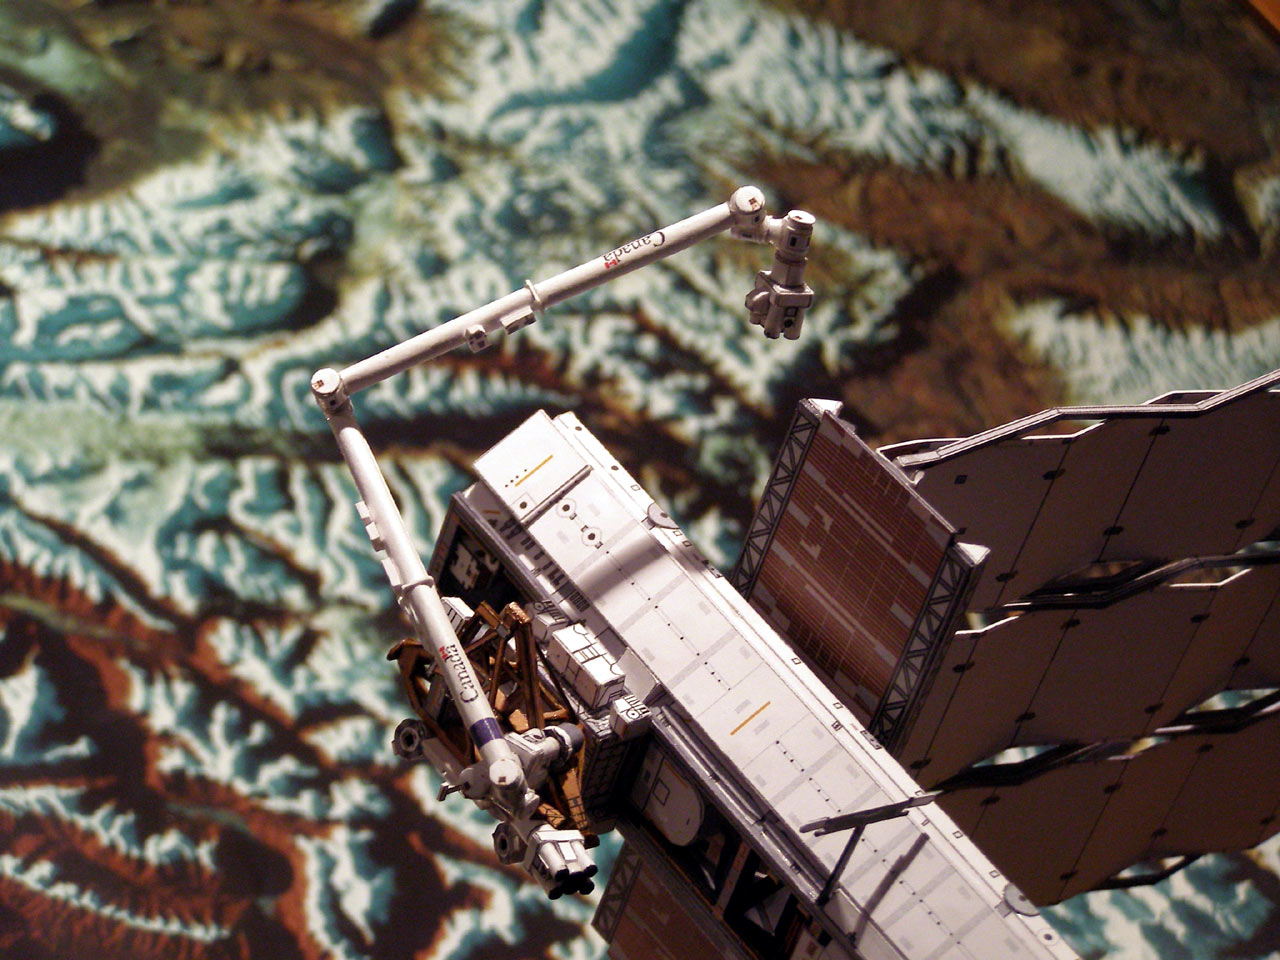
It's praise like that which makes me want to keep working hard. Today I am creating my Destiny/Tranquility joint, using a very short brass tube to act as a "stay" inside the actual joint. It will provide a larger surface area for the epoxy to work with, and ensure that all parts beyond Destiny are cantilevered and not supported by wires. So this joint has to support the weight of Node 2, Columbus, all of Kibo, a PMA *and* the Space Shuttle, which I will have a non-permanent join to the PMA. I am really struggling to come up with a way to mount Node 2 oriented 100% true, and then being able to attached both Kibo and Columbus so they appear straight. It is non-obvious to me on how to achieve this. I guess I'll just attach Node 2 and see where that takes me. Mohammed, your parts are coming along beautifully too. Your SSRMS is looking fantastic. Does the UHF antenna stay on Destiny permanently - or is this one relocated to S1/P1? I am itching for the HTV part from Alfonso, but I am so tied up with getting the parts together now, I still have plenty of catch up work ahead of me. By way of celebrating the Shuttle's 25th birthday, I did some work on my almost-there shuttle Atlantis, and include the shots here. This is the shuttle I'll attach to my model when complete. This is Fortezza's item, not from Alfonso, and several times during the construction I had to ask if I was sane for attempting it. This is a VERY difficult model to get right, and not to be undertaken lightly - believe me! This thing could break your heart... 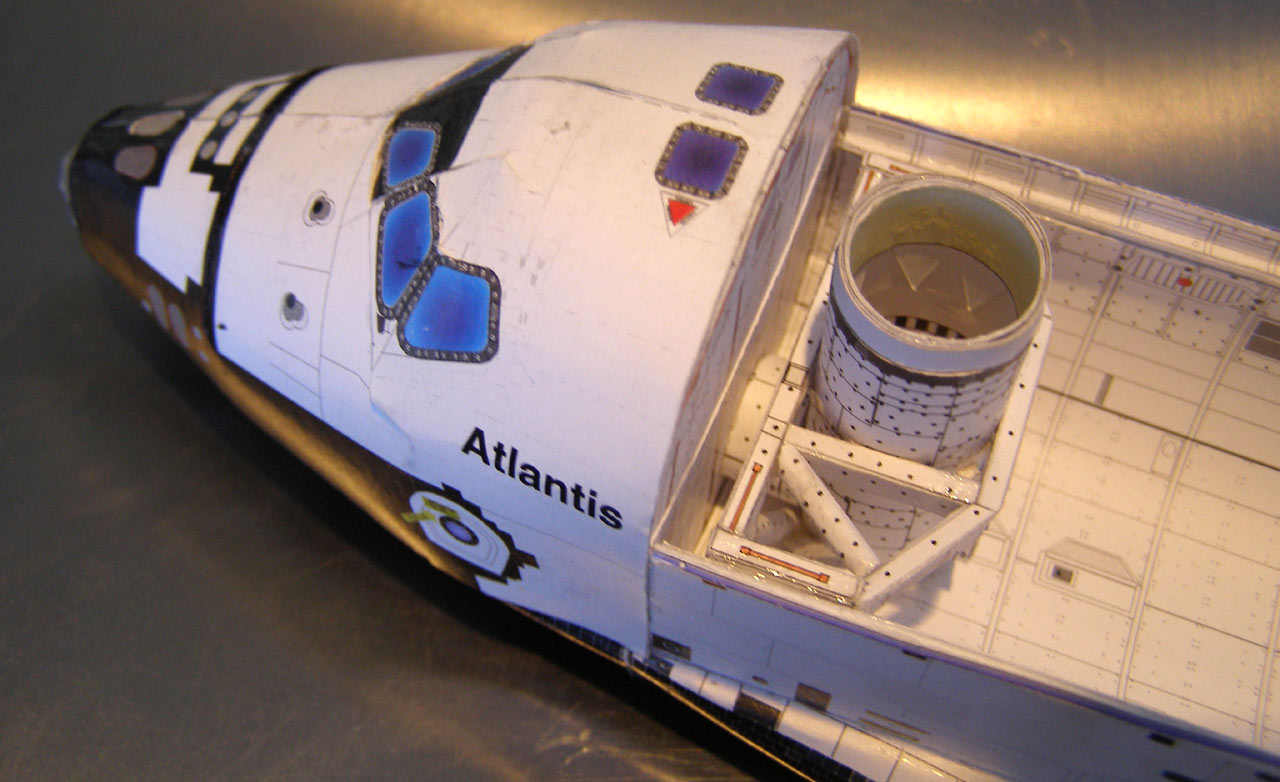 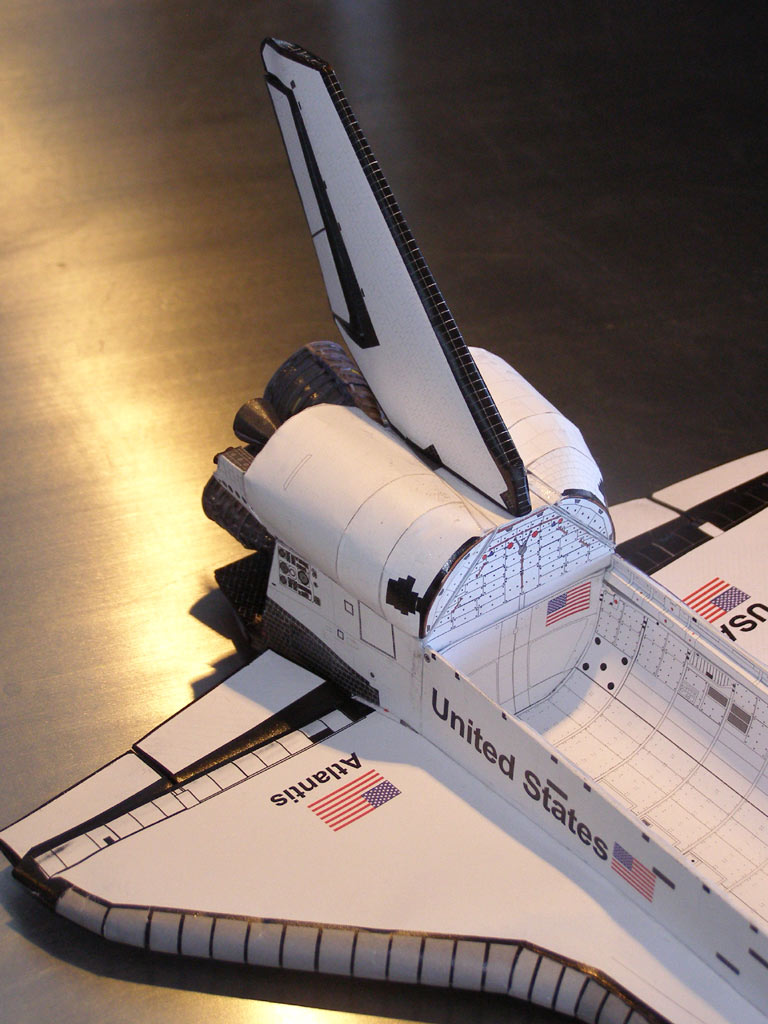  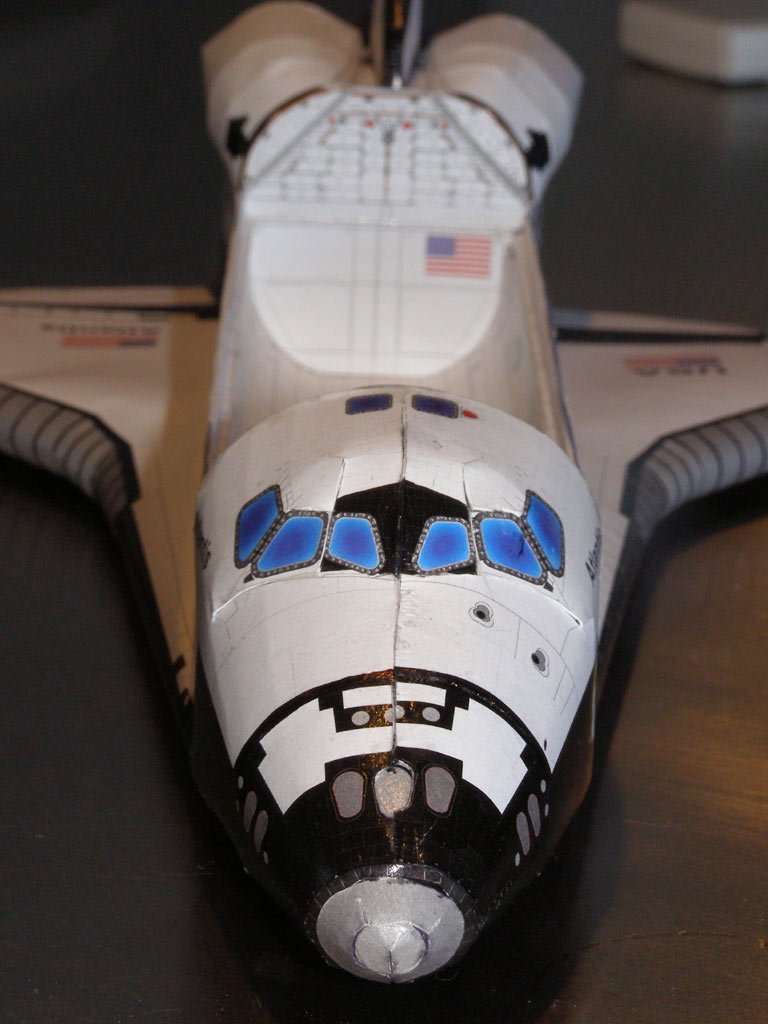 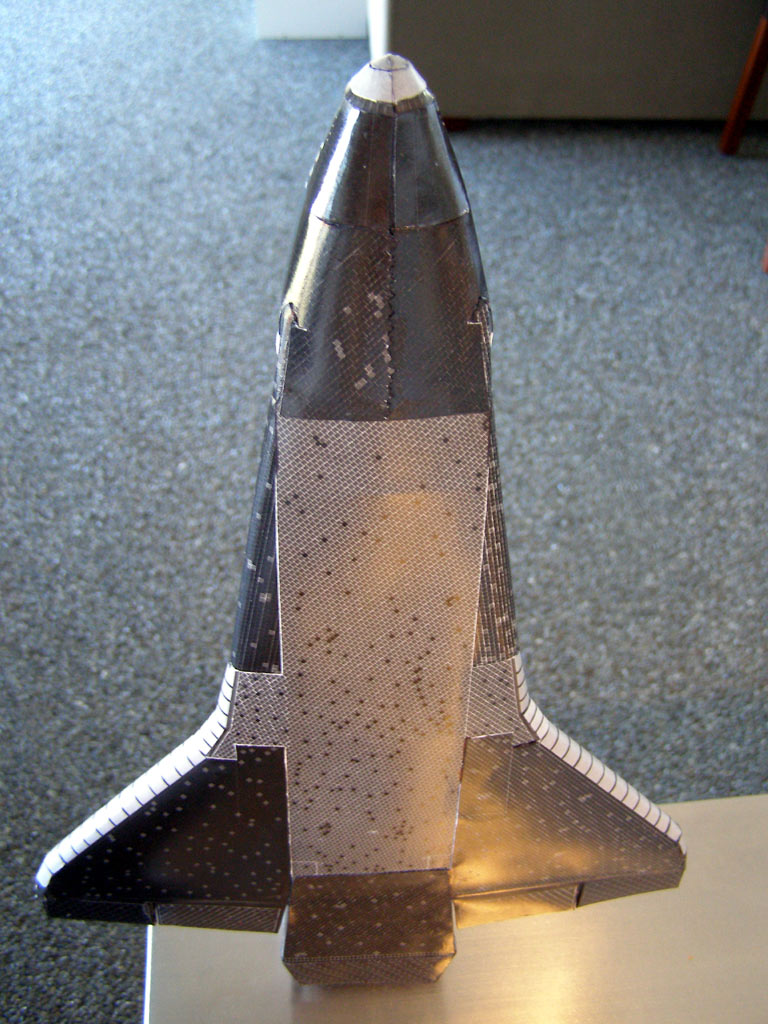 As with all my models - this one comes with several modifications. They're all internal so you can't see them, but I've built it to survive a fall from the ceiling with minimal damage. This thing is tough. I tripled the amount of wing spars, and these are made from very heavy duty laminated sections. The cargo bay is insanely stuff and internally, looks like an engineer puked into it! The nose has about 40 gluing process done on it, each one using reinforcing, and should take a direct hit to the nose without breaking or denting. Still, when the damage comes, Murphy will dictate it's to the only sensitive areas of the craft! :P If you're wondering what my floor is made of, it's all beach pebbles. It's called Stone Carpet. It rocks. Pun intended. My signature seem particularly apt for this posting. 
__________________
How many escape pods are there? NONE, SIR! You counted them? TWICE, SIR!
|
|
#185
09-03-2009, 01:33 AM
|
||||
|
||||
|
PROTIP: Do NOT Attempt Model making with 3 double bourbons under your belt.
This has been a public service announcement brought to you by Craptain Obvious
__________________
How many escape pods are there? NONE, SIR! You counted them? TWICE, SIR! Last edited by Mobius; 09-03-2009 at 02:06 AM. Reason: Drunk!!11!!one!
|
| Google Adsense |
|
#187
09-04-2009, 12:30 AM
|
||||
|
||||
|
Mars Center Shuttle Build.
Sober now. No real damage done. Phew.
Mohammed, if you are going to build Fortezza's shuttle, may I offer you some tips? You will be an absolute genius if you can get the nose part to stay together with just the parts supplied. To properly form the windshield area requires many extra small paper parts glued inside it. Take your time here! Use a black permanent felt tipped pen to blacken the edges of all parts which are black at the edge. This will help the quality where two sheets lie atop each other, both black, but with a white edge. Looks ugly IMO. This applies to all paper models though. I use a very cheap set of coloured felt tip pens to colour the edges of parts where I feel it will improve the realism. Yes, the colours are water-colours, so applying glue to the edges result sin a small amount of colour "bleeding". You don't get ANY leeway in positioning such parts, once wet - so get it right first time. You can see the effect clearly on the photos of my MBS. If you can use permanent ink, the result is superior. The cargo bay is a pain to get right. Mine isn't, really, but it will do. I hope you have two metal rulers to assist with some of the very-long-and-very-close-together-inside-outside folds which are critical to creating the interior ledges within the cargo bay. The OMS pods are VERY hard to construct, and the design is not properly perfect. If assembled in the way instructed, there is a nasty "lip" on the exterior part of the OMS where the small 11KG thrusters are mounted, where it transitions into this part. You can see the "kink" in my model. Also, constructing the OMS pods; make sure that the base remains perfectly square and flat. I reinforced with card. However, it is possible to build the rear end of the shuttle in a way which bends the spots where the OMS pods are glued. So, it's a great idea to glue internal reinforcing to the interior of the OMS pod mount points. This area is pretty important too, as the back end slides into/onto the cargo bay/wing part. The way I got mine to align correctly was this: 1) Glue rear engine assembly to cargo bay. 2) Glue wing surfaces - all parts, except the back of the wing area and the extreme outer and rearward parts. Do this BEFORE attaching to the cargo bay/wing spars. There *IS* enough room to insert the spars into the pre-formed wing. (Only the rearward wing spar is glued to the wing surface in my model.) 3) Glue wing surface part to the BACK of the shuttle, aligning it correctly with the engine assembly. There is "slop" at the front, but not at the back. Get it straight with the front, but align it to the rear. 4) Glue the wing surfaces in place. 5) For the nose part - do not glue the BOTTOM seam until you are 100% sure that once glued, it will fit on the front of the cargo bay! If it is too tight, you can grind/sand a small amount from the bottom part of the forward lower wing spar so it will fit. 6) Glue the completed nose to the cargo bay area, aligning the front part of the wings inside the slots provided at the back of the nose part. Tricky! 7) Glue on the tail, and rocket engines. I did not bother with all the gimballing rubbish. Such a model will deteriorate rapidly, and badly. 8) Complete the ailerons for the backs of the wings, and glue the remaining parts to the shuttle. The cargo bay doors I have not completed yet, and these are possibly the trickiest modelling job I have ever attempted. The reinforcing parts created by Fortezza are OK for the job though, but you will REALLY have to take your time here. The hand holds on the inner hinge of the doors just about made my brain melt down! I believe the model does not contain enough reinforcing (But you know I am a nut in this regard) and so I tripled up each wing spar (at least!) laminating them, as well as gluing a LOT of cardboard inside the wing area and below the cargo bay. Specifically, shaped parts to fill in the gaps between the wing spars, thus keeping their shape regardless of what you do to it! Do NOT attempt to glue the wing surfaces to the spars. They are there to form the shape, not to secure the wing surface! The tension required to glue the top surfaces down to their gluing tabs is sufficient to pull the wings into their correct shape. For the wing surface gluing tabs (upper wing surface) you will find it a great advantage if you glue matches UNDER these tabs, to ensure there is a solid gluing surface to glue down onto. This was the most tricky thing to do: get the wing upper surface right. Be aware the the front-most gluing tab for the wing top surface should not be entirely flat, but at a slight angle, where the wing blends into the body at the front of the cargo bay part. Do NOT just blindly go and glue one wing surface without first checking there is enough clearance to ensure the other side surface will glue down correctly. There is VERY little tolerance here. Raimondo assumed gargantuan modelling skills in this area, and failure to properly attend to the details here will undo all your hard work on the model. One side of mine is good, while the other is distinctly average! It requires a SINGLE gluing and pressuring operation per side. Be prepared to sit there for a few minutes holding your gluing stick (You will need something like your ruler to apply continuous pressure along the entire length of the cargo bay!) while the glue grabs strongly. A second bite of the apple will leave it bruised and battered! While gluing down - Do NOT apply pressure to the wing surfaces except where they are supported by the reinforced gluing tabs! I can't begin to imagine how one might glue the surfaces down without my match-sticks modification! Many swear words may have been directed at Raimondo as a result of this slight (but serious) design/instruction flaw. In fact, this area is so critical and so tricky, it's almost worth building the entire center part first while completely ignoring the other parts, in order to ensure that your model has good wings. Start with the wings and cargo bay exterior, get them right, then attach the other very time-consuming parts. The correct shape of the wings' leading edges is achieved through correct gluing of the leading edge parts, and the rear corners of the wings, so spend plenty of time aligning these parts before applying pressure to secure them. I did not go with the "twin rudder" design as it will be untidy and almost impossible to get right. So I just glued both parts together to give it is nice on-orbit look. Nor will I attempt closing cargo bay doors. This I think, is a bridge too far, and it is HIGHLY unlikely you will be able to make doors which look good both open and closed. If you can, you're a card-carrying paper-guru, and I want your autograph! That's about all the advice I can give you. Good modelling!
__________________
How many escape pods are there? NONE, SIR! You counted them? TWICE, SIR!
|
|
#190
09-08-2009, 02:30 PM
|
|||
|
|||
|
excellent work Mobius
John John
|
| Google Adsense |
 |
| Thread Tools | |
| Display Modes | |
|
|


 Linear Mode

