


|
|
|
#611
 06-16-2011, 12:55 PM
|
||||
|
||||
|
Hi,
After ISS I will continue with the rest of the STS missions until completion, I'll do the Pegasus barge, MIR, the commercial rockets, and of course the 1:100 Space Shuttle model, among other stuff. 
|
|
#613
06-16-2011, 02:08 PM
|
||||
|
||||
|
Alfonso, good to see the new items. Nice work. I do have a question though, in the Pirs/Poisk manual on pages 24 and 25 there is a docking target that is to be added to Zarya, I can't find this anywhere in the files I have. Has this docking target been released yet, if it has can you let me know which file it's in.
NYC Irishman, good to see your model is going to a good home, nice to see that other people will enjoy your build. Dyna-Soar, excellent photo. Now on to my build, moving along nicely with the russian section. Zarya finished, only got the debris panels to put on Zvezda, Poisk finished and only need to put the engine nozzles on to the ATV. Next to build, Soyuz and progress. At the moment I won't be building Pirs, because I want to include MLM in my final model. I think Pirs is taking up the port that MLM will be docked to, so I won't need to build Pirs. Ok, now a photo.
|
|
#614
06-16-2011, 02:11 PM
|
||||
|
||||
|
I can't answer that at this time. Perhaps, if I feel the "pressure" from all of you guys. ;-)
|
|
#615
06-16-2011, 02:13 PM
|
|||
|
|||
|
Quote:
|
|
#616
06-16-2011, 02:16 PM
|
||||
|
||||
|
Hi Paul,
The Zarya docking target you'll find it on the Zarya page itself. You are right regarding PIRS. This module will be discarded by the end of next year and the new Russian module MLM will take its place. Very soon I'll add the strela arms for PIRS, but only one of the arms will be moved to POISK. This information comes from the EVA documentation for Expedition 28. Alfonso
|
|
#617
06-16-2011, 02:27 PM
|
||||
|
||||
|
S3 Truss WIP
Wow!
Alfonso's latest work fills me with the desire to work even harder on my model. Fortunately I have this coming week off to get some serious modelling hours in! Paul your Russian section looks outstanding. I think I will have to rebuild mine! Irish: I love the crispness of your 1:35 model - looks FAB! This post is to show you my WIP shots for the S3 truss. When I originally looked at the instructions for this section, I knew immediately I would have to reinforce the thing quite heavily to support what will be a heavier solar panel section than Alfonso's design. To this end I got some more square-section brass tubing which I installed inside the struts. (Here I actually made a mistake to do with mounting S3: I should have extended the brass tubing from the top and bottom beams, to act as locators and glue anchors which slide into the prepared holes in S1. Ah well, I'll do it for P3 instead to make that side easier to mount.) 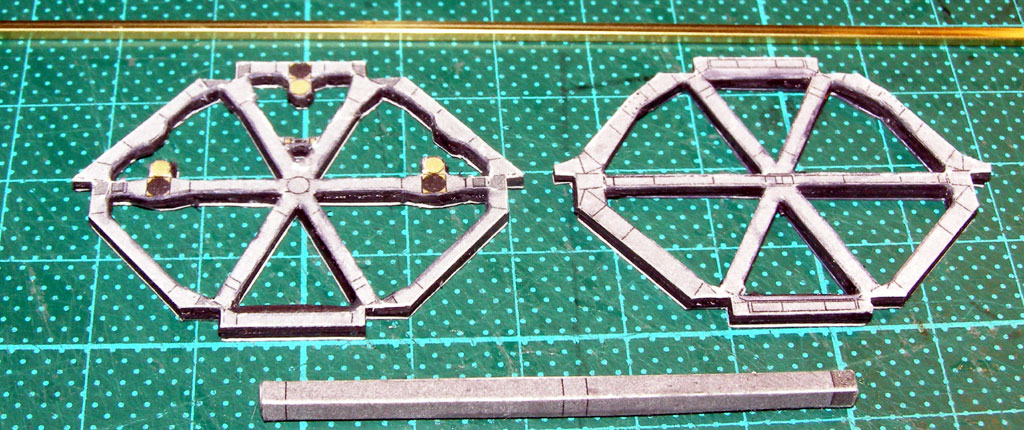 I additionally knew that I would never be able to assemble the "box" without these rods/struts being pretty strong, and I knew that the box would require a lot of "massaging" to get it straight and square and keep it straight and square. The walls are my usual 2-layers of photograph mounting card, and are the same thickness as the walls in the other truss sections. I needed them to be the same thickness to give the glue enough surface area to bond to. Then there was my concern about how to glue it straight to begin with. So I used a simple clamp to hold the first wall in place. 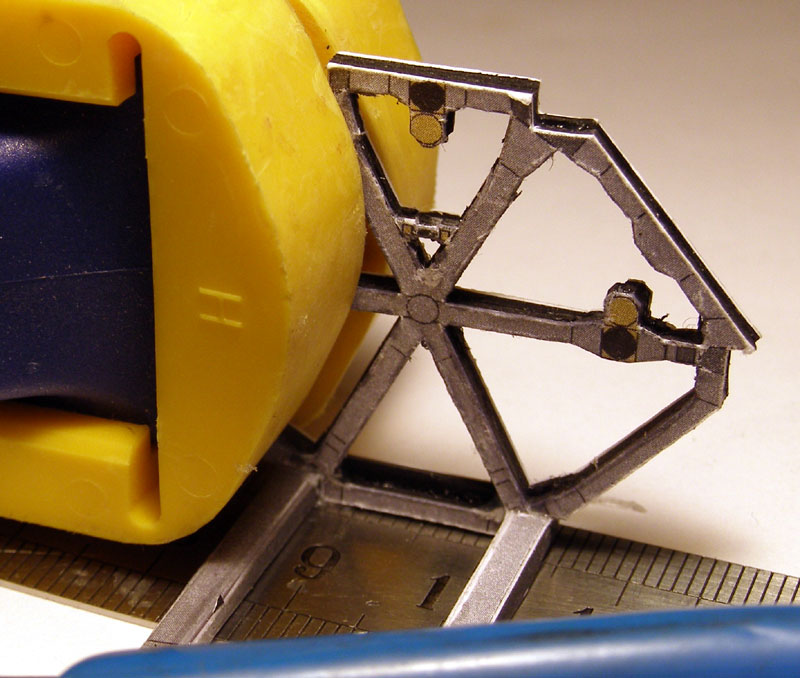 Following on from that, but only when the glue completely dried, I secure the second wall and get it as close to straight as I can... 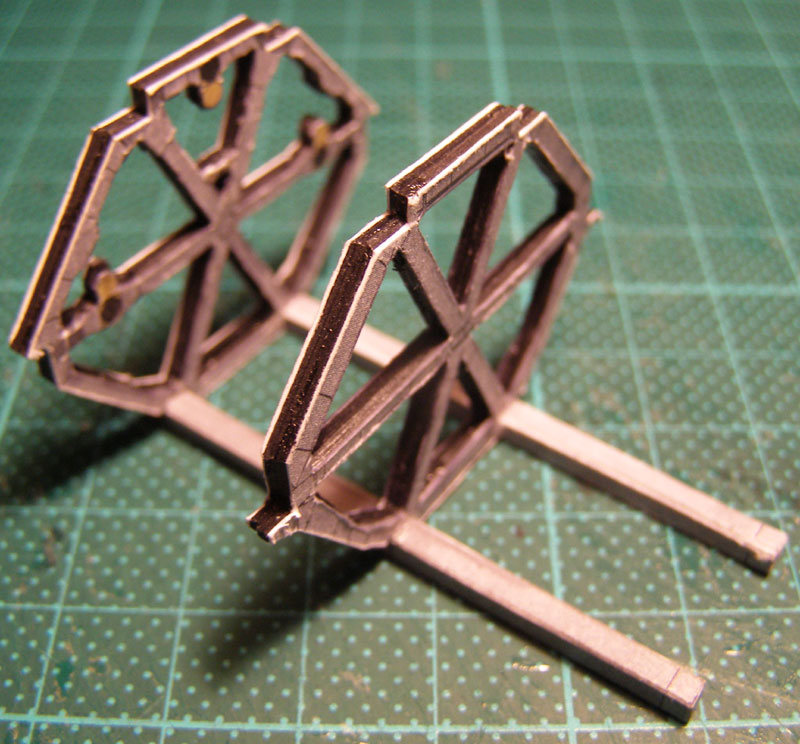 Finally, I glued the end-plate (SARJ) and just used my vernier callipers to hold the thing straight. 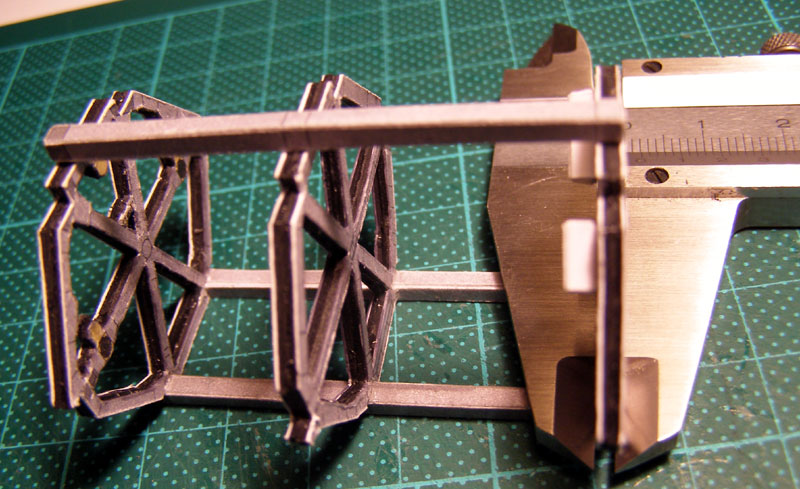 Half an hour later I can glue the remaining beams, but only after very VERY carefully cutting away some card on the parts to allow the beams to fit. I cheated a bit and put a tiny bend in one of them to avoid trimming away too much of the middle wall.  The next step is to continue with the external beams - but I will not use Alfonso's "wrap-around" design, which stems from his 1:144 scale model, and allowed him to scale up to 1:100 easily. I have glued the wrap around onto 2 layers of card with a grey back, and will cut out each section individually and glue to the box. This will make S3 look more like the true box-structure it is, and hopefully add yet more strength to it. (The box is quite stable without anything additional glued to it, but not sufficient to prevent it deflecting when mounted on the model. I hope i can achieve this relatively easily, but it will take a lot longer than the original design. More photos soon - and I promise - the movie, as soon as I have fixed Kibo's sag. Have fun everyone!
__________________
How many escape pods are there? NONE, SIR! You counted them? TWICE, SIR!
|
|
#618
06-16-2011, 02:38 PM
|
||||
|
||||
|
Paul,
Is that photo from the 1:144 or 1:100 Russian section? If it's the 1:144, then that's a great build. I will be pleased to know because I have not built my 1:144 version yet. All my photos are from my 1:100 ISS model. Mobius (Chris), your engineering talent is well seen on those pics. Nice job. Alfonso
|
|
#619
06-16-2011, 02:42 PM
|
||||
|
||||
|
Paul,
I think your model is the 1:100 version. Right?
|
|
#620
06-16-2011, 02:47 PM
|
||||
|
||||
|
Thanks Alfonso, found it.
Mobius, great work. It's going to be nice and strong. I find it amazing that you have done all these mods on the 1/100 version, watching you build amd modify, I thought you had scaled up. Really nice work. Edit: 1/144 version. I built it this scale to compare to the Revell plastic model., Yours is better.
|
 |
|
|


 Linear Mode

