


|
|
|
#2251
 09-16-2020, 03:31 AM
|
||||
|
||||
|
If it's a choice between 'not having that detail' or 'having the detail deformed/bloated due to manufacturing/skill limits', the latter would be an acceptable 'artistic expression'. Detailing at the lower size limit of a model will often be deformed for this reason. For the Revell kit, the lamps and rails are likely at the lower limit of what injection moulding can achieve, and were never intended to represent the actual diameter of the poles and handrails. The other option would be to not have them - we can agree that the model will look even worse.
Now, if one starts using accessories or scratchbuild, that lower limit is reduced. PE fixes many things that injection moulding does wrong. But in the same vein, PE railings on 1/700 subjects are never as thin as they actually should be, for exactly the same reason. It's an artistic expression again. I like the way you use a variety of materials and techniques to push detailing far beyond any kit has to offer. I am always learning something new when I step into this thread.
__________________
"The world is big" On hold: Fuyuzuki, Zao, Zara, Akizuki, Past works: XP55 Ascender, CA Ibuki, Seafang F32, IS-3, Spitfire V, J-20 
|
|
#2252
09-16-2020, 04:51 PM
|
||||
|
||||
|
I'm not sure if you've read and understood the beginning of my thread correctly.
 I had to try to take into account the crazy scale mix of the old Revell Kit,  which is why I build the MLP and the Crawler as well as the Diorama on a scale of 1:160 as a compromise. And for this scale I scale and scratch all my additional details based on very good reference photos in order to come as close as possible to the original. which is why I build the MLP and the Crawler as well as the Diorama on a scale of 1:160 as a compromise. And for this scale I scale and scratch all my additional details based on very good reference photos in order to come as close as possible to the original. That's all.  
__________________
Greetings from Germany Manfred Under construction: Launch Pad 39A with Challenger STS-6 (1:144)
|
|
#2253
09-16-2020, 04:52 PM
|
||||
|
||||
|
Hello friends,
and now it goes from the 2D view into the 3rd dimension, for which I've placed the FSS and RSS of my deceased Raumcon friend Thomas Emberger (golgi63) onto the diorama floor plan, which I took over as his modeling legacy after his death in order to keep an honorable memory of him on my diorama. May he rest in peace ...  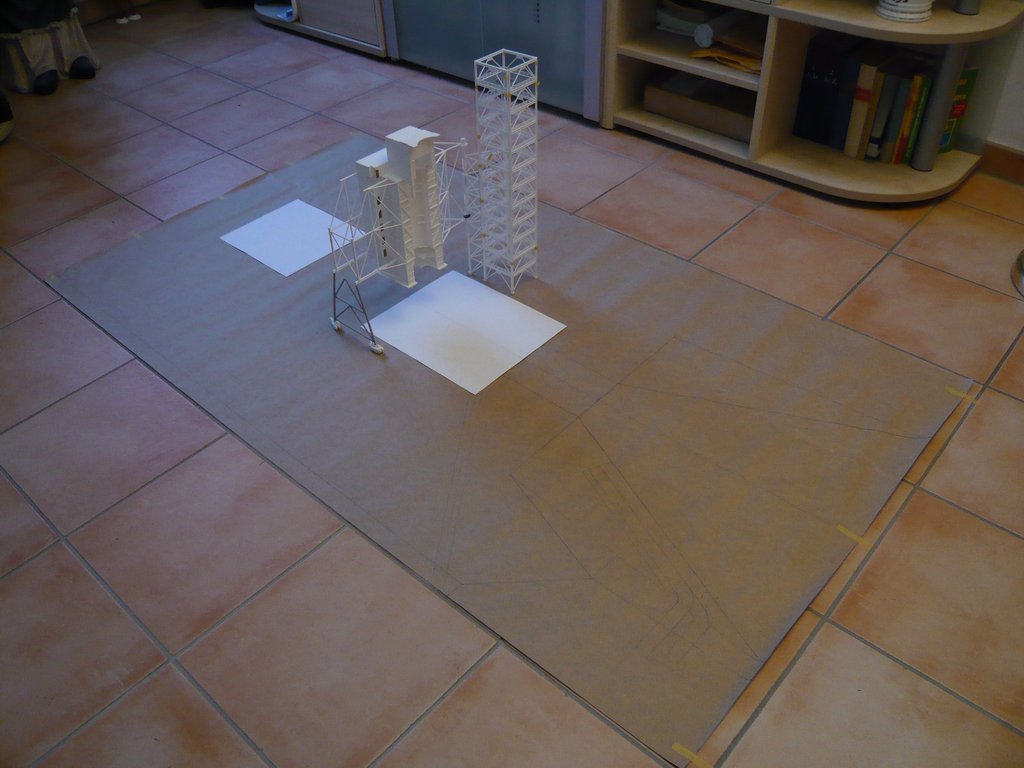  Then I also added my MLP, which rounds out the picture further. 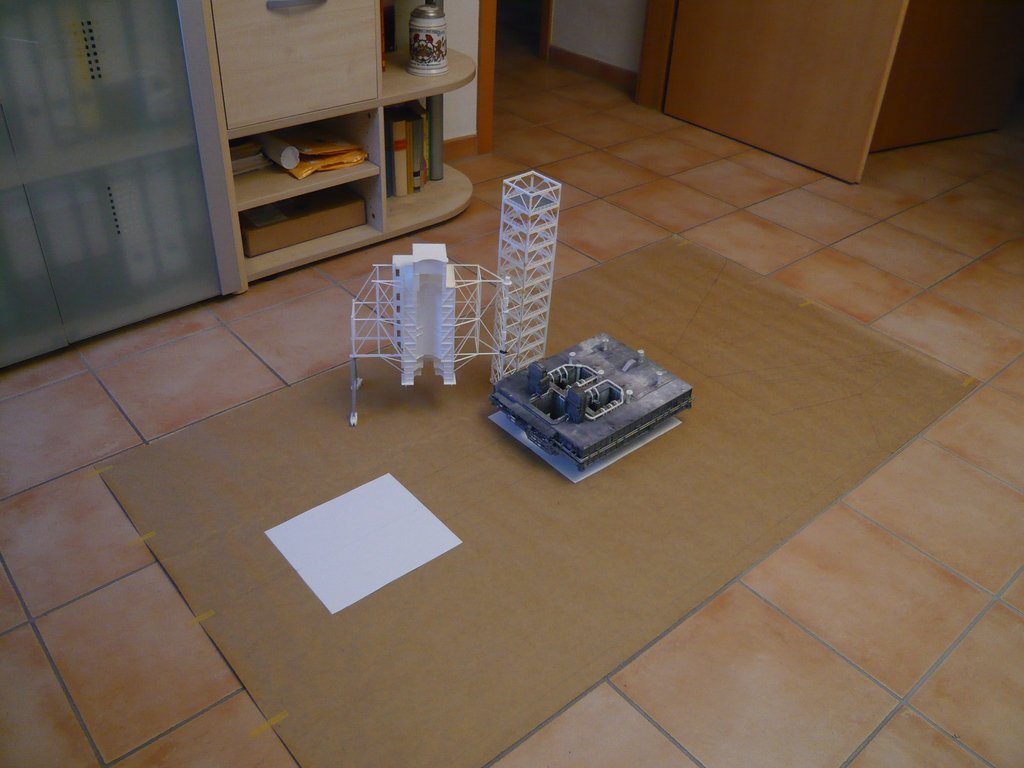 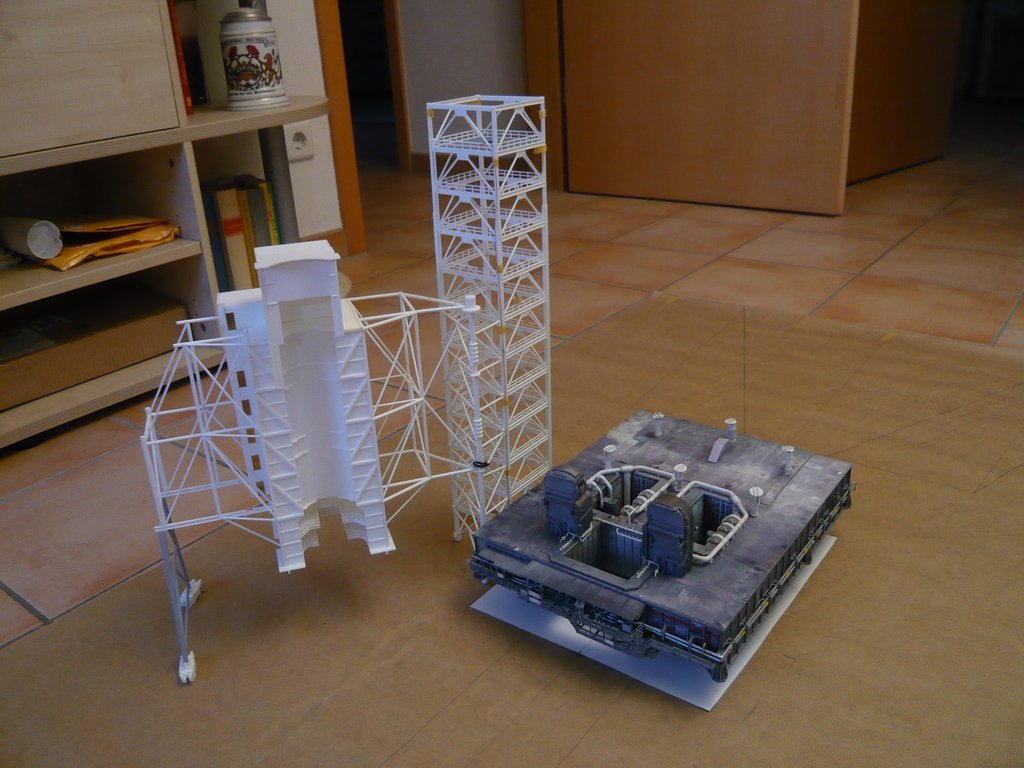 But as a precaution I quickly put the MLP away and parked it in the closet.  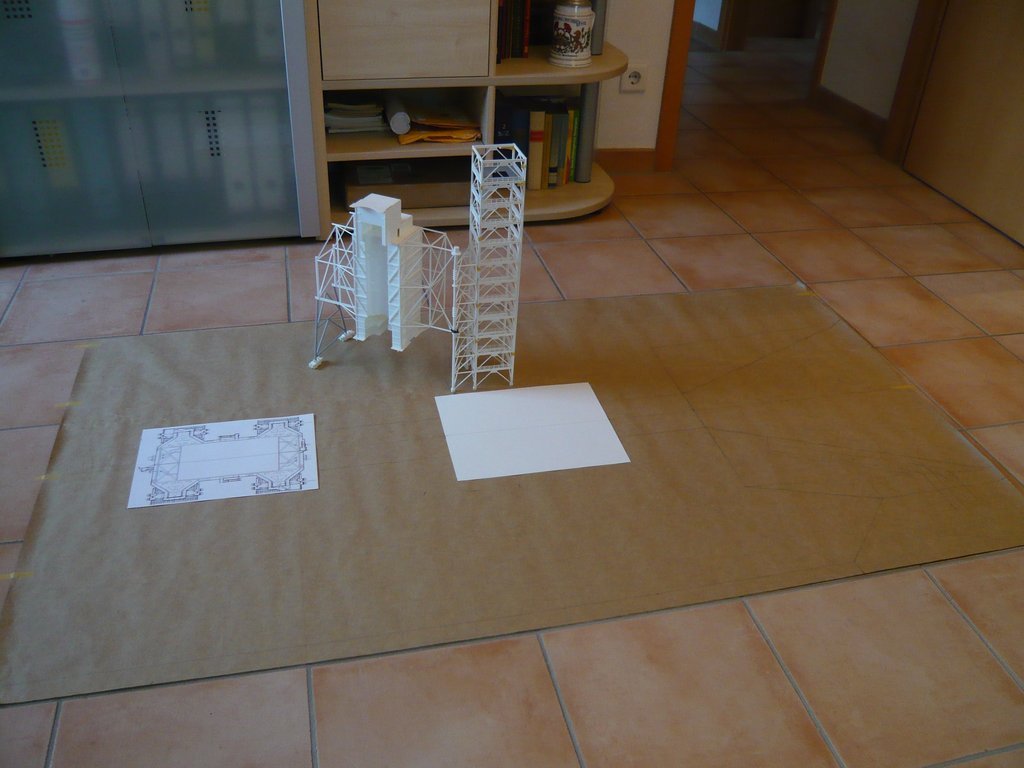 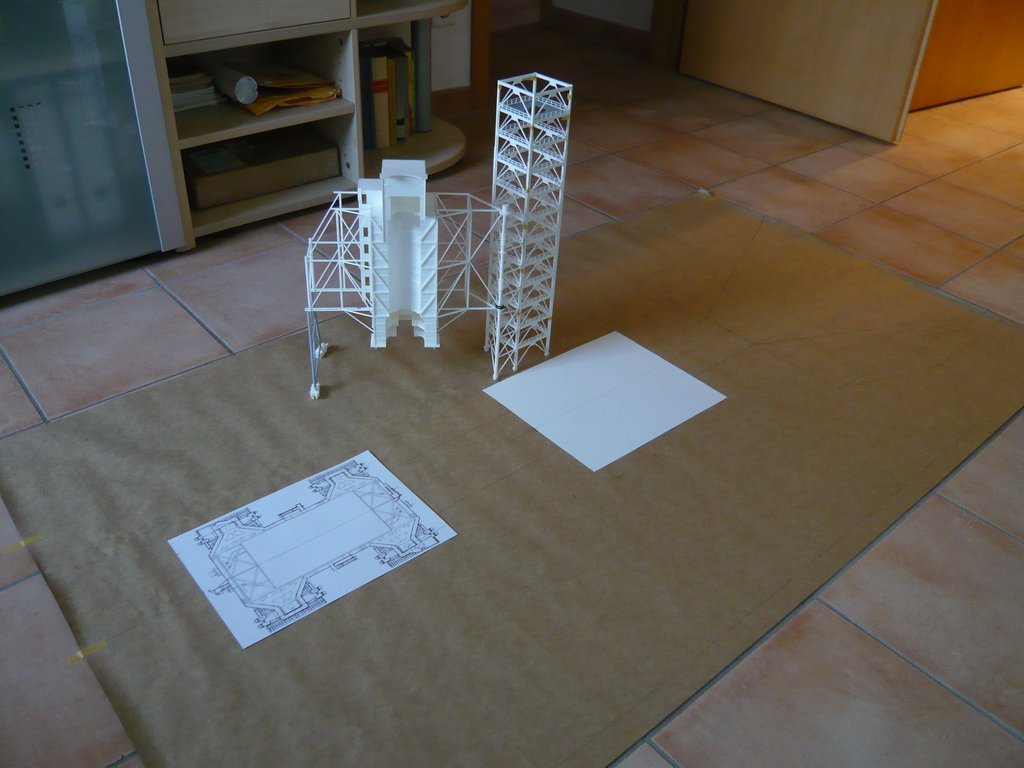 And with that back to the wiring on the Dio plate, which I imagined as follows. The planned interface for the possible decoupling of the MLP has been modified and is now laying on the Pad ground besides Pedestal 6 and takes place via a small Connector (Plug with socket). The LED Lamp circles on the FSS and RSS will all be laid downwards on the back of the FSS, especially because there are already lots of pipes etc. there, so that the LED wire bundles will be hardly noticeable.  Fortunately, there are also two cable ducts at this point, which I will use of course, 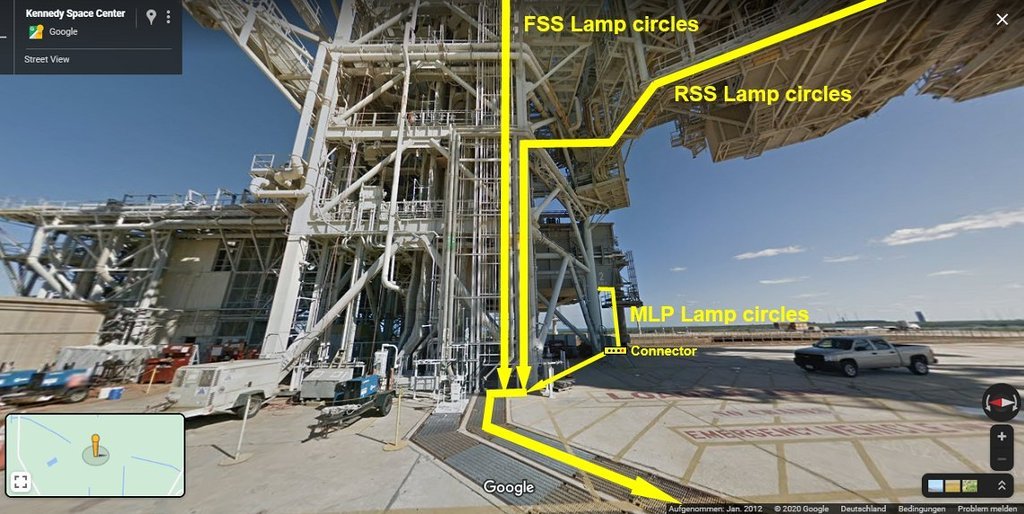 in order to lead the LED wires to this small building, which was built there that time thanks to the wise foresight of NASA!  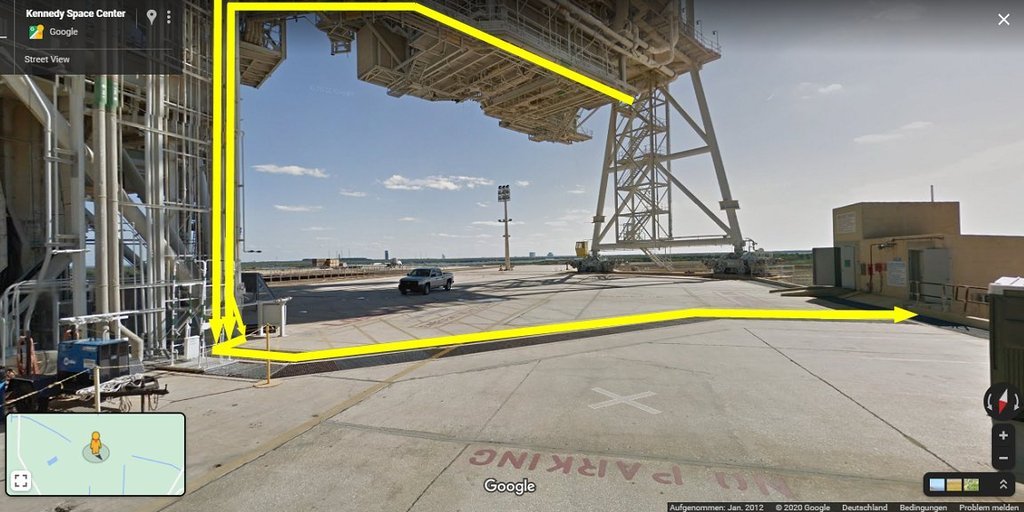 This concrete structure with blast doors, housed the freight elevator (on the left) and the door to the stairwell (on the right) which took you down to the Pad Terminal Connection Room (PTCR) at ground level, with further access from there to the roadways and parking areas scattered around the pad, as James MacLaren explained to me yesterday.  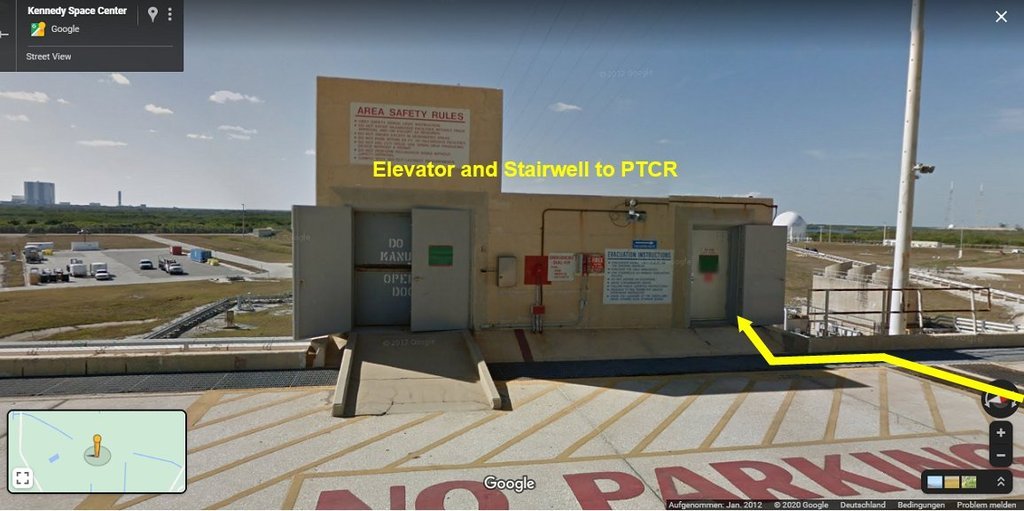 And in this building at the back of the diorama, the already shown Connection plate can be conveniently accommodated, which is why I've measured out and scaled it right away, 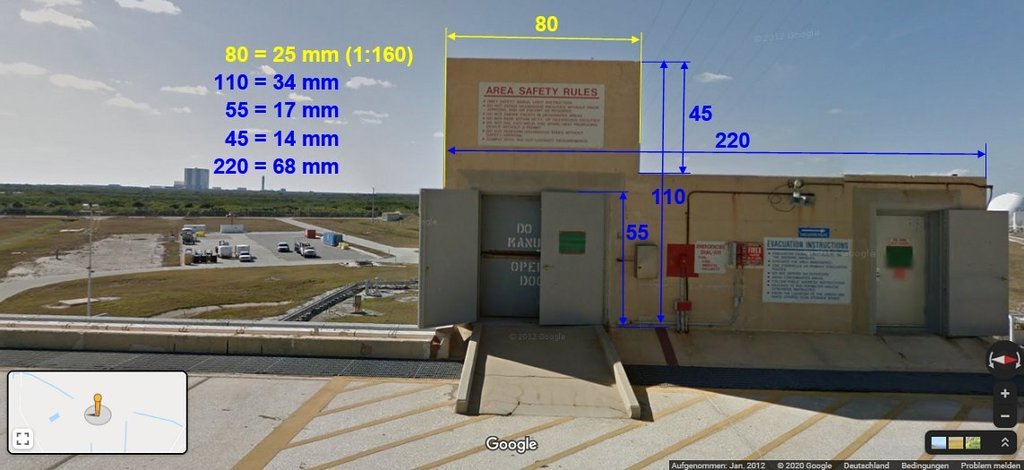 from which all cables are then be led to the Current bank, which also has a plug connection.  As far as the wiring of the MLP is concerned, the three lamp circles as well as an additional circle for Caution lights are still easily manageable. And for the Crawler Transporter it will certainly be similar, although I still have to do the exact lamp analysis. That should become difficult again, however, since there are only a few images of the MLP-2 Crawler, used during STS-6, let alone still with lighting. But more on that soon.
__________________
Greetings from Germany Manfred Under construction: Launch Pad 39A with Challenger STS-6 (1:144)
|
|
#2254
09-16-2020, 05:38 PM
|
||||
|
||||
|
682 Euro!
 You sure that's not Yen? You sure that's not Yen? 
|
|
#2255
09-17-2020, 03:17 AM
|
||||
|
||||
|
__________________
Greetings from Germany Manfred Under construction: Launch Pad 39A with Challenger STS-6 (1:144)
|
|
#2257
09-17-2020, 12:37 PM
|
||||
|
||||
|
Thanks my friend for looking in on me again.
The journey is going on, and therefore stay tuned and have fun. 
__________________
Greetings from Germany Manfred Under construction: Launch Pad 39A with Challenger STS-6 (1:144) Last edited by spacerunner; 10-12-2020 at 03:48 PM.
|
|
#2258
09-23-2020, 11:04 AM
|
|||
|
|||
|
Que gran modelo amigo, felicitaciones: estoy muy pendiente de tus avances.
Translation provided by Google Translate and rickstef What a great model friend, congratulations: I am very aware of your progress. Last edited by rickstef; 09-23-2020 at 11:41 AM.
|
|
#2259
09-28-2020, 01:56 AM
|
||||
|
||||
|
Thanks for watching, hectoli,
and keep looking in.
__________________
Greetings from Germany Manfred Under construction: Launch Pad 39A with Challenger STS-6 (1:144)
|
|
#2260
09-29-2020, 07:33 AM
|
||||
|
||||
|
Hello everybody,
during my search for suitable ways to wire the LED lamps, I've already looked extensively around some nasatech.net Street View panoramas of the Launch Pad 39A. And since I was there once, I has been going on with further structuring my diorama floor plan, which goes beyond the immediate launch pad area. The entire Launch Complex 39A (LC 39A) has an octagonal configuration and covers around 160 hectares of land. 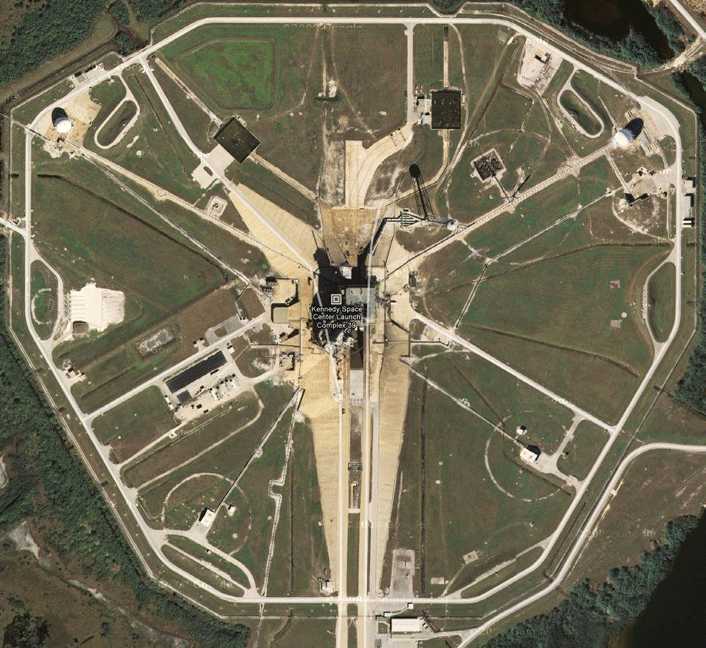 Source: NASA Due to the associated facet-like arrangement of the huge concrete retaining walls (18°) rising at an angle to the launch pad, which can be seen in this photo,  Source: NASA extensive measurements of the contours and distances including the conversion of the dimensions to 1:160 were necessary, which was quite laborious and time-consuming.  For such measurements, however, one needs the most exact reference dimensions possible, which can be used as a basis, for which even the scales in Google Maps are only partially suitable, as I have found. Therefore as a reference dimension I have chosen the width of the Flame Trench given in NASA Facts Online of 58 ft = 17,68 m ≙ 111 mm (1:160) and have drawn the contours calculated with it in my Dio floor plan. 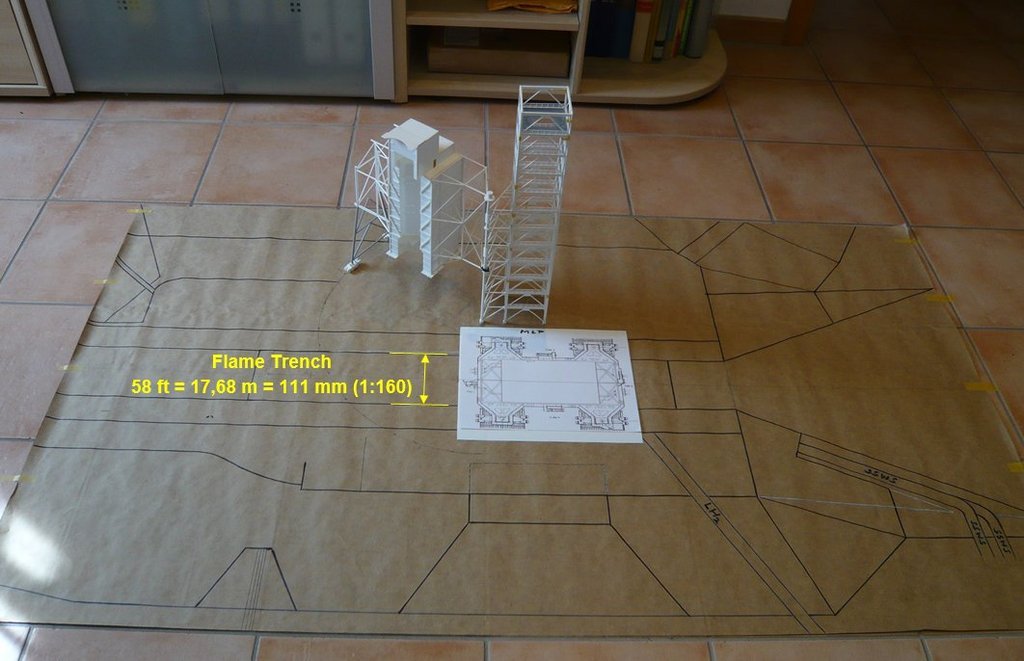 In this image one can see how close the MLP on the Crawler is standing next to the tower. 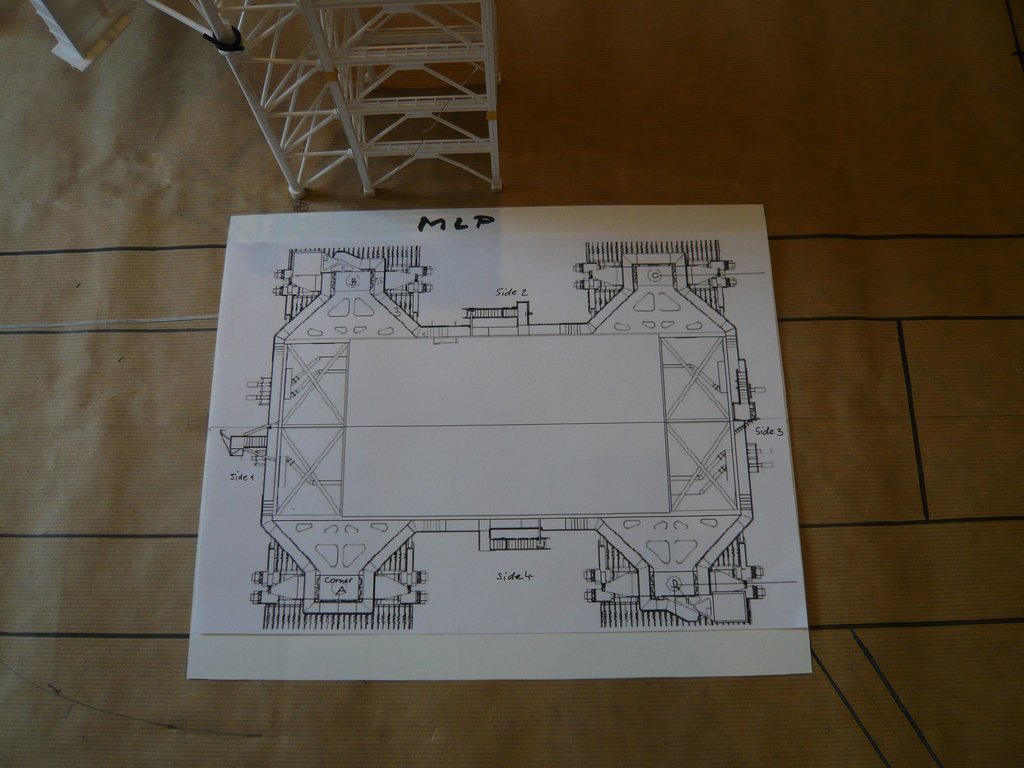 Then I've started to deal with the SSWS inlet pipes in the back corner of the diorama (red frame), 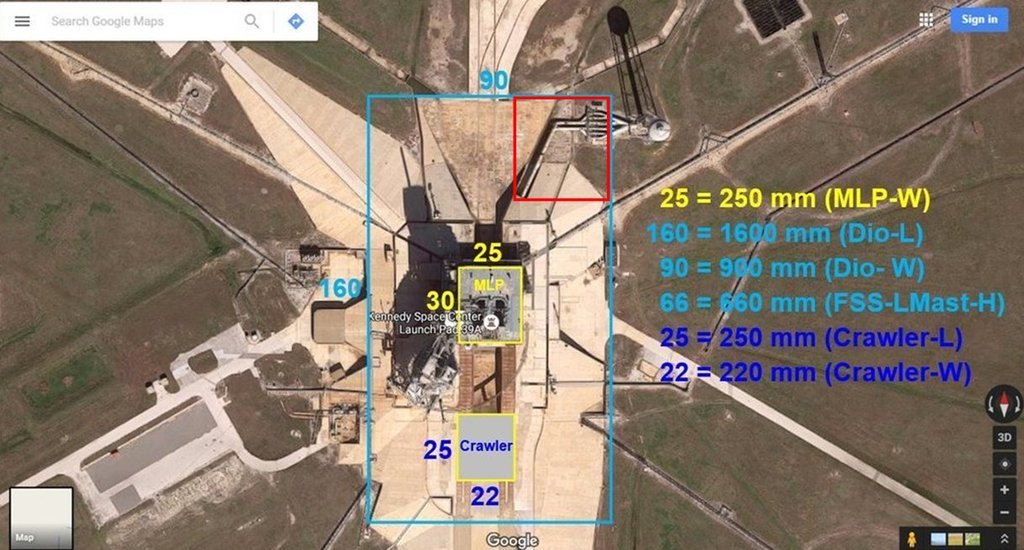 which are connected with an elevated water tank standing on a tower, which has a capacity of 300.000 gallons (1.135.620 liters) and a height of 290 ft = 88 m ≙ 550 mm (1:160). 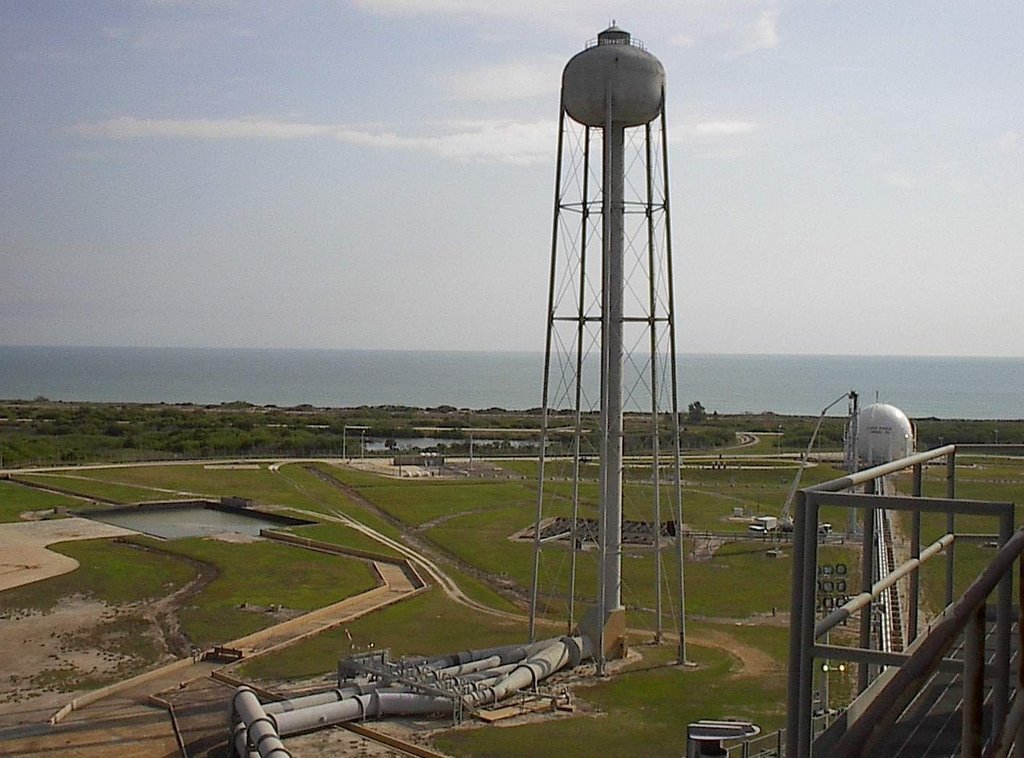 Source: capcomespace.net Then I've tried to print out a copy of this place with the bizarre pipe system that was as true to scale as possible in order to stick it onto the Dio floor plan, which is problematic without precise knowledge of the pipe diameters. 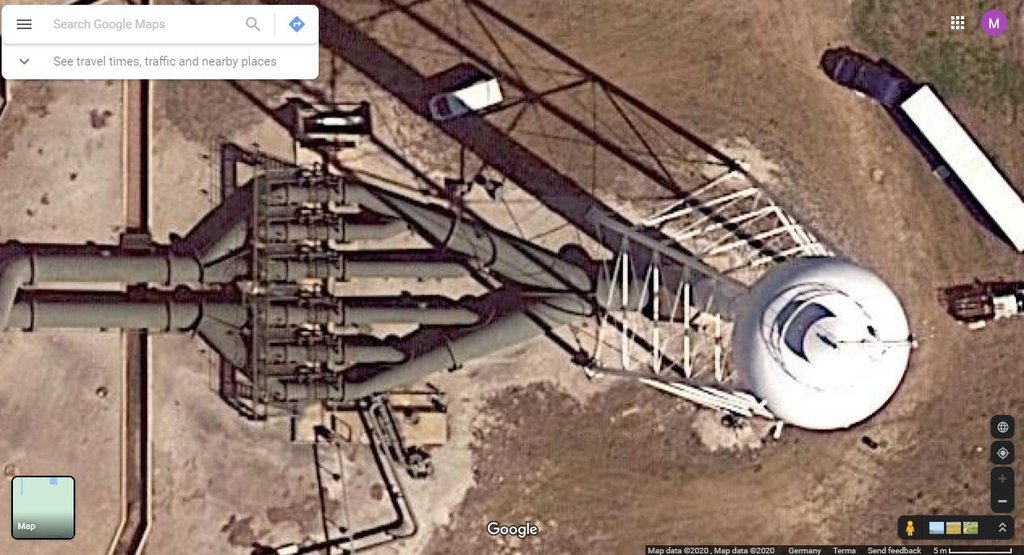 However, the copy ends right in front of the tower, which was clear to me from the start when planning, but now it didn't want to like to me regarding the perception because it would certainly look somehow strange.  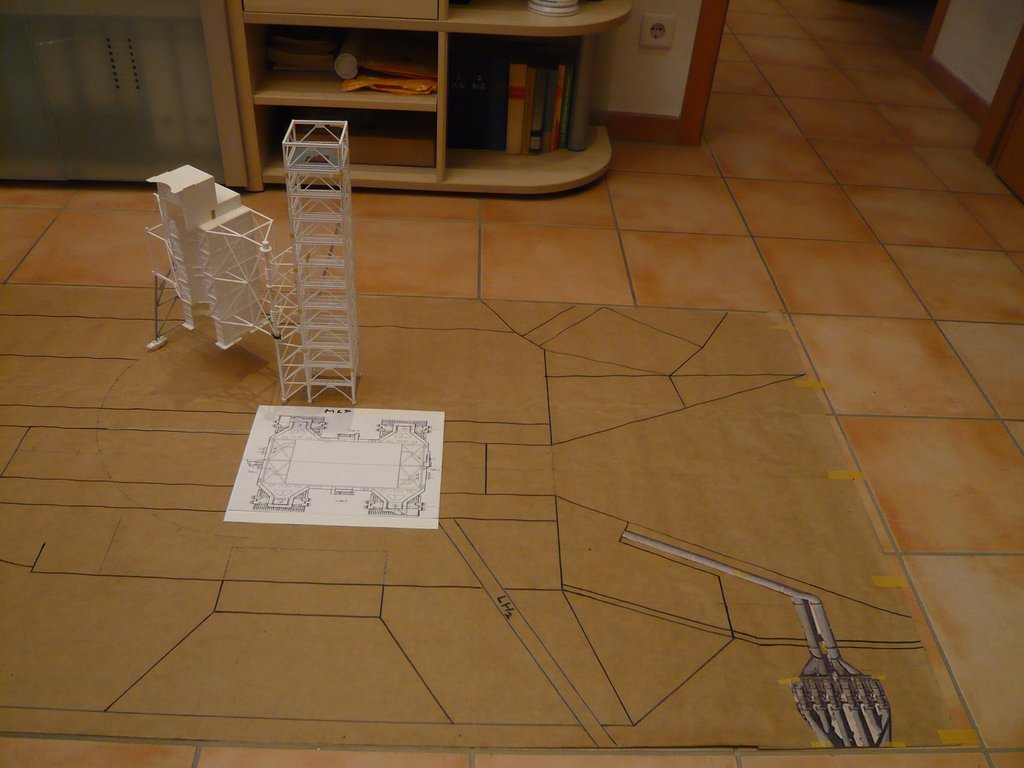 But since the water tower is a striking detail next to the launch pad and should therefore not be missing on the diorama, I've decided to add a small extension at this point of the Dio, on which the water tower also has space, which certainly rounds off the overall picture, which Gino does not seem to be very impressed with.  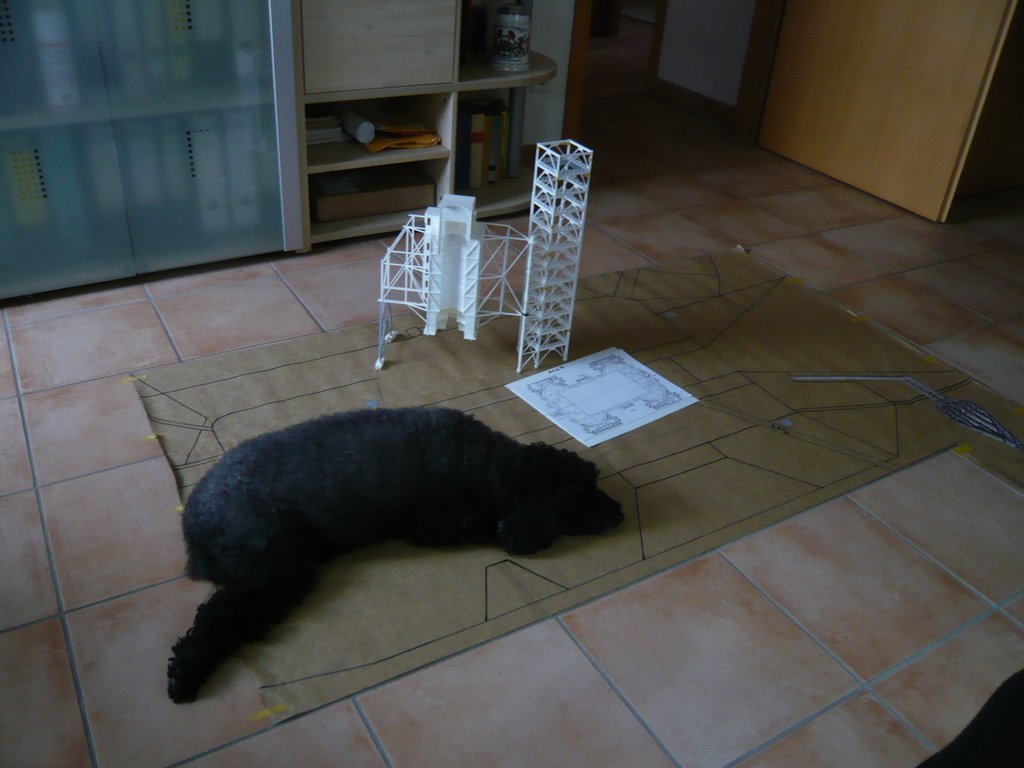 Before determining the dimensions of the water tank I have to get an exact reference dimension, because I only know the height of the tower (290 ft ≙ 550 mm (1: 160), and that the water flows through pipes with a diameter of 2,1 m to the pad.   Source: NASA And to determine the tank diameter or other diameters from a height is unfortunately too error-prone, as I have already found elsewhere. So I have to do some more research to be sure.
__________________
Greetings from Germany Manfred Under construction: Launch Pad 39A with Challenger STS-6 (1:144)
|
 |
| Thread Tools | |
| Display Modes | |
|
|


 Linear Mode

