


|
|
|
#2261
 09-30-2020, 11:22 AM
|
||||
|
||||
|
Let's get on with it!
 As it is said in a Bible verse, "He who seeks finds".  And so I've actually made a find in my extensive SSWS collection. It doesn't always have to be brilliant HiRes. reference photos, but rather as in this case the following schematic representation of this branched pipe system at the foot of the water tower, from which the different pipe diameters are to be seen,  of which the diameter 114" = 2,9 m ≙ Ø 18 mm (1:160) can be used as a reference dimension for drawing of the water tank, which I've also done then. of which the diameter 114" = 2,9 m ≙ Ø 18 mm (1:160) can be used as a reference dimension for drawing of the water tank, which I've also done then.  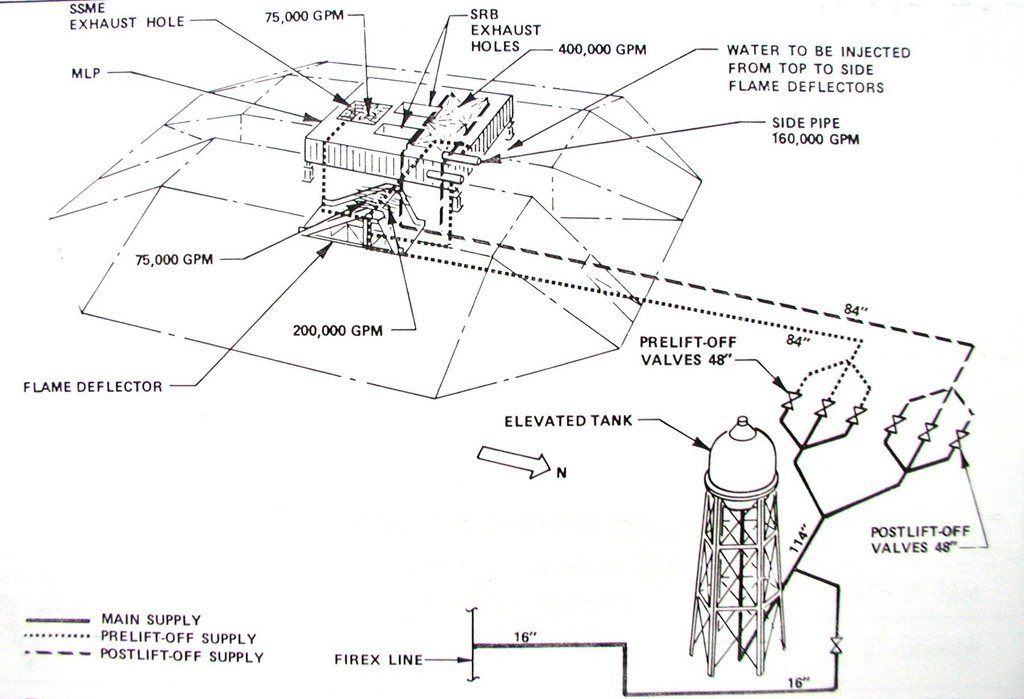 Source: capcomespace.net In addition, the clear display shows which SSWS systems in the Flame Trench and the MLP are served with water by the two 84'' pipes. These are the said pipes with a diameter 2,1 m ≙ Ø 13 mm (1:160), which one can see very nicely in this Street View panorama, as well as the changing diameter of the pipes following to the tower. 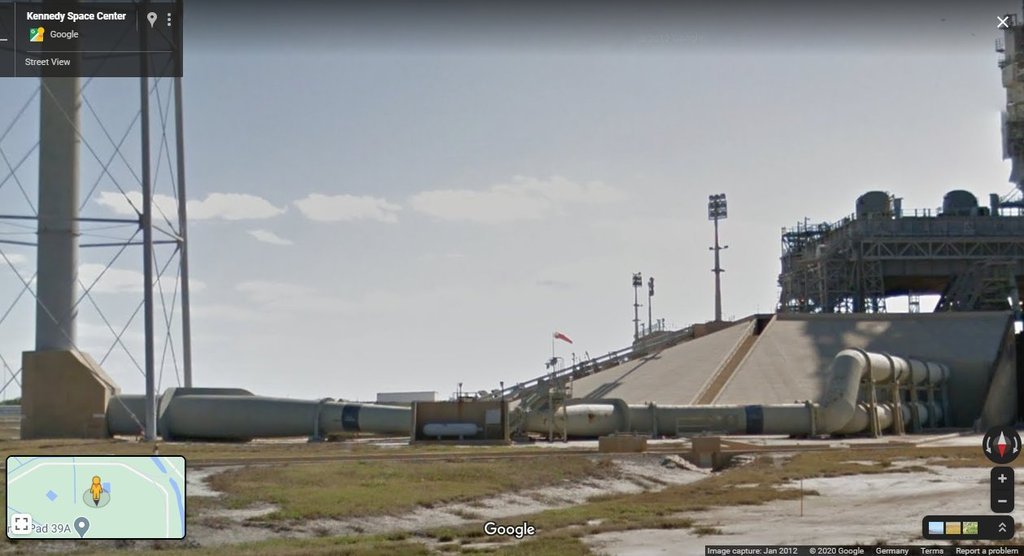 Source: google.com/maps And with this diameter (114'' ≙ Ø 18 mm (1:160) as a reference dimension, I was able to determine the different diameters of the water tank (blue) that I need for scratching.  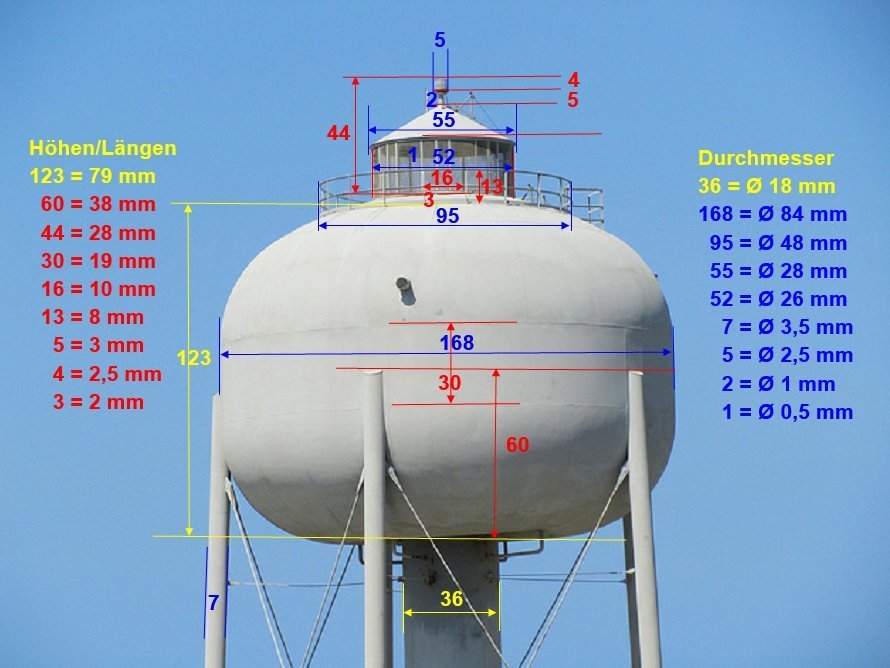 Source: NASA The required heights I've determined from this photo, in which I used the height of the tower as a reference measure.  Source: NASA When drawing the top view of the water tank for the diorama, one must note that the tank stands on a support structure consisting of five steel pipes that has a pentagonal floor plan, which is why I also had to deal with the designing a Pentagon , which is by no means trivial, but fortunately there are instructions for this. 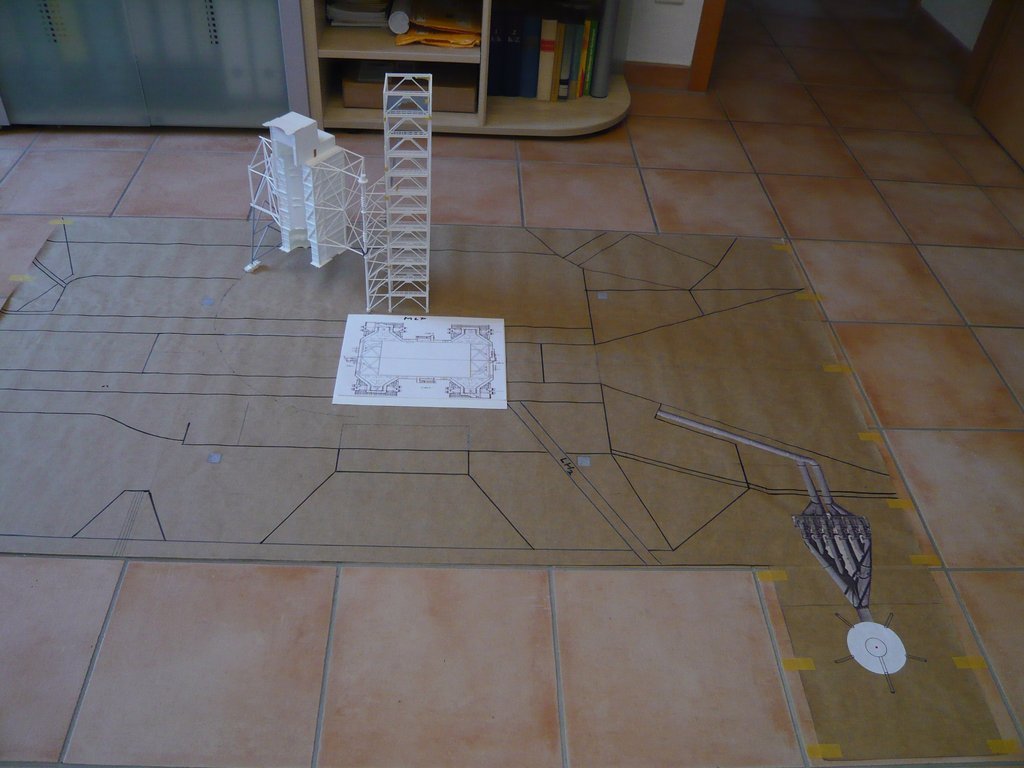 In this image some details are drawn in that will be taken into account later when scratching. At the rear support tube there is a ladder with a protective cage , which leads up to the railing on the top of the water tank, 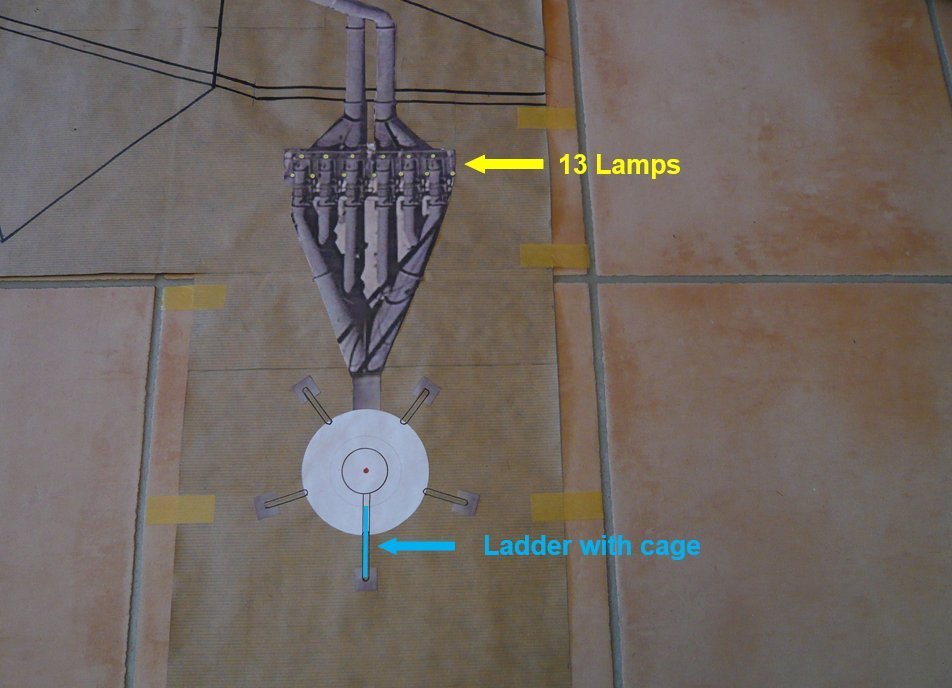 which I've only recently recognized on closer inspection in this image.  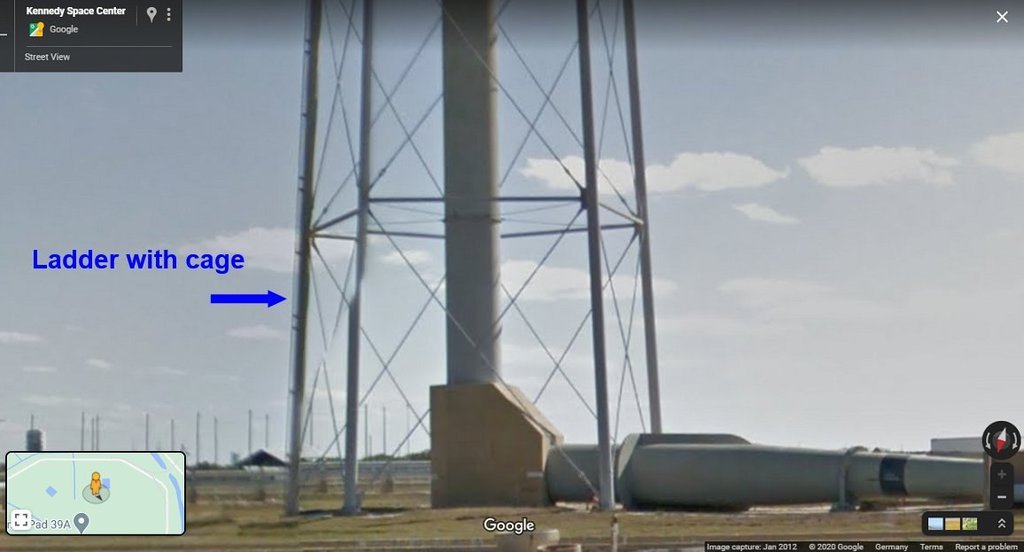 Source: google.com/maps On the pipe distribution system there are also 13 lamps, which would certainly also be attractive to scratch, which one can see on this panorama. 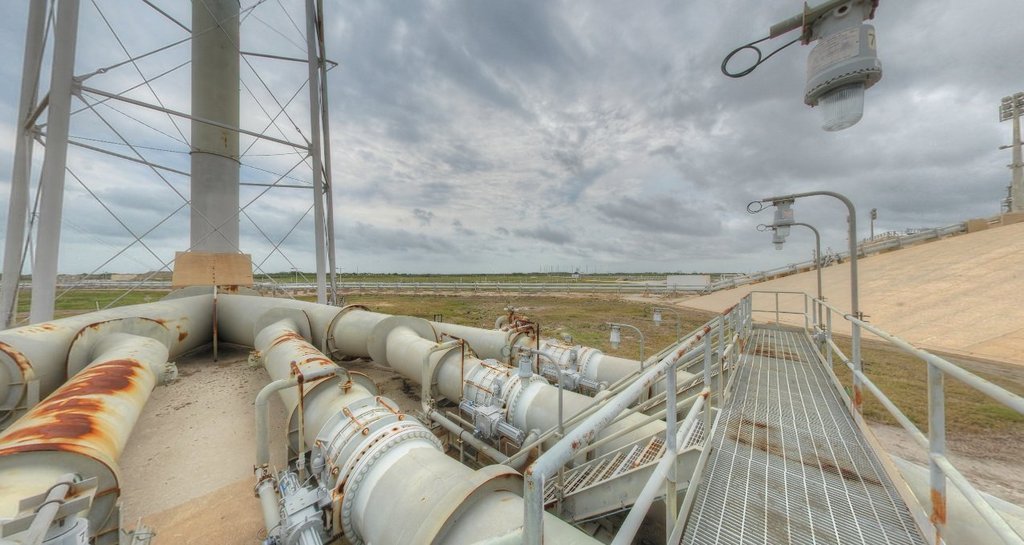 Source: nasatech.net And since we are back to the lighting, here is a picture in which the foundations of the four Floodlight masts of the pad lighting are glued on. 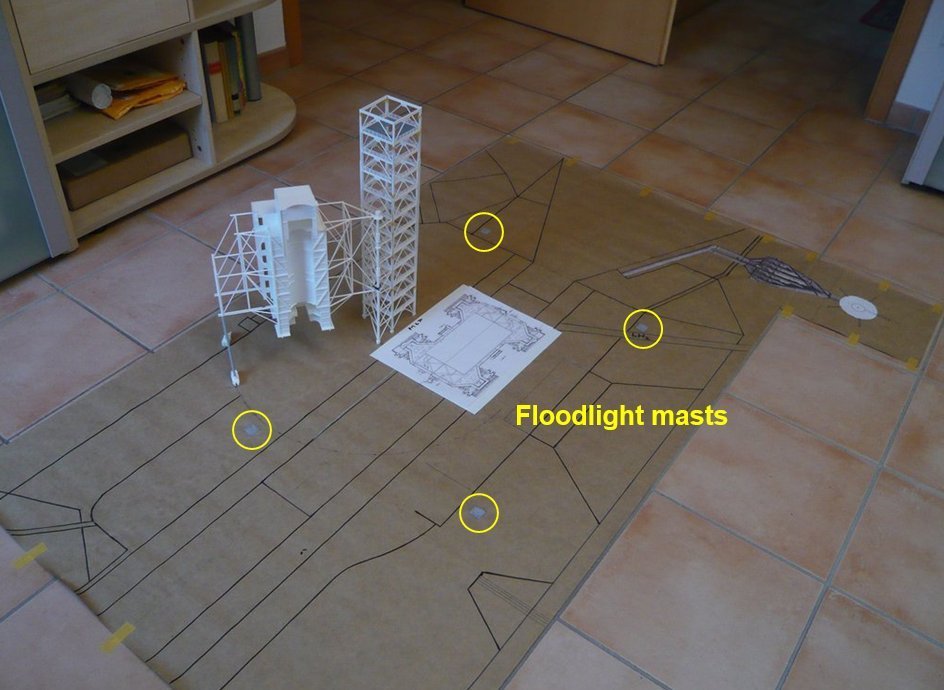 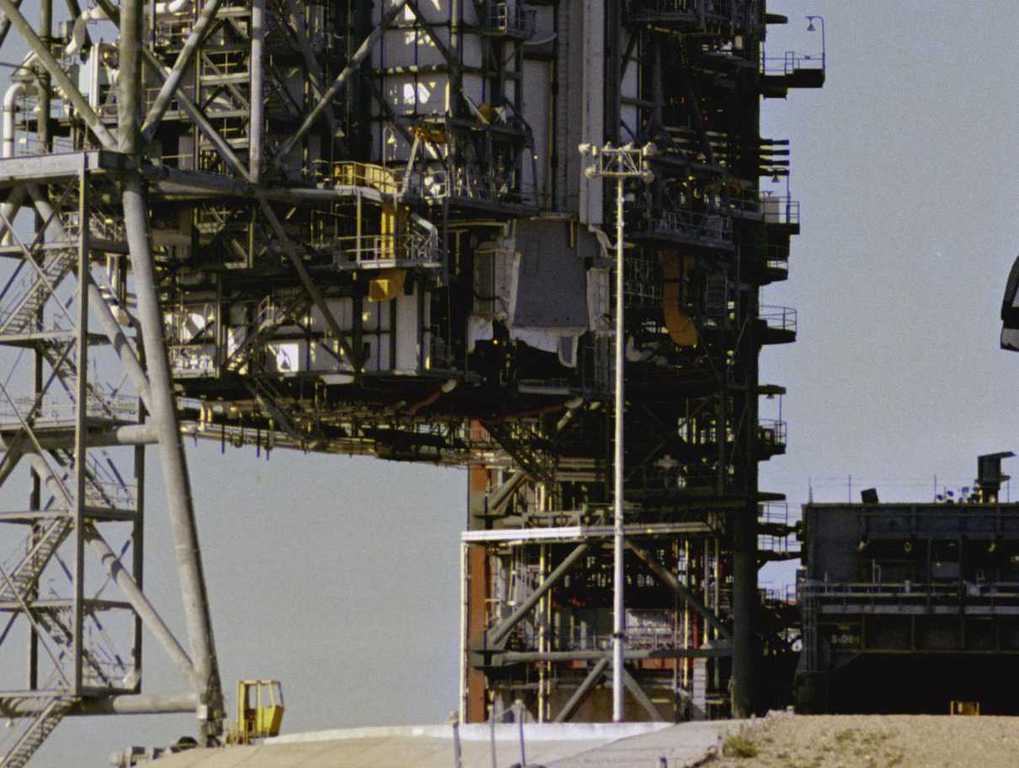 Source: NASA But that's supposed to have been for the present with the Diorama plan, especially since the Dio will sound the bell for the Final countdown of my project, which is still a long way away ...  
__________________
Greetings from Germany Manfred Under construction: Launch Pad 39A with Challenger STS-6 (1:144) Last edited by spacerunner; 09-30-2020 at 11:47 AM. 
|
|
#2262
10-03-2020, 02:47 PM
|
||||
|
||||
|
Hello everybody,
to err is human, said the hedgehog, getting off the brush ...  If in doubt, I always ask James MacLaren, and so this time too, whether he also had been once at the Water tank tower and has seen a Ladder with protective cage as I has suspected it.  And lo and behold, he was actually there once and says, that the ladder there probably had no protective cage according to his memory. Accordingly, there were ladders with protective cages on the Launch pad, such as also at both corners of the MLP (Side 1), as well as without, wherefore there were apparently no uniform regulations.  In the case of longer ladders, the pad climbers were secured using a safety wire rope with fall protection, as is also used by mountaineers.  The little house on top of the tank, which I also asked him about, was a screened enclosure to keep birds and bats out, and perhaps people too, especially since inside of it, the top of the tank has a large opening.  So far, so good, although from the point of view of German safety regulations I was surprised with the missing protective cage at this height. By chance I also still found a confirmation that the ladder at the water tower actually has no protective cage, for which this GigaPan panorama has furnished evidence for, what I have saved in my optical memory, because it has an incredible resolution in the zoom.   Originally I wanted with the help of the perfect direct view and the known height of the High Pressure Gas Battery of 32 ft = 9,75 m ≙ 61 mm (1:160) only determine the height of the Launch pad area of the diorama. On the occasion I also looked at the water tower and when I zoomed up I was amazed at the superb detail resolution, since one can now see what the ladder of the tower really looks like from the bottom until the roof of the house on top of the tank and up to the navigation light, and that it has no protective cage.  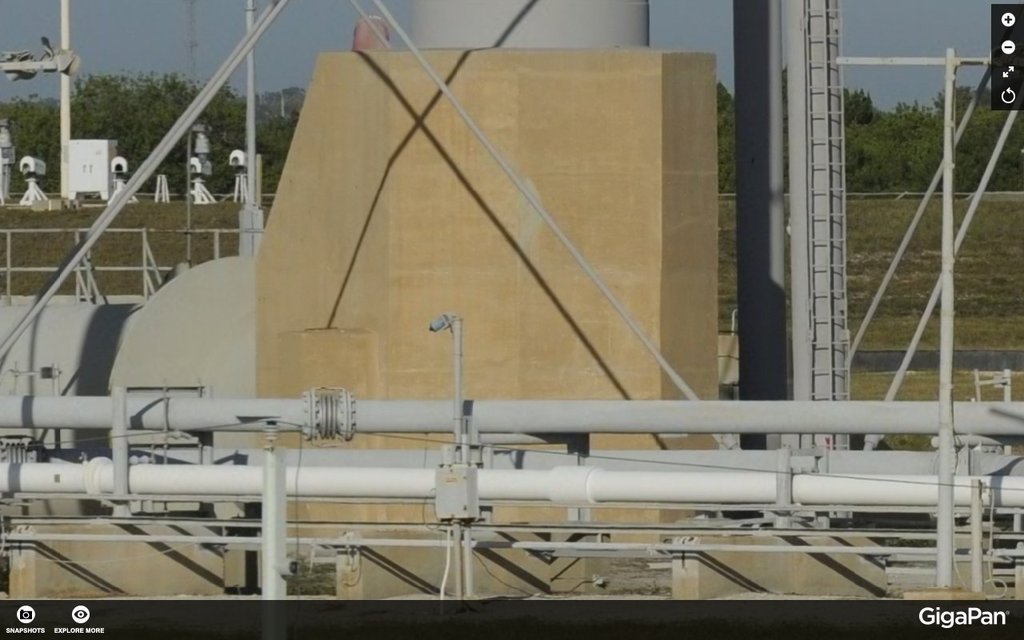 Source: GigaPan 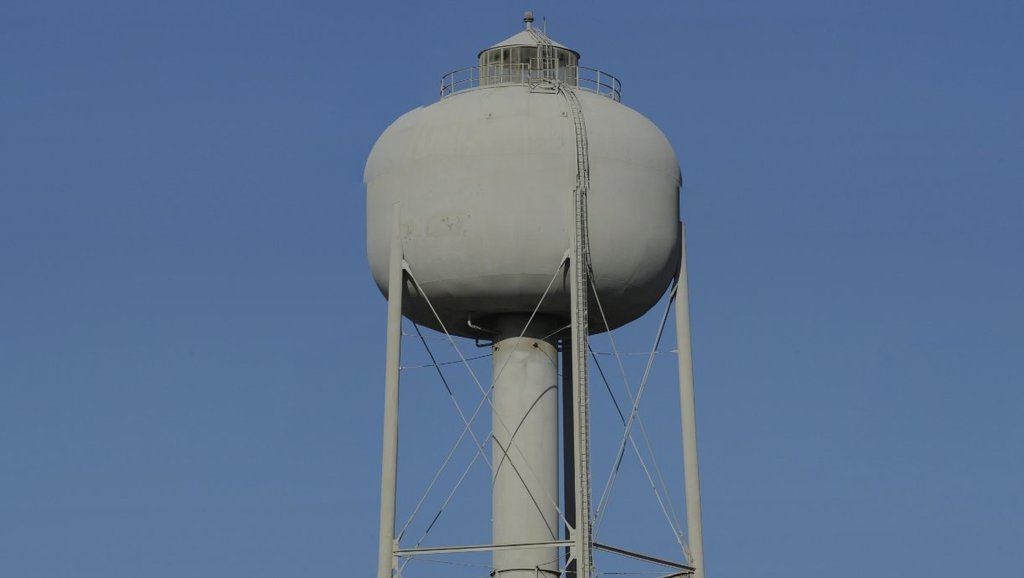 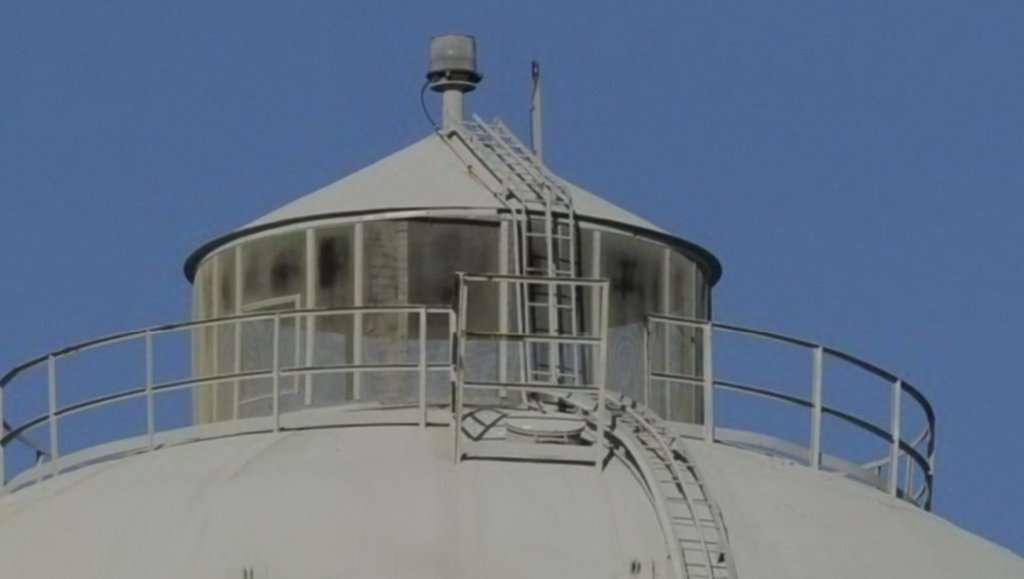 As one can see, a continuous strand/rod runs above the middle of the rungs over the entire length of the ladder, on which one can probably secure himself with a fall protection device.  Since the length of the Gas Battery, 110 ft = 33,5 m ≙ 210 mm (1:160), and its width, 56 ft = 17,1 m ≙ 107 mm (1:160), already have been drawn into the diorama plan, 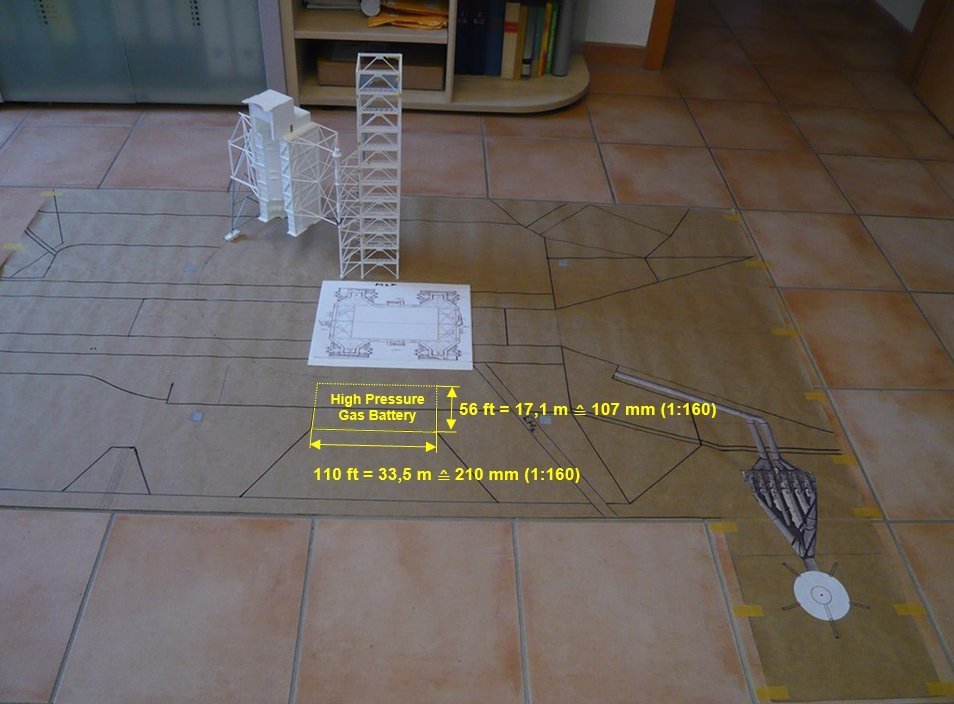 I have drawn the height 32 ft = 9,8 m ≙ 61 mm (1:160) into this GigaPan section and determined the height from the Dio floor to the pad surface, which is approx. 76 mm and thus roughly corresponds to the depth of the Flame Trench, 42 ft = 12,8 m ≙ 80 mm (1:160). 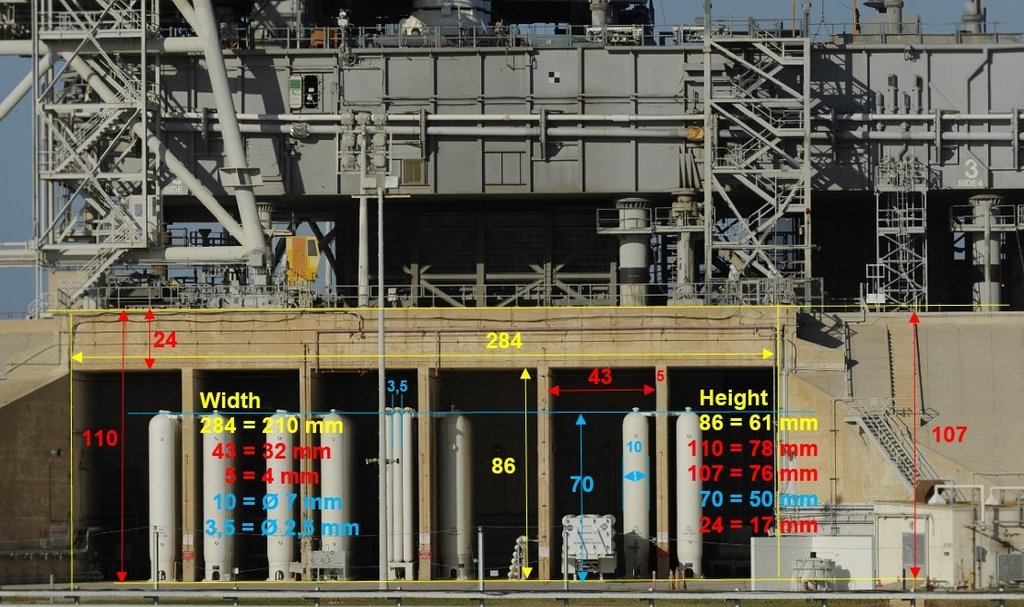 And with that I would like to definitely conclude the planning phase of the diorama.
__________________
Greetings from Germany Manfred Under construction: Launch Pad 39A with Challenger STS-6 (1:144) Last edited by spacerunner; 10-03-2020 at 02:57 PM.
|
|
#2263
10-04-2020, 03:16 PM
|
|||
|
|||
|
Hi Manfred. Amazing posts and work as always. I do not think it is surprising that there is no cage around the ladder up to the tank. Many such structures today are still not required for such things.
Take a look at this for example Very excited to see how the build progresses on this new phase of your model. Regards Kevin
__________________
Normally the most advanced tech I use is a pencil.
|
|
#2264
10-05-2020, 09:38 AM
|
||||
|
||||
|
Thanks Kevin for your compliments and staying tuned,
 and especially for this scariest video I've ever seen, really very impressing, having goosebumps!!! and especially for this scariest video I've ever seen, really very impressing, having goosebumps!!!
__________________
Greetings from Germany Manfred Under construction: Launch Pad 39A with Challenger STS-6 (1:144)
|
|
#2265
10-08-2020, 04:58 PM
|
||||
|
||||
|
Hello everybody,
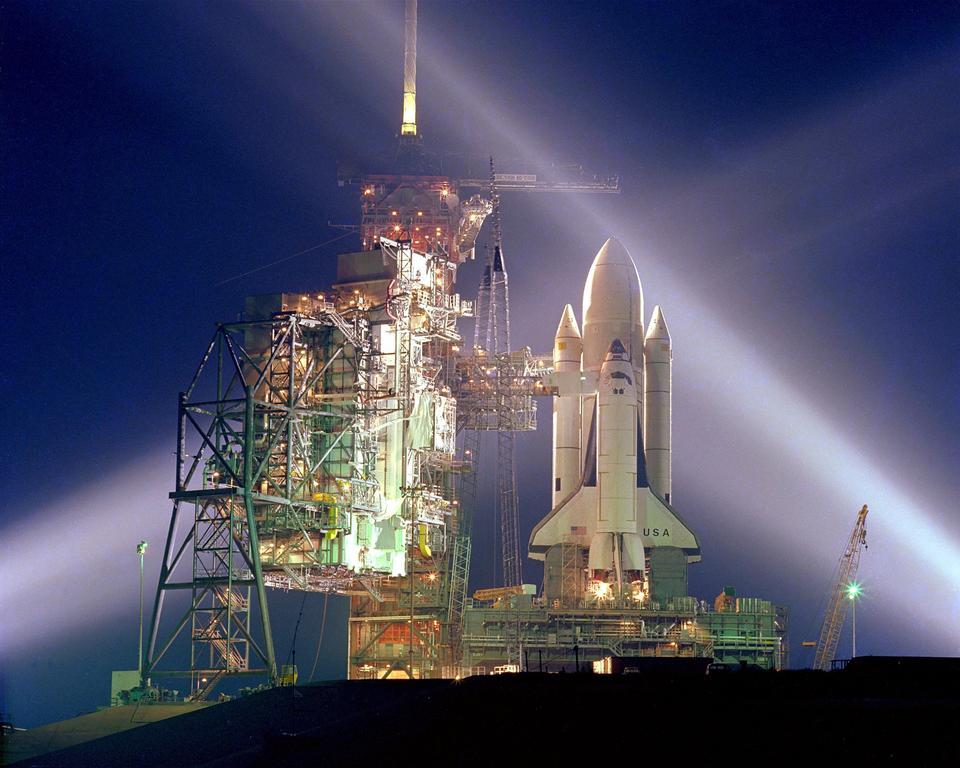
is there anybody in there? I want to come back briefly to the Launch pad lighting once more, which I have assumed so far to consist of four Floodlight masts at the corners of the pad, but unfortunately the following photo does not show enough details.  Source: spacefacts.de The foundations of the masts I had already glued into my Diorama plan. 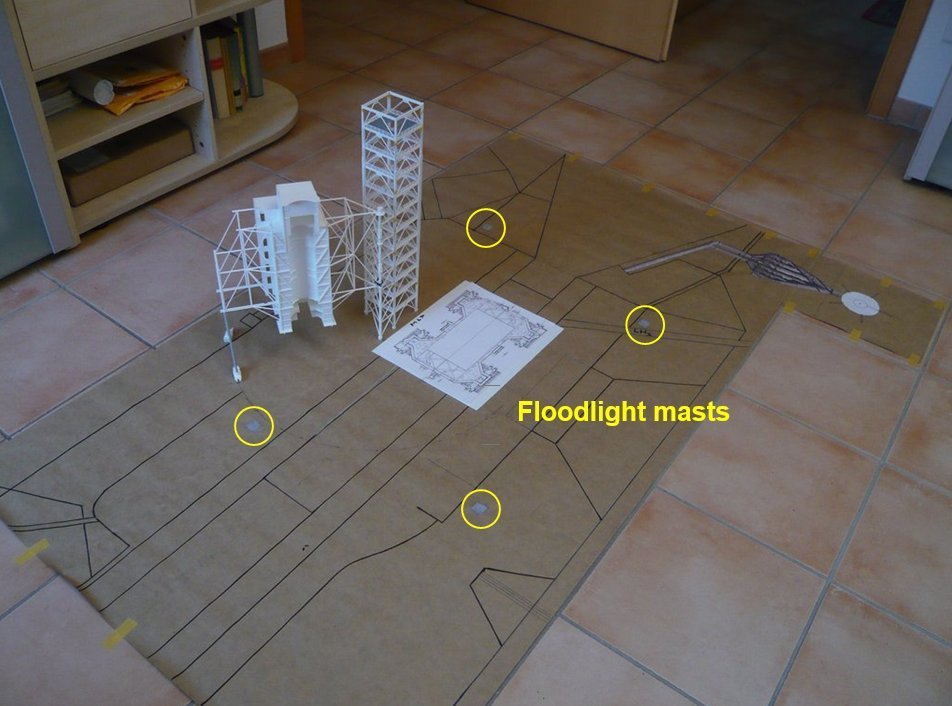 To scratch these masts one needs more detailed photos, which one can also find indeed, such like these ones here, whereby I always have to consider their historical relevance.  Source: NASA 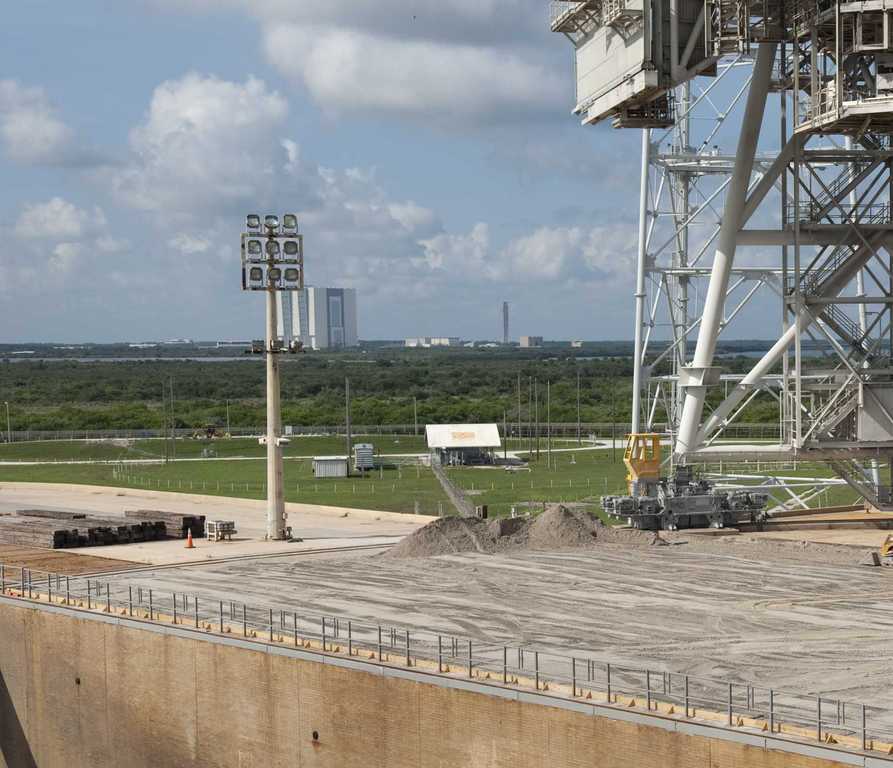 Source: NASA This is what the masts looked like only in the second half of the shuttle program, while on photos of the first missions, like here during a so-called Flight Readiness Firing (FRF) during the preparations for the launch of the Challenger to her first mission (STS-6) one can see that the masts at that time were higher, but far more spartan and, in contrast to the later modernized main masts, had not 9 + 3, but only 6 Flood light lamps (4 above, 2 below).  Source: NASA Fortunately, there are more precise images of the extensively documented STS-1 mission, as one can see here, on which one can even see the rungs on the mast for the pad climbers.  Source: NASA These details look pretty good, but unfortunately they are not enough for scratching, since one has no clear reference measure to which one can refer all dimensions when converting. So I've searched further and found this STS-1 photo here, on which one can now see important details that are crucial for scratching the floodlight masts, which one can see more clearly in the zoom.  Source: NASA A first important finding from this is this one, that in addition to the four floodlight masts found so far, there is also a 5th Mast, which stands directly in front of the Gas battery bunker, is slightly lower than the other four masts and has only four flood lights. Even more important, however, is the fact that with the height of the bunker of 32 ft ≙ 61 mm (1:160) I now also have a reliable reference measure with which I can determine the height of this mast (128 mm) as well as the dimensions of the spotlight holder. Source: NASA On the other hand, by using this mast height as a reference measure I was able to determine now also the height of the four longer main masts via the Mast 1, which is 144 mm.  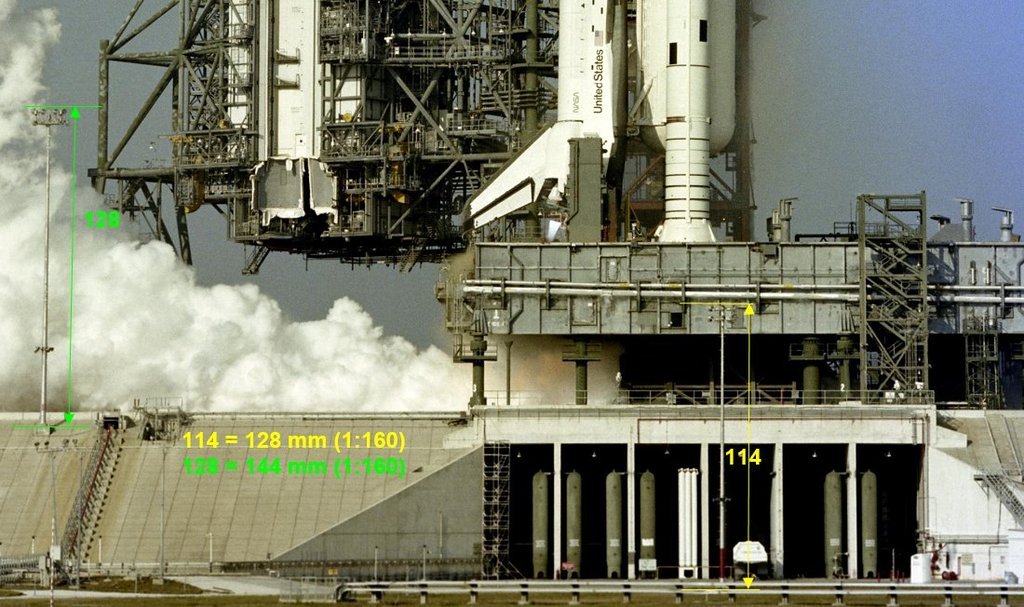 One can also see that there are lamps on all ceilings of the Bunker cells, which means that another LED cicuit is required, but what has already been considered by my friend Arno (McPhönix) as a reserve in his Multi-power bank.
__________________
Greetings from Germany Manfred Under construction: Launch Pad 39A with Challenger STS-6 (1:144) Last edited by spacerunner; 10-12-2020 at 01:16 PM.
|
|
#2266
10-08-2020, 04:59 PM
|
||||
|
||||
|
And as optical details one can see in this photo that the large gas containers in contrast to the shown GigaPan-Panorama had a gray paintwork during the first missions in the early 80s, and that there was no container in the 3rd cell (behind the mast),
what is explained by the fact that the GigaPan-Panorama shows the Discovery before her last launch for the STS-133 (2011). As one can see on this panorama, this mast (red) was modified in the following years and afterwards only had two smaller Flood lamps. But there is a further Floodlight mast (yellow) on the Gas battery with 9 Flood lights, which one can see better in the following nasatech.net panorama, but what doesn't interest me any further, as it didn't exist yet 1983. 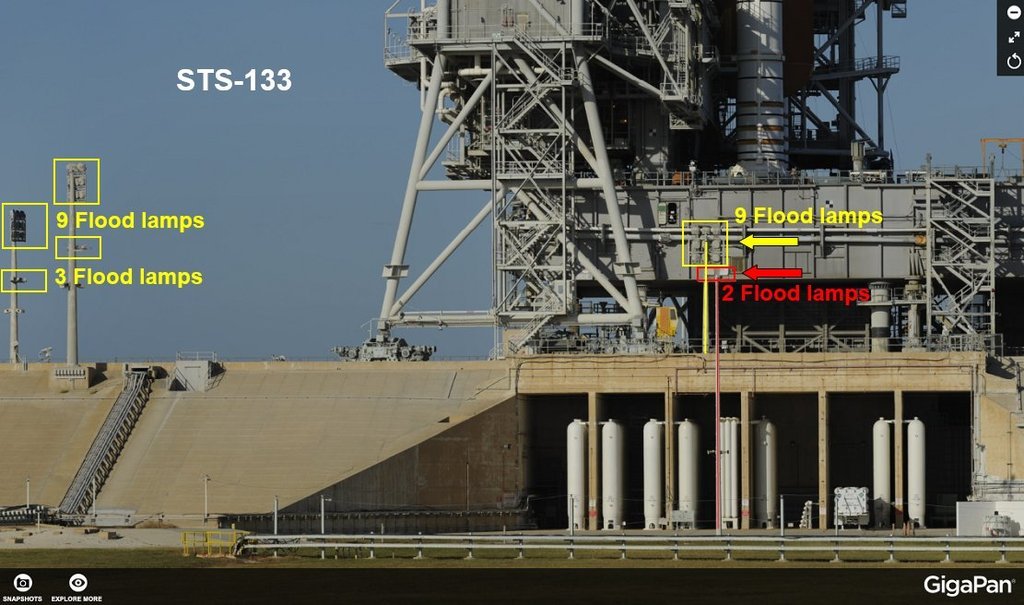 What interests me, however, is the position of the base point of this mast in front of the battery in order to be able to decide whether it is still on my diorama floor plan or not.  Source: nasatech.net And after I took another look at my first photo from the STS-6 Rollout, one can also recognize this 5th Mast that was already existing there back then exactly at the same place, so that I could also determine its base point. And that is situated indeed on the front edge of my Dio, so that I can now also consider this mast in my pad lighting, provided my friend also has considered a Floodlight LED-Circle for it in reserve too. And finally, one more thing that I was very surprised about at first, because on a Google Map (2012) the mast, which was still visible at this point in the GigaPan panorama (2011), one year after the last shuttle mission (STS-135) was already no longer there, as one can see here. 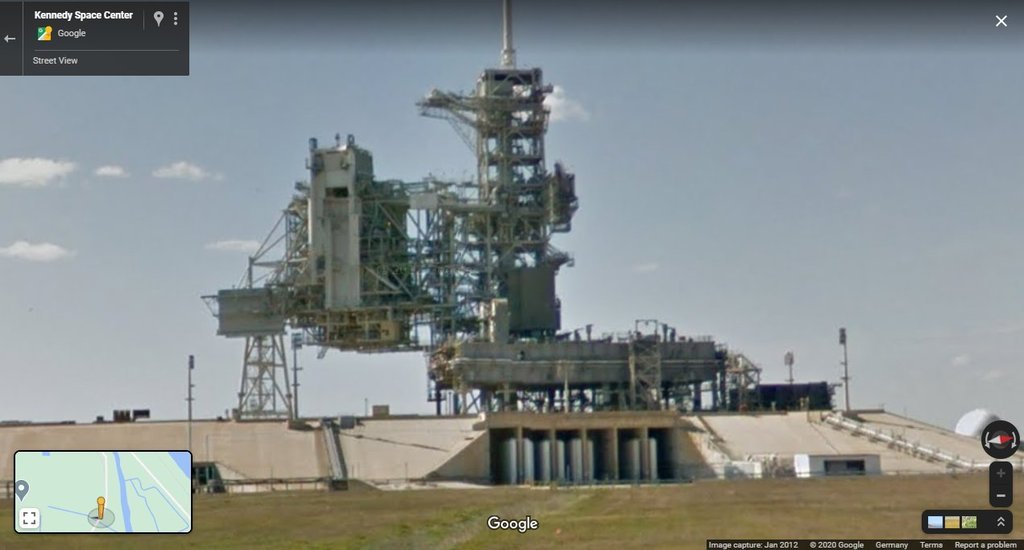 The final proof of this is provided by this nasatech.net panorama, which was updated lastly after the end of the shuttle program, on which only the foundation of the mast with cut cables can still be seen at this point ...  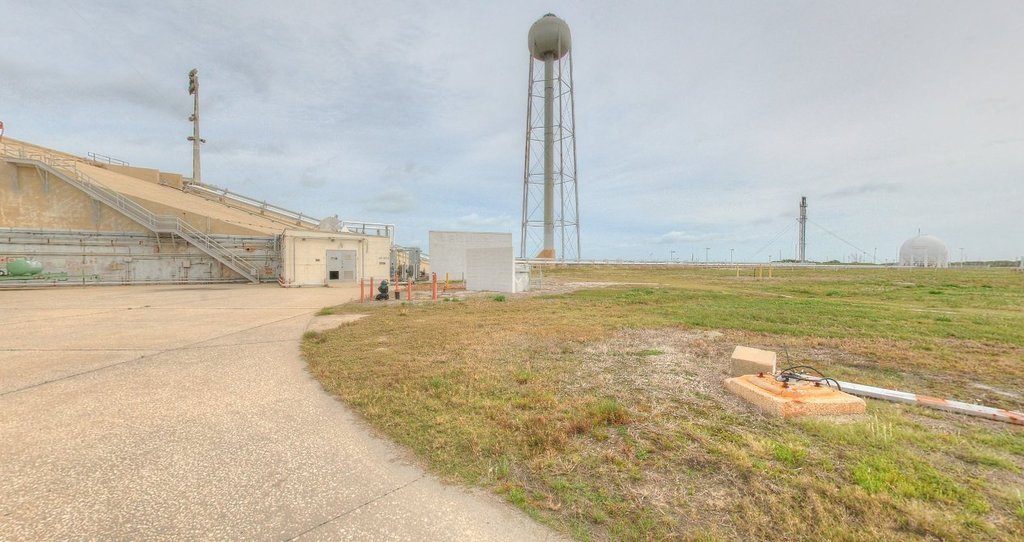 Source: NASA With this impressions I can for now finally roll in my Diorama plan and instead roll out the carpet that my Gino likes to lie on.
__________________
Greetings from Germany Manfred Under construction: Launch Pad 39A with Challenger STS-6 (1:144)
|
|
#2267
10-11-2020, 03:01 PM
|
||||
|
||||
|
Hello friends,
since my Multi-power bank still has a floodlight LED circuit in reserve, I've swarmed out again and actually still have found a 6th Mast on the pad, at this already known location next to the building, about its purpose I had reported in Reply #2253 about which, according to James MacLaren, one could get by elevator or stairwell to the Pad Terminal Connection Room on the ground floor. 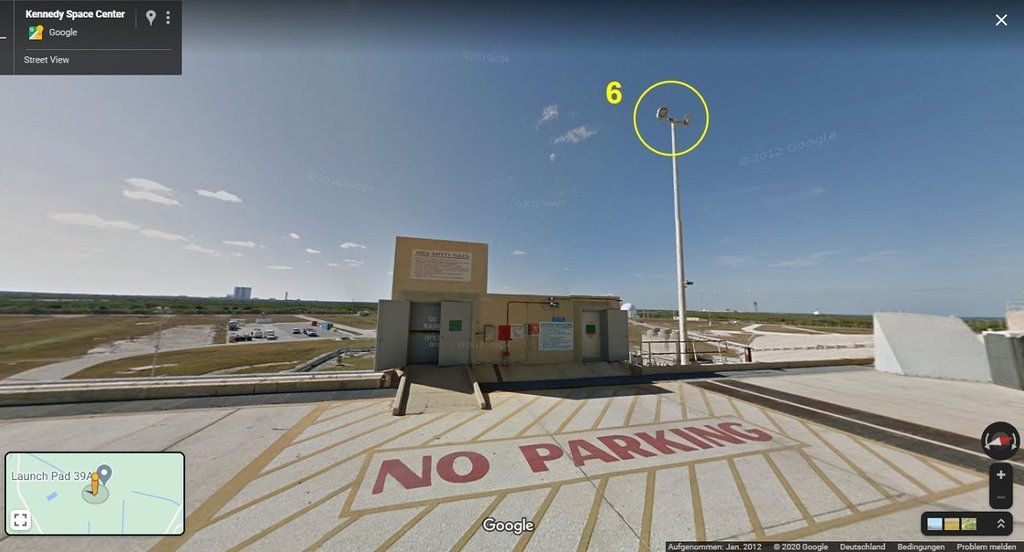 Source: Google Maps - Street View And next to the building there is actually a Floodlight mast (6), which illuminates the FSS/RSS rear, wherewith the 6th Mast of the Pad lighting would be found, which can still be fed by the power bank. The crucial question is only whether this mast was already there during STS-6, which I suspect. And that's why I will now look for photos from this time that provide information about whether the mast come into question for my Diorama or not.
__________________
Greetings from Germany Manfred Under construction: Launch Pad 39A with Challenger STS-6 (1:144)
|
|
#2268
10-12-2020, 01:19 PM
|
||||
|
||||
|
Hello everybody,
since I now know which point on the pad to pay attention to, I've first viewed my STS-6 photos, and already on this photo from the Rollout, on which one can see the back of the pad behind the RSS, one can actually see the contours of a further Mast (6) at this point, albeit blurred, next to the building in question. 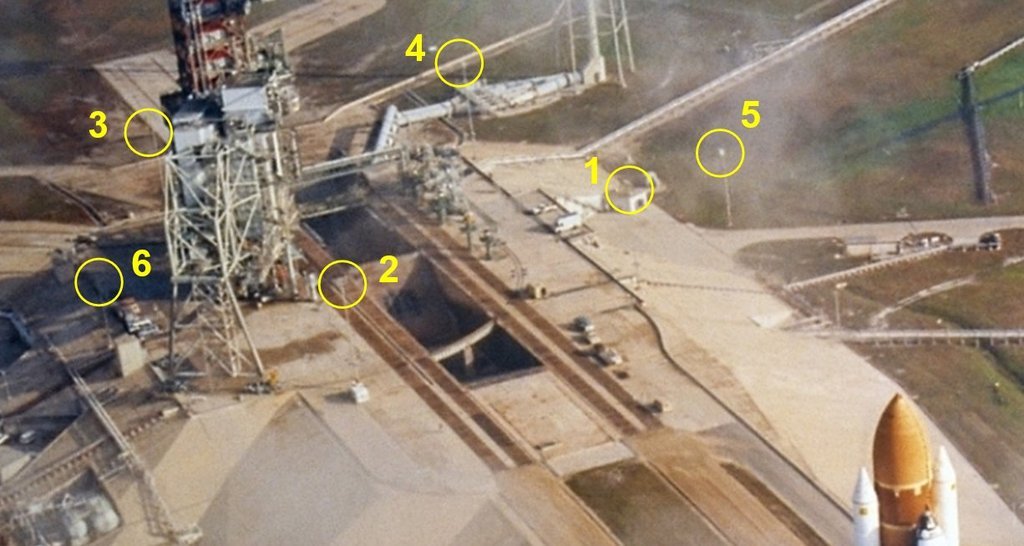 Source: NASA More accurate information about this 6th Floodlight mast then again gave photos of the STS-1 like this one, on which in the zoom one can clearly see the illuminated mast behind the building,  Source: NASA as well as in these images.  Source: NASA  Source: NASA Therewith the available 6 Floodlight LED circuits of the power bank are now exhausted, so that I don't need to look any further. Rien ne va plus - Nothing works anymore! 
__________________
Greetings from Germany Manfred Under construction: Launch Pad 39A with Challenger STS-6 (1:144) Last edited by spacerunner; 10-12-2020 at 03:49 PM.
|
|
#2269
10-12-2020, 06:01 PM
|
||||
|
||||
|
I've always loved this photo
 : :
|
|
#2270
10-13-2020, 01:35 AM
|
||||
|
||||
|
Thanks Becky for looking in on me again.
Yep, it's really fascinating too. 
__________________
Greetings from Germany Manfred Under construction: Launch Pad 39A with Challenger STS-6 (1:144) Last edited by spacerunner; 10-13-2020 at 09:21 AM.
|
 |
| Thread Tools | |
| Display Modes | |
|
|


 Linear Mode

