


|
|
|
#841
 07-22-2015, 03:49 PM
|
||||
|
||||
|
Hello everybody,
since we are now already drifted to the Rainbirds, I have constructed one of the birds from the Paper Kit by David Maier (1:144) to get an idea of the size on the MLP. And I must say, that's not easy to have to handle again with scissors and paper.  These is Rainbird N 5, which has this pipe back, which is only indicated in the typical style of David Maier.   On the left stands the sleeve (Ø 8,5 mm), right beside it a sleeve of the other birds which have all the same diameter (7.3 mm). The preparation of the hood was a little tricky, whereat initially irritated me that only four fold lines were declared for the lateral struts.  First I tried to fold this about 1 mm wide strips next to the fold lines, which would then have to be glued together, but what I have soon abandoned.  Therefore, I have separated this ring at the fold lines and then folded the narrow strips and glued together, what looks so in about as it was probably provided by the master.  In the original, however, the struts adjacent to the front opening are angle profiles, the rear two are T-profiles, and up on the roof sit two double-T- or H-profiles, as you can see here well.   Source: NASA Then came the roof cap, which had to be folded several times to hint the H-profiles,  and was glued up on the top.  Apart of the simplifications, the similarity with the original is unmistakable.  And also the visual impression on the MLP is pretty neat, although the Rainbird appears a bit too thick.   Nevertheless, I will but try to get closer to the original by the already indicated Scratch variant, what certainly means more effort, but so be it.  
__________________
Greetings from Germany Manfred Under construction: Launch Pad 39A with Challenger STS-6 (1:144) 
|
|
#842
07-22-2015, 08:37 PM
|
||||
|
||||
|
Finally you're working on something that doesn't count as quantum mechanics

__________________
PAPERENGINEER Designs in progress: -C-2A Greyhound -Br.1050 Alize
|
|
#843
07-22-2015, 10:55 PM
|
||||
|
||||
|
spacerunner,
post of Yours is worth to be saved as pdf - in case all pictures might disappear. You put so much work not only on model itself but on thread as-well
__________________
Finished projects: RMS Mauretania 1/250; SS Canberra 1/250; Toyota Hilux Overdrive; Current projects: SS Michelangelo 1/250
|
|
#844
07-24-2015, 05:59 AM
|
||||
|
||||
|
Thanks my friends for your nice words, I'm glad if you like it.
 Hi folks, the construction of the Rainbirds in themselves certainly should not be a big problem, especially since their tubular structure should not be excessively difficult. More headaches prepare me, however rather the lot of screws on the flange rings, I want to indicate somehow, the only question is how?  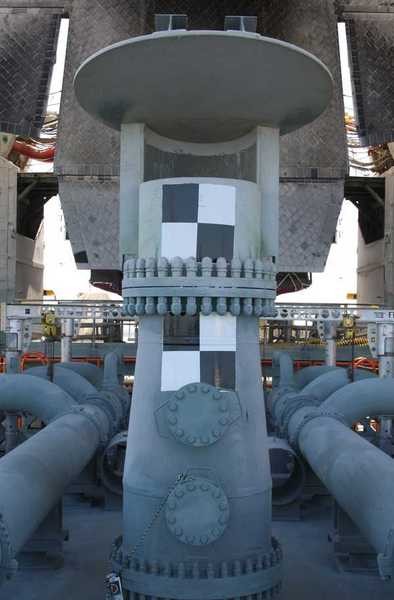 Source: NASA Since the Paper kit variant but appears to highly abstracted and also to brawny, I have calculated the essential dimensions of the two Rainbird types based on my reference photos, here first for the bigger birds with the conical midsection.  Quelle: NASA As reference dimension I have chosen again the diameter (4.0 mm) of 24'' pipe, approximately beside the rainbird.  After my first estimate I get for this rainbird type to approximately 132 screws, of whom there are two. For the other four slender rainbirds I come respectively to 78 screws, so together makes 576 screws, if I don't have miscalculated!!!  For the screws dimensions I tend to Ø 0,5 mm and 1 mm in length, for which one could use Evergreen rods. For their assembly but still I have to come up with a suitable solution, since their distance should be about half a screw diameter, what looks like a rather stressful action.  
__________________
Greetings from Germany Manfred Under construction: Launch Pad 39A with Challenger STS-6 (1:144) Last edited by spacerunner; 09-26-2016 at 03:22 AM.
|
|
#845
07-24-2015, 09:03 AM
|
||||
|
||||
|
576 screws! Have fun with that!
__________________
PAPERENGINEER Designs in progress: -C-2A Greyhound -Br.1050 Alize
|
|
#846
07-24-2015, 09:04 AM
|
||||
|
||||
|
Hi all,
for this action, I've been thinking about the following mounting template, which I will try now. For the spacers between the screws I use Styrene strips 0,4x1,5 mm, and in between I glue with MEK in each case strips 0,5x1,0 mm. And in the interstices are then inserted round rods Ø 0.5 mm for the screws.  Here firstly is space for the first 9 of up to 36 screws.  To be continued, so stay curious guys.
__________________
Greetings from Germany Manfred Under construction: Launch Pad 39A with Challenger STS-6 (1:144)
|
|
#847
07-24-2015, 10:37 AM
|
||||
|
||||
|
Hi all together,
and here comes the next step. Before I'll build the whole mounting template, I first wanted only start with the right side and try with one screw ring, how or whether my idea can ever be realized.  And then there was already a nasty surprise when selecting the Evergreen rods with Ø 0.5 mm for screws, as if Ø 0,5 mm!!!  Since I have a fairly good sense of proportion, I have immediately noticed the scattering of the diameters of the rods in a package, both within a rod and rod-to-rod that has shocked me really. That goes from Ø 0.41 mm to 0.6 mm, and so one has the agony of choice, and this is in my view quite simply botch!  Well, no matter, for the first test I have used a rod with a diameter of 0.46 mm to 0.52 mm and cut into about 8 mm long pieces, that I've inserted into the gaps.  Since the screws have a certain distance from the wall, as you can see here well,  Source: NASA I have glued to the inside of the flange ring a carrier strip (0,25x1,5 mm) on the screws, in which I have brushed the strip with MEK only at the supernatants.   And that's already the trimmed strip in which on the circumference of the pipe (Ø 5,5 mm) for the slender Rainbirds only 21 screws have found a place. The number of screws could be further increased if one would use for the spacers in place of the 0.4 mm only 0.25 mm thick strips.  Since this should be the screw ring for one of the slim birds, standing on the Blast deck, there is only one flange ring at the bottom. Therefore, the screws are flush separated and have upwards an overhang of about 1 mm.  This somewhat uneven supernatants can certainly be equalized.  And now came up the thrilling act of gluing this screw strip on the pipe. Here I first lightly rounded the beginning of the strip and then glued with CA. And then it went in two or three steps further around the circumference, in which the longer strip has been very helpful.  Because so I could calmly determine the point of cutting off the rest. Because so I could calmly determine the point of cutting off the rest. And thereafter the short end was only to glue with CA, and so the result looks like.  And now I am surprised how great it has become yet, or not?   Now comes even outside a Strip 0,25x0,5 mm above the screws. But now occurs to me that I wanted to make the carrier strip for this Rainbird type actually just 0.75 mm wide, because the 1.5 mm wide strip I had only intended for the double screw flanges.  But that's no big deal, I will consider this in the other rings. But that's no big deal, I will consider this in the other rings. Anyway, I'm happy that my conception can be realized in principle, as I thought to myself.
__________________
Greetings from Germany Manfred Under construction: Launch Pad 39A with Challenger STS-6 (1:144) Last edited by spacerunner; 09-26-2016 at 03:19 AM.
|
|
#849
07-24-2015, 10:48 AM
|
|||
|
|||
|
The screw ring looks good Manfred. I think you nailed it.
__________________
This is a great hobby for the retiree - interesting, time-consuming, rewarding - and about as inexpensive a hobby as you can find. Shamelessly stolen from a post by rockpaperscissor 
|
|
#850
07-24-2015, 03:32 PM
|
||||
|
||||
|
Hey guys,
thanks for your kind words. I can only repeat it again and again, you have to have patience of a saint for these crazy details,  possible more than enough, and strong nerves day by day. possible more than enough, and strong nerves day by day. 
__________________
Greetings from Germany Manfred Under construction: Launch Pad 39A with Challenger STS-6 (1:144)
|
 |
| Thread Tools | |
| Display Modes | |
|
|


 Linear Mode

