


|
|
|
#1681
 05-21-2018, 05:45 PM
|
||||
|
||||
|
Quote:
 I think I can dispel your concerns, because the flour coat is only for a short time at air, then it is preserved by the primer and paint and should not be able to spoil, moreover, the layer is only extremely thin.  
__________________
Greetings from Germany Manfred Under construction: Launch Pad 39A with Challenger STS-6 (1:144) 
|
|
#1682
05-21-2018, 06:18 PM
|
||||
|
||||
|
Quote:
Indeed, the issue that required cleaning the 3D-printed intertank might actually be a plus if 3D-printing the rest of the ET. Doesn't the stuff have a somewhat ridged appearance anyway as the layers are built up? The Stack I built for Mike's book was 1/144th scale. That was quite a few years ago. The late 1980s, as I recall. The overall "pebbled" or rough surface one gets from the flour technique winds up with a tank that looks like the one that comes in Monogram's 1/72nd-scale stack. To most folks, it probably looks ok. But to me, it never did. The lateral bands are such a prominent feature that Monogram should've replicated them. They'd be visible in 1/144th scale. Heck -- I even felt the need to give some impression of them when I built my STS-1 in 1/288th scale. I always say, "In for a penny, in for a pound" and given the lengths you've gone on this project, I think it would be a shame if your ET lacked those prominent bands. But it's your model, of course....
|
|
#1683
05-25-2018, 12:13 PM
|
||||
|
||||
|
Hi David,
thanks for your kind words and interesting thoughts. It sounds nearly, as if you just want to challenge me a bit, isn't it?  Unfortunately I have only a black&white copy of Michael Mackowski's "Space in Miniature #3, on whose figures one cannot see the details of your stack clearly enough.  Although I had an idea what you mean with the Lateral bands, I was not sure. But Michael Mackowski was so nice and had thankfully sent me some scans of your original photos like these here.  As one can see in the photos, you had roughened the ET in circumferential direction with sandpaper, which was a promising approach, but that's not the typical Instafoam structure, if we mean the same.  Independently, the crucial question for me is always how certain details looked at the STS-6.   Source: retrospaceimages.com (STS-6)  Source: NASA (STS-126) BTW, in my view, not this structure but the Intertank is the dominant structural feature of any External Tank,  especially since this band/ring structure is not always very distinct. especially since this band/ring structure is not always very distinct. But at least you made me think, though it could surely become difficult to create such a regular as well as delicate structure.  Maybe I have an idea, which is a bit complicated and still not definite yet.
__________________
Greetings from Germany Manfred Under construction: Launch Pad 39A with Challenger STS-6 (1:144)
|
|
#1684
05-25-2018, 02:08 PM
|
||||
|
||||
|
You've solved several problems so far, so I have no doubt you'll come up with a solution here, too. A lot can probably be achieved with a masterful paint job.
I think I have a copy of Mike's book back in storage in the U.S. Any original photos of mine are long gone. That was back in an era where we took photos with these devices called "cameras," from which we removed these canisters called "film," which we then took to a special shop to be developed and printed into "photographs." Now I feel old....
|
|
#1685
05-25-2018, 06:00 PM
|
||||
|
||||
|
Thanks David for your premature praise!
Well, David, those were the good old days ... BTW, with evil tongue one says in our country: As old as we look, we'll never become ...  But all jokes aside!  So far, I still have not thought seriously about these crazy Instafoam rings, but now you have made it.  BTW, you are the pioneer and I take my hat off to you,  what you have built with great ideas even then, incredible ... what you have built with great ideas even then, incredible ...  My idea for the ET front end is relatively simple and came up when I looked at my WSF-IT, especially at the sight of the fine ribs in the Thrust panel. 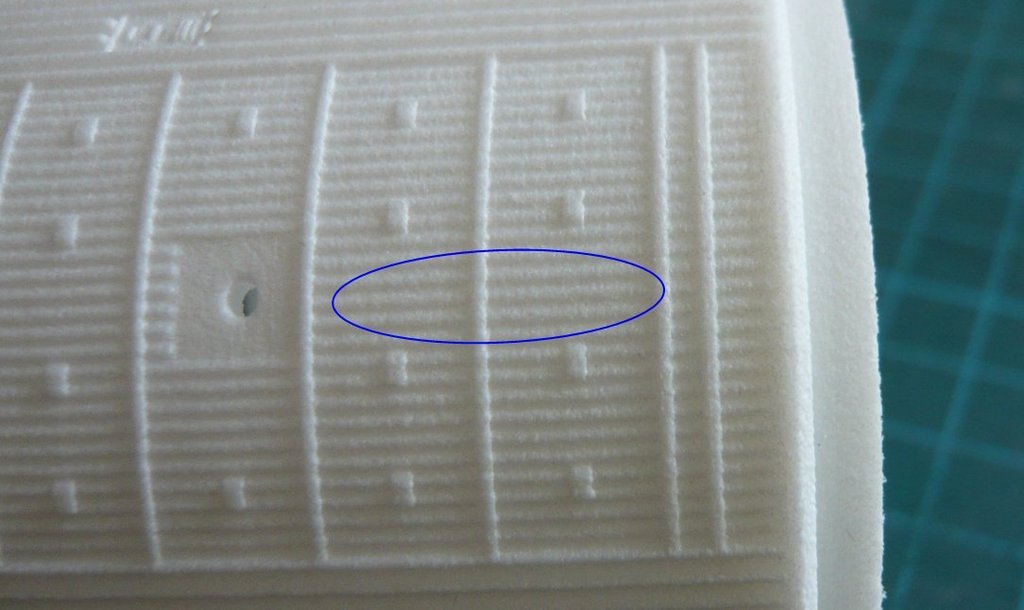 There are 26 ribs in this panel, which is approx. 24 mm wide, corresponding to approx. 0,9 mm for one rib. Therefore, I imagine this ET front part as WSF 3D print with adjacent annular bands at a distance of about 0,9 mm. 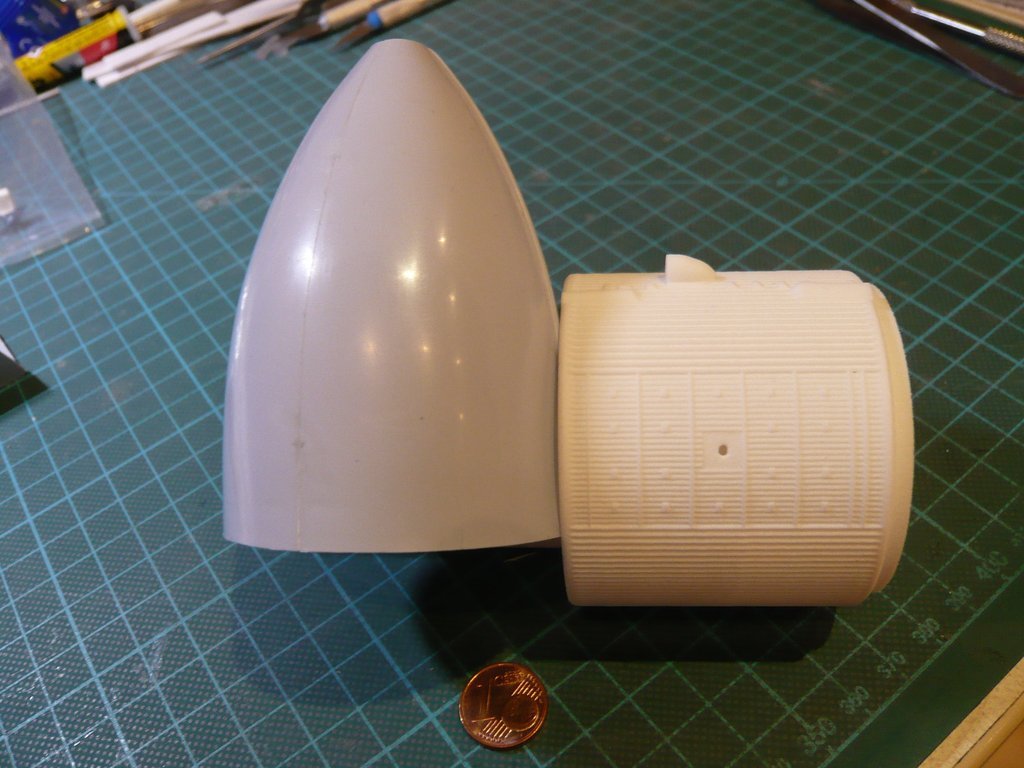 It would be ideal if these bands would become flatter towards the nose. Or one could choose a uniform height and sand off these bands softly to the nose. But I think that a good 3D designer can easily model such a front piece, which is why I have already asked Michael Key, if he could do this job. In this picture I tried to count the bands from bottom to top, which is not that easy, and came to about 55.  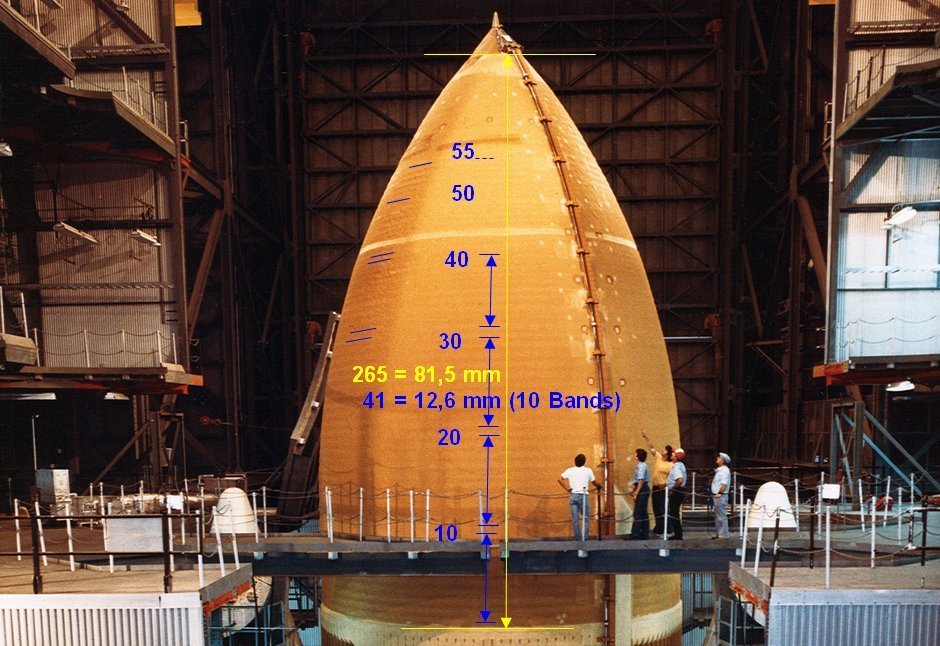 Source: retrospaceimages.com (STS-6) Depending on what this structure of the 3D front part looks like, one could also use the Flour-Technique to level out the gaps if necessary. For the ET rear part (185 mm), this approach would also be possible in principle, although I do not know what height Shapeways can print. But even a division into three parts would be conceivable without thinking about the costs.  But I could also imagine a different solution without 3D printing, with a lot of small Evergreen strips plus Flour-Technique, or better not?  Maybe I'm dreaming about it now, because meanwhile it has become late again and I'll go to bed now quickly ... 
__________________
Greetings from Germany Manfred Under construction: Launch Pad 39A with Challenger STS-6 (1:144) Last edited by spacerunner; 05-27-2018 at 04:43 PM.
|
|
#1686
05-26-2018, 05:53 PM
|
||||
|
||||
|
"BTW, with evil tongue one says in our country: As old as we look, we'll never become ..."
Just as long as I don't end up looking like this>  
|
|
#1687
05-26-2018, 06:23 PM
|
||||
|
||||
|
That emoji reminds me of Beaker, from the muppets .
__________________
Non Sufficit Orbis-The world is not enough.
|
|
#1688
05-28-2018, 04:28 PM
|
||||
|
||||
|
Thanks Becky and Ed,
a little bit of fun is always good.
__________________
Greetings from Germany Manfred Under construction: Launch Pad 39A with Challenger STS-6 (1:144)
|
|
#1689
05-31-2018, 09:49 AM
|
||||
|
||||
|
Hi everybody,
in the ARC Forum I got an interesting hint to Simon Atkinson, who used a lathe for simulating the grooves in his External tank. He is a professional modeler and illustrator since more than 40 years and here is his awesome Shuttle stack (1/72), which is currently (2016) in store at The London Science Museum.   Source: satkinsoncreativearts.com A similar technique, e.g. by engraving the grooves, I have already imagined, but unfortunately I have no lathe, which would probably need a CNC control to get even intervals.  But for that, 1/72 is of course much more workable, especially since the grooves should be at least 2 mm apart. This approach is marvelous,  but if you take a closer look at its texture, the grooves for my taste are a bit too pronounced and smooth, because only perfect even grooves are created with the lathe, and thus seem almost a bit artificial. but if you take a closer look at its texture, the grooves for my taste are a bit too pronounced and smooth, because only perfect even grooves are created with the lathe, and thus seem almost a bit artificial.  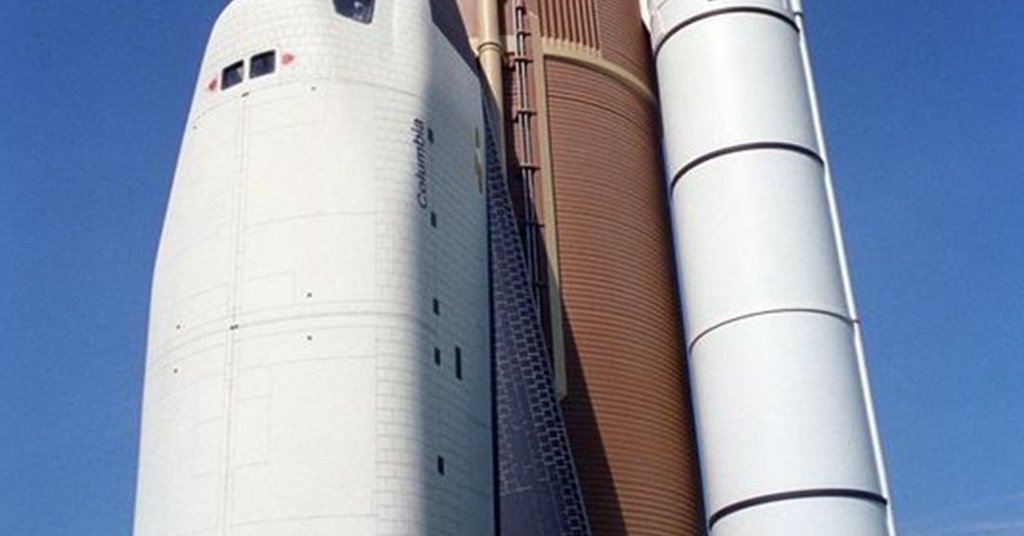 Nevertheless, I think that this structure could also be simulated for a 1/144 ET, if one can realize the corresponding spacings of approx. 1 mm by a clever 3D modeling of a narrow and very flat wave-like ring structure by creating fine grooves (approx. 0,3 mm) in about 1 mm intervals, much like between the fine ribs in the Thrust Panels. Regarding the Spray On Foam Insulation (SOFI) of the ETs one has to distinguish early and later missions, as for the Orbiter's TPS Tiles and Blankets. In the earlier missions like STS-6, this wave-like ring structure was more pronounced, while it is less or barely visible in later missions. Later at the SLWTs, the SOFI was also much more evenly applied and reworked.
__________________
Greetings from Germany Manfred Under construction: Launch Pad 39A with Challenger STS-6 (1:144)
|
|
#1690
05-31-2018, 11:53 AM
|
||||
|
||||
|
It does seem an interesting approach but like you, Manfred, I find the grooves too uniform and smooth. I would've been tempted to "paint" the plastic with liquid cement to soften up the grooves after lathing. Similarly, I think alternating some colors or drybrushing some highlights would've softened up the look a bit. It looks too monochrome for my tastes.
I like what I can see of the Orbiter. I've never been up close and personal with an External Tank, but I have been right next to (and under) Discovery (back in '86 in the OPF) and what stunned me, as a modeler, was just how rough the surface appeared. Aside from the RCC nosecap and wing leading edges, there wasn't a smooth surface to be found. It looked anything but aerodynamic....
|
 |
|
|


 maybe it would be conceivable that 3D printing of the ET front part in WSF would create a similar roughened band structure ...
  Linear Mode

