


|
|
|
#941
 02-04-2016, 04:22 PM
|
||||
|
||||
|
Hello guys,
your interest will be rewarded, here is the perplexing answer: Hardly to believe, but true, this is my friend James MacLaren on the top of the Pad 39B Lightning mast (347 feet) .  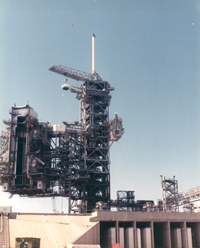 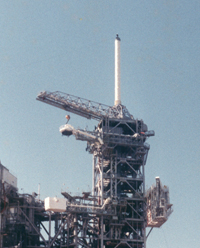 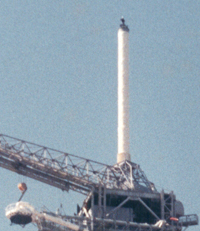 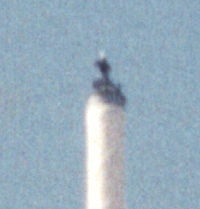   He had been working five years (1980-85) on Pad 39B when it was being converted from an Apollo pad into a Shuttle pad and has taken a lot of great photos, also experienced a lot and reported in a stunning documentary thread Launch Complex 39-B Construction Photos - Space Shuttle in NSF Forum.  I hope, you can open it. I hope, you can open it. And his incredible story happened in the Payload Change Out Room (PCR) of the RSS, the most holy place on the entire Launch Pad, which had been mentioned here already several times. Shortly for attunement some pictures of the PCR which is behind the Payload Canister (PC),  Source: retrospaceimages.com (STS-6) Through these Payload Bay finally the movement of the respective payload into the orbiter is carried out by a huge handling device inside the PCR, the so-called Payload Ground Handling Mechanism (PGHM). The PCR is a giant cleanroom hermetically sealed from the outside, whose doors are equipped with inflatable seals, which are enclosing directly the fuselage of the orbiter and its payload bay doors, why everything must fit perfectly and as close as possible. So it looks from the inside the PCR before the PC is opened (left), and here after opening the payload bay doors the already "unpacked" payload in the PGHM (right).   Source: NASA (STS-112) Enough of the preface, here is now the spectacular story of James MacLaren and his friend Jack Petty, A Techno-Redneck's Encounter With NASA's Satellite with whom I you (and your goosebumps) now wants leave alone, enjoy and a lot of fun!!!  
__________________
Greetings from Germany Manfred Under construction: Launch Pad 39A with Challenger STS-6 (1:144) 
|
|
#943
02-04-2016, 08:48 PM
|
|||
|
|||
|
Funny story. Having spent 25+ years in combined Federal service the story has the unmistakable ring of truth to it. What makes it so good is that it is being told by a master storyteller. I needed a good laugh Manfred. Thank you!
__________________
This is a great hobby for the retiree - interesting, time-consuming, rewarding - and about as inexpensive a hobby as you can find. Shamelessly stolen from a post by rockpaperscissor 
|
|
#944
02-05-2016, 12:02 AM
|
||||
|
||||
|
Quote:
__________________
Finished projects: RMS Mauretania 1/250; SS Canberra 1/250; Toyota Hilux Overdrive; Current projects: SS Michelangelo 1/250
|
|
#945
02-07-2016, 02:11 AM
|
||||
|
||||
|
Okay guys, then let's go.
And from the cover plates of the Rainbirds now to the openings below, and thus the question of how to do this best, where already the marking out of the openings is not easy.  For the slender birds this should be approx. 4 mm wide and 3 mm high, and that is a bit tricky for the thin tube.  Then should also still be produced the beveling (8°) for the cover, with which I have started, but perhaps it would be better to make the opening at the end after reworking. Then should also still be produced the beveling (8°) for the cover, with which I have started, but perhaps it would be better to make the opening at the end after reworking.  The beveling was still relatively easy. The only problem is that these operations and the resulting basic contour (length, incline) should also be uniform in all six Rainbirds why probably again a template would be appropriate.  Then I tried to saw the opening at a distance of 4 mm with a mini-saw blade. But the handling is quite tricky for the small diameter, and the opening should be reasonably clean.  And this is the result, which shows that the opening so is feasible in principle, but in terms of accuracy and reproducibility it is still not sufficient.  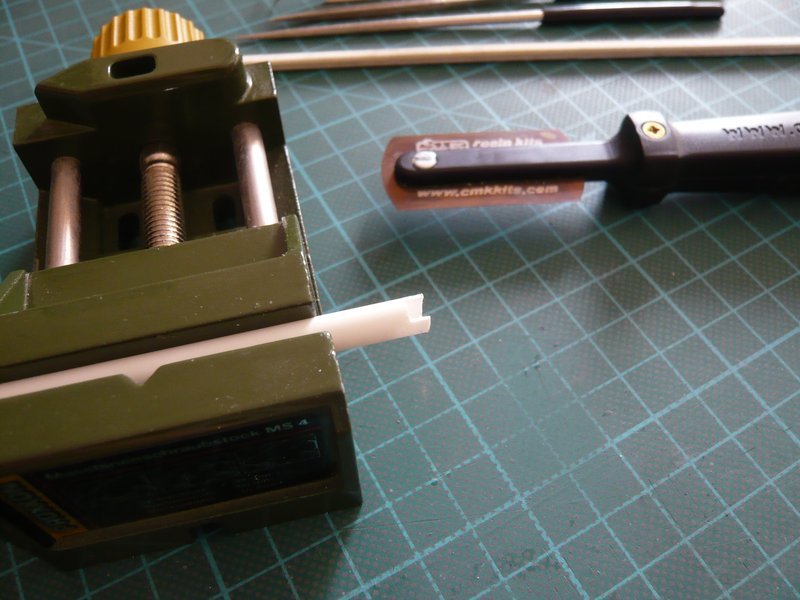 For the two thicker central birds this will be certainly simpler, because the opening is half the diameter (180°).  So I initially have thought of a template, in order to get the length and incline of pipes reproducible. In addition I have drawn the length and incline to a 6 mm thick plastic strip, 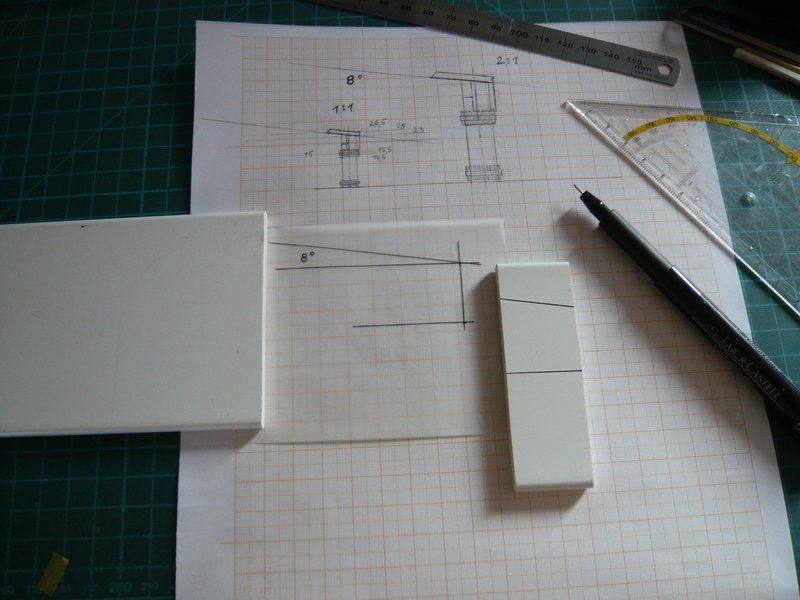 and sawed with a fine saw guides for cutting the tubes. 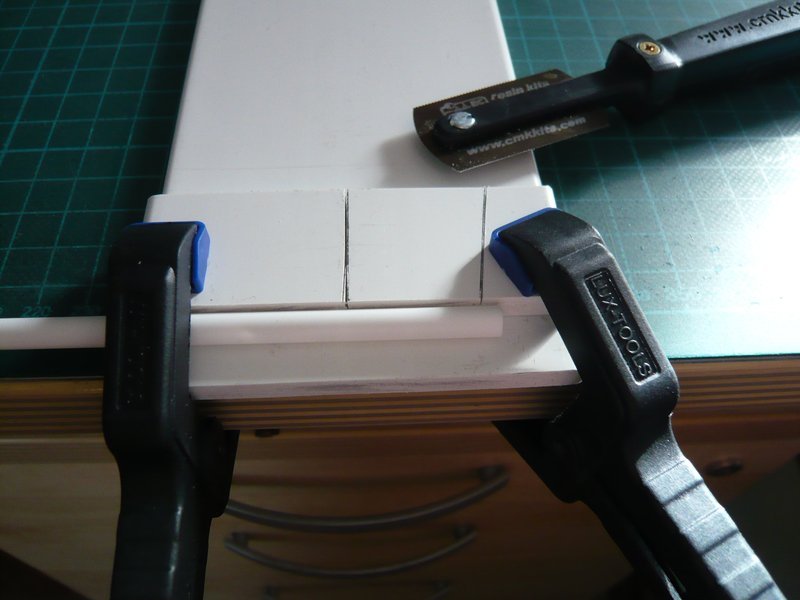 And so I could serrate the pipes with the slant for the covers, as I did here.  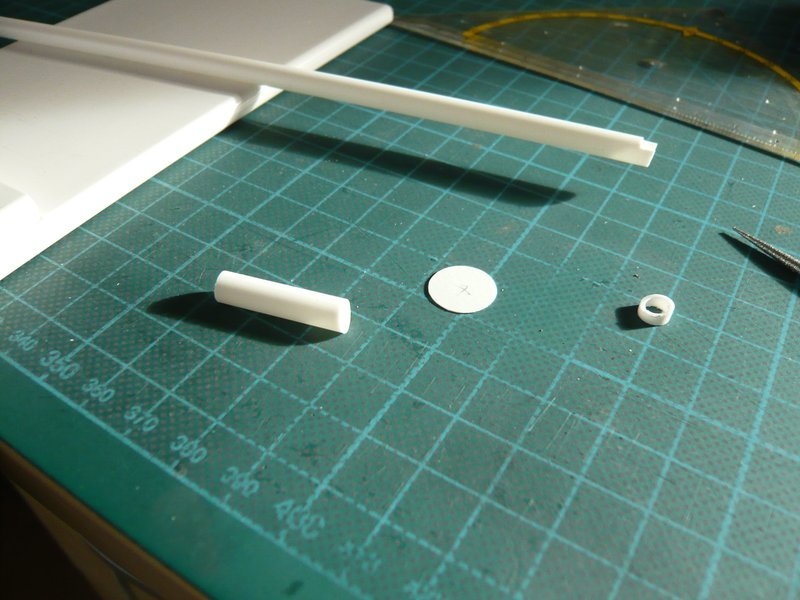 Now only the opening at the front must still be sawed. Perhaps it would be better not to cut the tubes to the final length immediately, but rather to cut only the opening, this rework accordingly until the opening is right, and only then cut to the final length.  Then I had a feeling of success in our hobby shop where I found this nice part for the two middle rainbirds. This is a Knitting needle with 8 mm diameter, which corresponds exactly the diameter of the thicker foot part, I have marked.  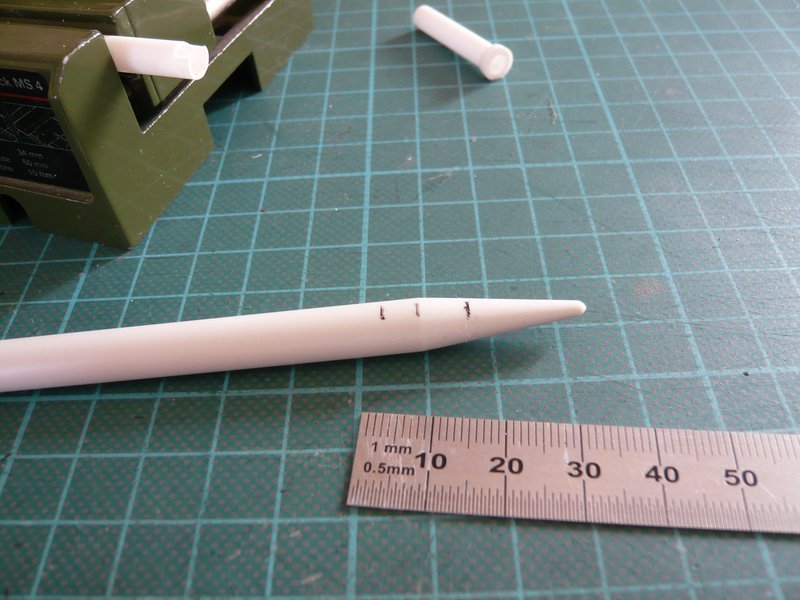 And the top corresponds to the shape and dimensions pretty much the central conical part of the bird, what really has surprised me.  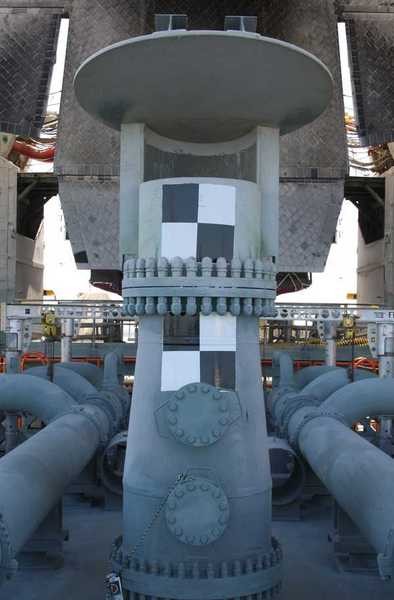 Source: NASA Now only a pipe with Ø 6.3 mm must then be fitted with the wide opening and cover, and the shell construction is finished, that could work. 
__________________
Greetings from Germany Manfred Under construction: Launch Pad 39A with Challenger STS-6 (1:144)
|
|
#946
02-07-2016, 05:01 AM
|
||||
|
||||
|
Another small part you've put so much effort. Willing to see it finished soon.
__________________
Finished projects: RMS Mauretania 1/250; SS Canberra 1/250; Toyota Hilux Overdrive; Current projects: SS Michelangelo 1/250
|
|
#947
02-07-2016, 07:07 AM
|
||||
|
||||
|
Thanks Sharunas,
yep, these six Rainbirds are already quite a challenge. Let's say better a mid-size part, the Pipe supports and ROFIS were even smaller. BTW, I am curious how many individual parts such a Rainbird will have, when he's finished ...
__________________
Greetings from Germany Manfred Under construction: Launch Pad 39A with Challenger STS-6 (1:144)
|
|
#948
02-08-2016, 05:21 PM
|
||||
|
||||
|
Hello everybody,
yep, finding the knitting needle was really a stroke of luck, because thus I need only two parts for the tube, because the transition to the conical central part already exists, and can thus save me some work. But just in case I had already set aside some marker pens (Ø 8 mm).  Then I further thought about to improve the cutting of the bevels for the cover plates. For this I've cut a separate 8° cut in my miter-device what sawing makes something easier as with my auxiliary device.  That could occur to me even before. That could occur to me even before.  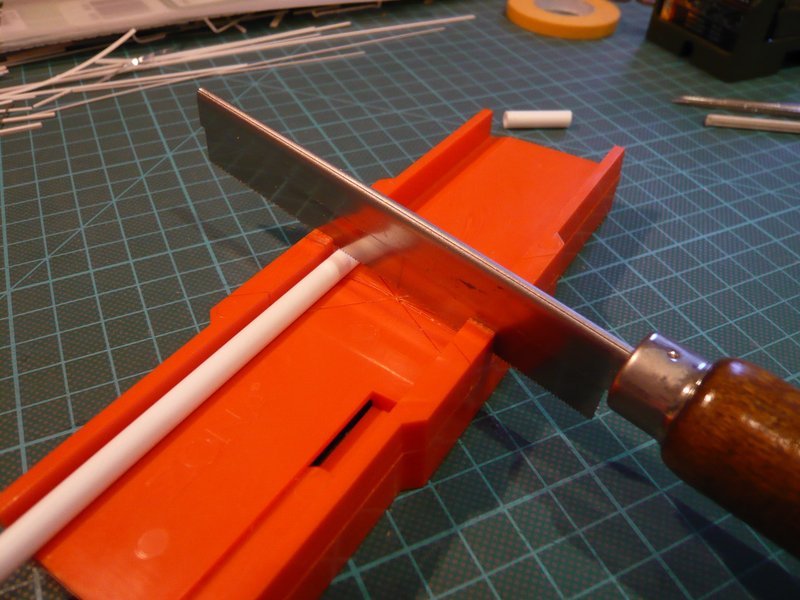 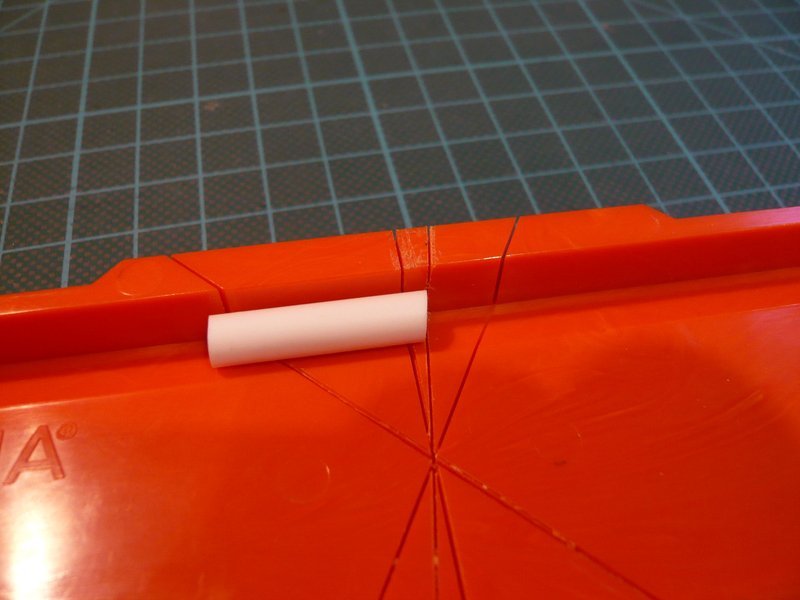 And for marking out and sawing of the openings I have also been thinking a better solution. For that I have marked the opening of a tape and glued to the tube. 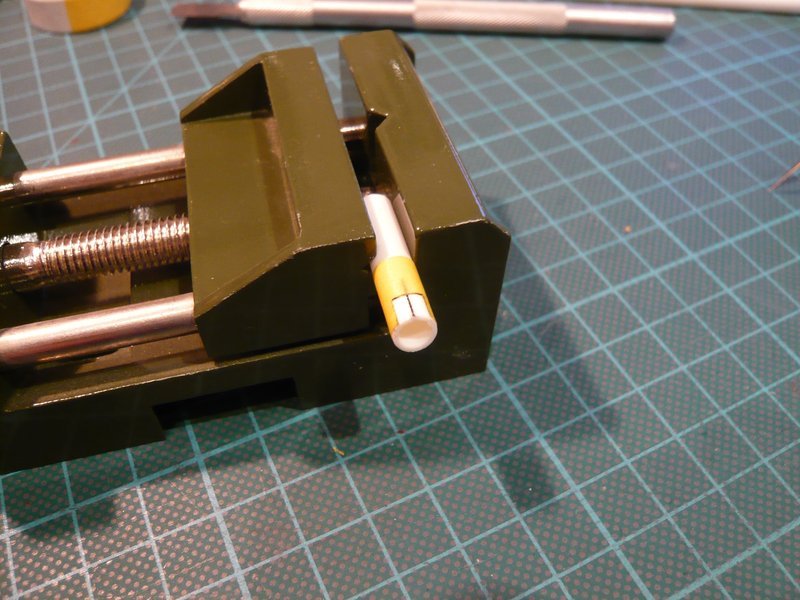 And for the sawing of the opening I have used my Dremel with the small circular saw, 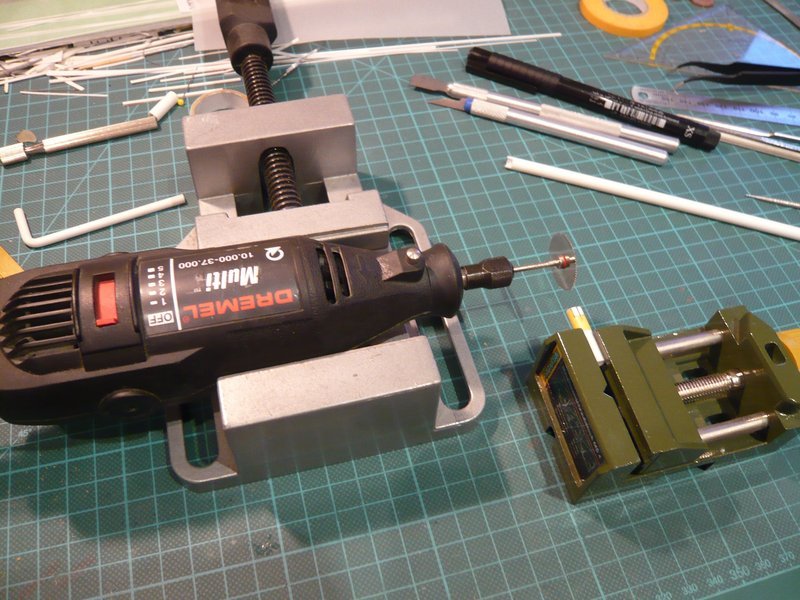 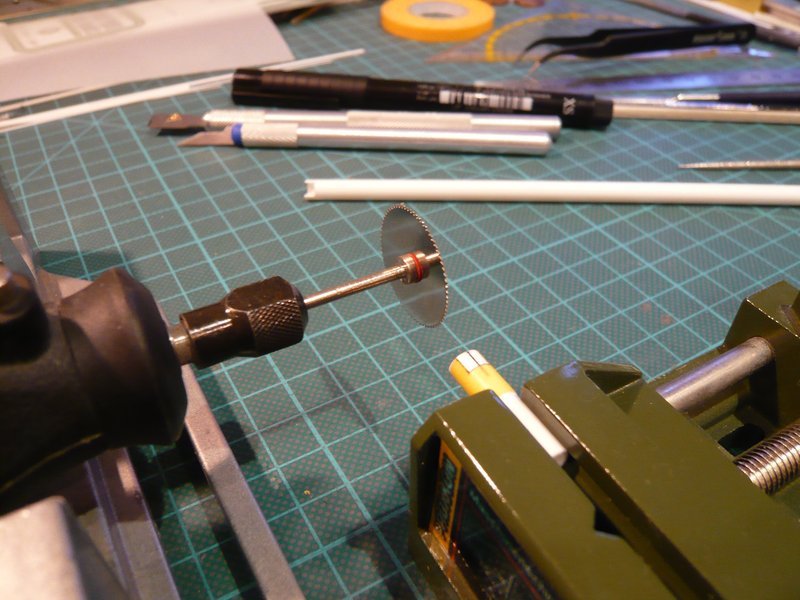 because the openings so should certainly become more accurate, I hope.
__________________
Greetings from Germany Manfred Under construction: Launch Pad 39A with Challenger STS-6 (1:144) Last edited by spacerunner; 09-25-2016 at 04:25 PM.
|
|
#949
02-12-2016, 04:11 AM
|
||||
|
||||
|
Hello everybody,
that was a surprise when I've realized that I had sawed the opening at the bottom of the beveling instead of at the top, what nobody has noticed so far. And that was also the reason for further pretests. Here again first with the mini circular saw, but without having sawed the beveling previously. 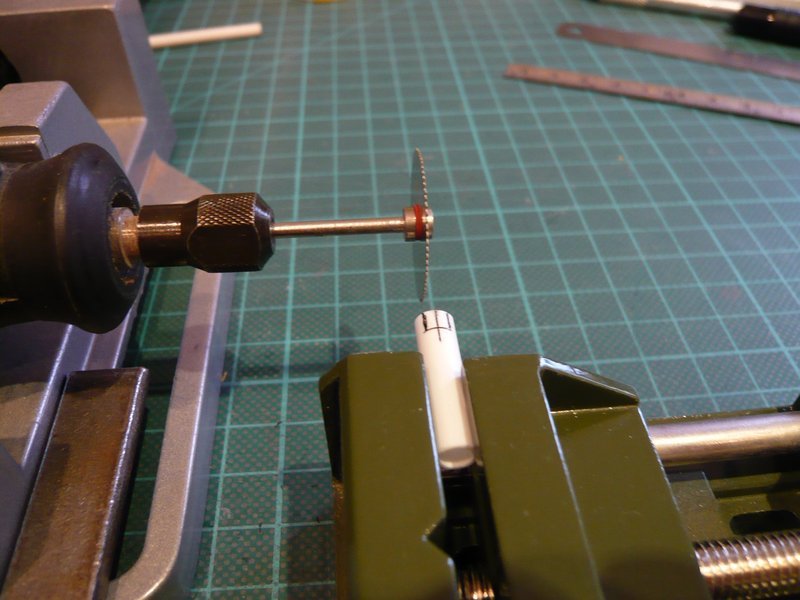 But thereby the markings can also quickly be exceeded, 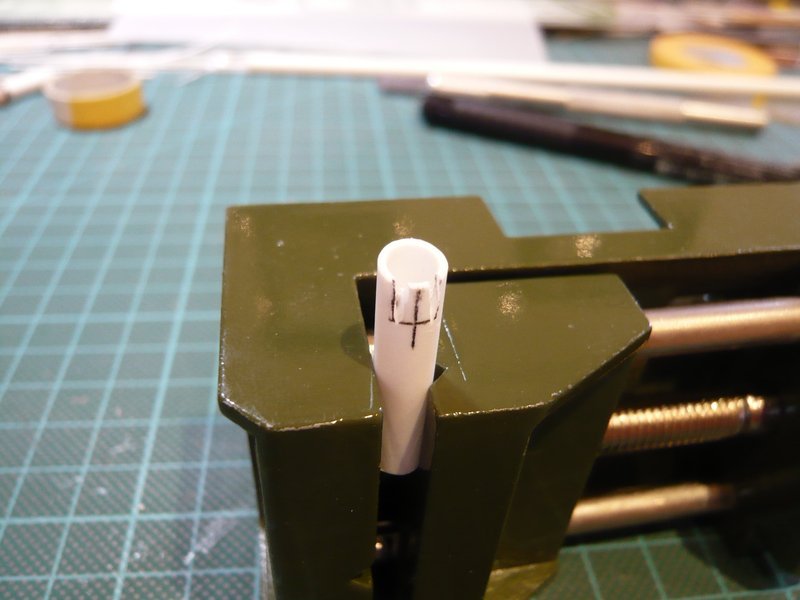 or else be cut as here in another test into the side wall. 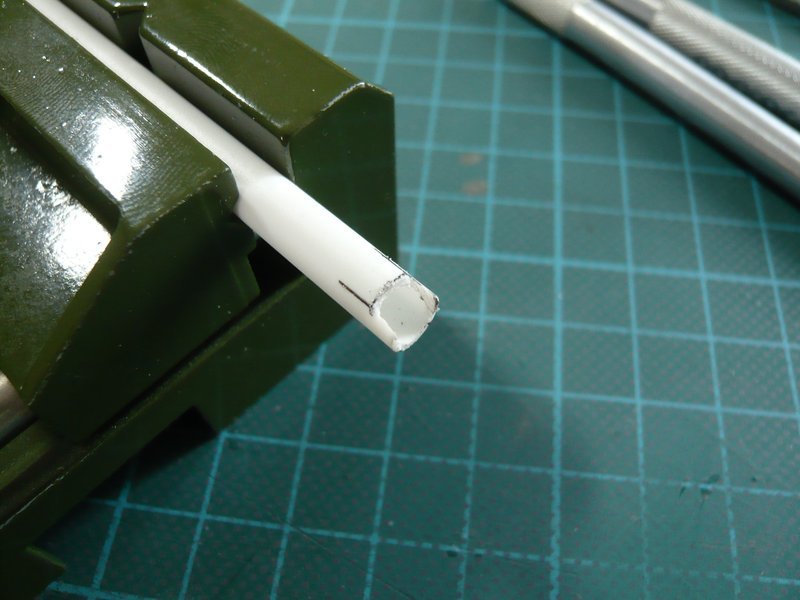 In any case one must still rework the opening, 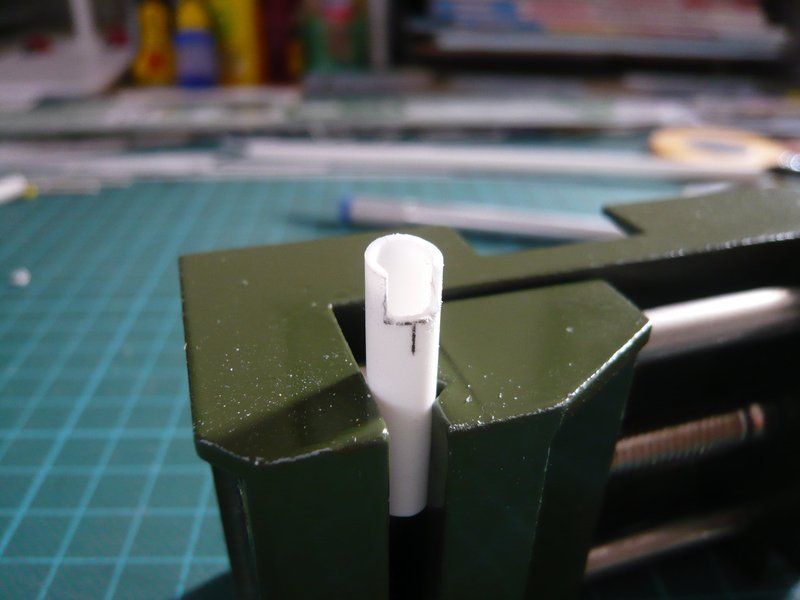 whereby this also can become wider and higher than desirable.  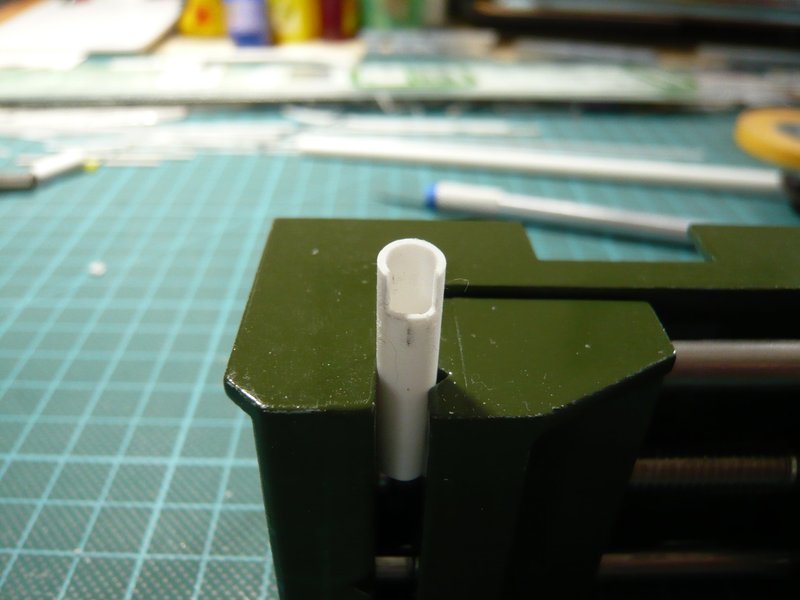 The height can be adapted by making the cut for the beveling a little bit further below. But all in all I'm still not completely satisfied with the results of the saw method, especially as I have also noticed that probably the spindle or the clamping sleeve of my Dremel has a slight blow which is transmitted to the saw blade. That's why I tried yet another method, where far fewer swarfs arise, and therefore seems to me much more sympathetic. For that I have used this cutter blade with straight blade, which can be applied as a wood chisel. For that I have pushed the tube to a suitable drill shank and then carefully gouged out the opening, what has worked very well.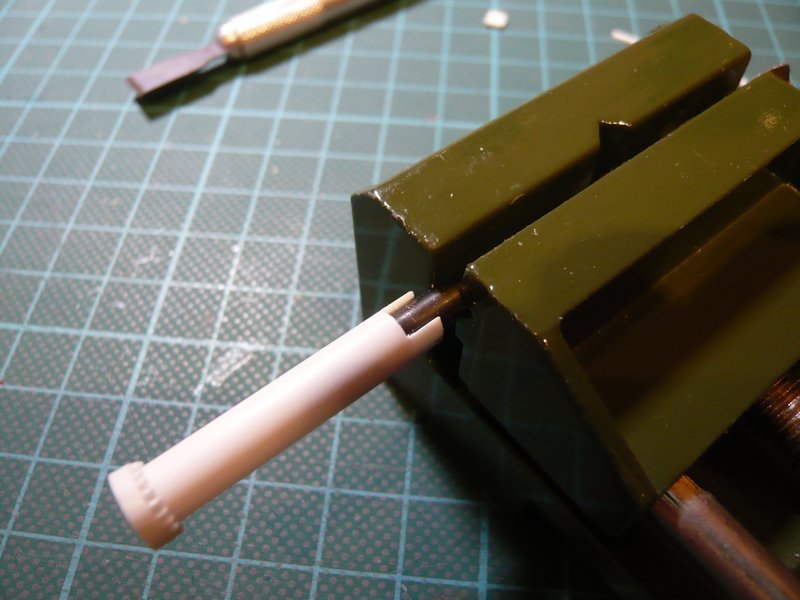 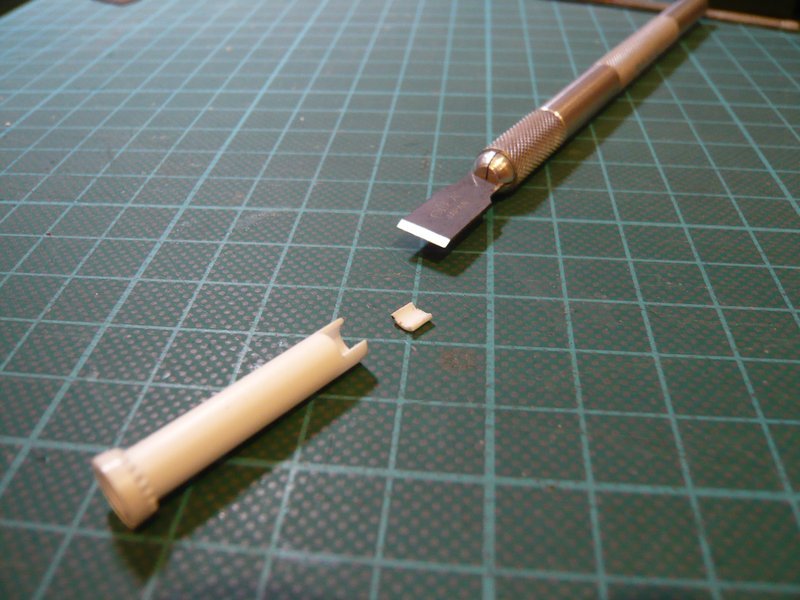 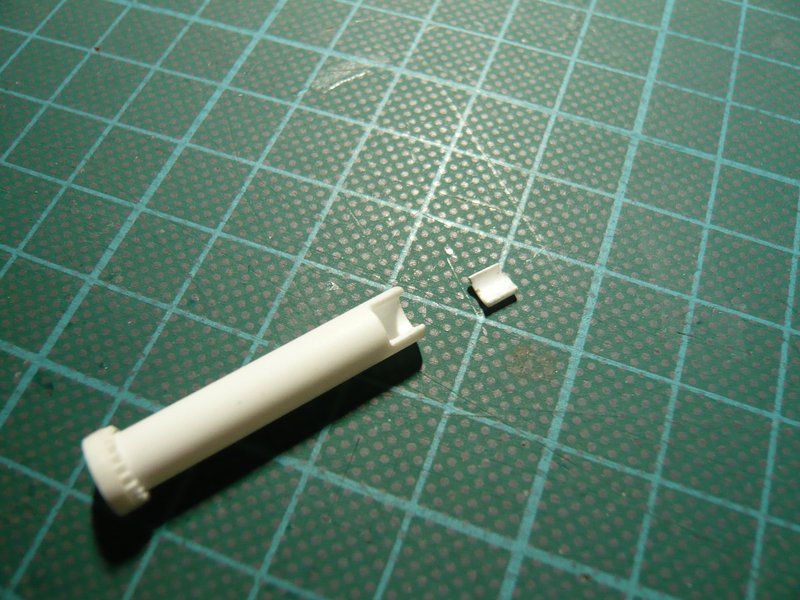 And as you can see, the edges are immediately much more accurate and cleaner than with the saw method and require almost no post-processing. 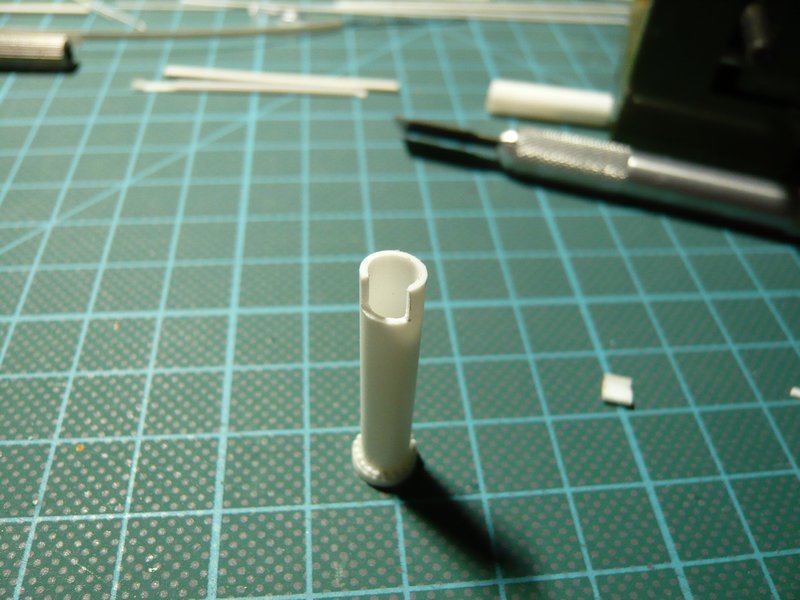 And the beveling can also be subsequently attached smoothly. 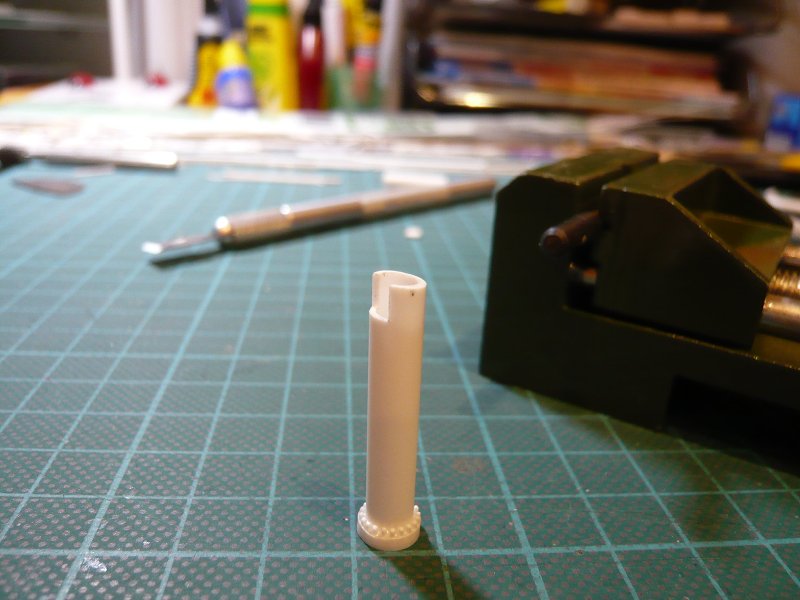 And that's why I will now apply this simpler and more accurate method.
__________________
Greetings from Germany Manfred Under construction: Launch Pad 39A with Challenger STS-6 (1:144) Last edited by spacerunner; 09-25-2016 at 04:27 PM.
|
|
#950
02-12-2016, 05:56 AM
|
||||
|
||||
|
The story reminds me of a time when security was being beefed up in hospitals to reduce the incidence of undesirables getting into the delivery unit of obs/gynae wards. They put in a host of new doors with keypad locks and intercom systems but in one department we were locked out for a whole shift. An installation crew had installed the lockes the wrong way round and were locked in the security room between the main hospital and the unit and they could not get in or out. A complete shift was locked in the unit while another was locked out. I know, a logical person would have suggested using the fire escape for the staff but I AM talking about health service and management would not let it happen. The locksmiths had only themselves to blame but it was highly 'ripe' in there when the doors finally came off.
|
 |
|
|


 Linear Mode

