


|
|
|
#371
 05-27-2018, 04:57 PM
|
|||
|
|||
|
Quote:
Regards Kevin
__________________
Normally the most advanced tech I use is a pencil. 
|
|
#372
05-27-2018, 05:01 PM
|
|||
|
|||
|
Quote:
Quote:
Quote:
Thanks for your support. Very much appreciated. Will try to take lots of photos. Is there a way to upload videos onto the forum? Regards Kevin
__________________
Normally the most advanced tech I use is a pencil.
|
|
#373
05-27-2018, 05:07 PM
|
|||
|
|||
|
Quote:
Regards Kevin
__________________
Normally the most advanced tech I use is a pencil.
|
|
#374
05-27-2018, 05:15 PM
|
|||
|
|||
|
Quote:
Thanks for your suggestion. The real problem is the volume of the model in that it will occupy at least 1/3 of the room (at the very least). Houses in England are not like the big two storey ceilings or huge open plan living areas of Florida homes. C'est la vie. Thanks for your comments Regards Kevin
__________________
Normally the most advanced tech I use is a pencil.
|
|
#375
05-28-2018, 12:50 PM
|
||||
|
||||
|
Hi Kevin,
Great to see your progress! After reading about your intended display date, looks like you've created a deadline to finish by. I too plan on building Ken's Command Module, thinking of enlarging to 1/6th scale, the only thing I would like to change is using actual text for the switches... Not sure if you've seen the 1/4 scale Mercury Capsule constructed by closet astronaut: The Journey Begins...1/4 Mercury capsule Here is the POTW photo: http://www.papermodelers.com/forum/p...=scale+mercury Hopefully the reading is not going to sidetrack you for too long. Lots of interesting work has been done, yours is another upgrade on "normal"! Looking forward to the final build photo! Best regards, Mike Bauer
__________________
Cardstock Property Tables and Terms Flying Cardstock Models http://www.papermodelers.com/forum/m...uers-projects/
|
| Google Adsense |
|
#376
05-29-2018, 05:50 AM
|
|||
|
|||
|
Quote:
Good point. But I did live in a 2up-2down in Ireland for many years, so I know what small homes are like (-= But you're right, I wasn't considering the amount it would stick out from the wall. Cheers, John Gay
|
|
#377
06-02-2018, 01:26 AM
|
|||
|
|||
|
Quote:
The 1/6 Ken West command module sounds awesome. Sure loads of people would like to see that. Thanks also for the link to the 1/4 Mercury capsule. Really enjoyed reading it. Gave me a boost. And yes I have got a deadline now for a finish and am feeling nervous about getting it finished. Regards Kevin
__________________
Normally the most advanced tech I use is a pencil.
|
|
#378
06-02-2018, 01:34 AM
|
|||
|
|||
|
Change for the 1/48 model
Dear all
I have been doing some thinking. Because of the 1/24 model going to be displayed horizontally I still want a "vertical" Saturn V to be seen. Fortunately "health and safety" permits a 1/48 model being displayed vertically, so I have decided to make the rest of my 1/48 model as an "outside" skin only (so that is stage 2 and up). That means I will (hopefully) finish it in time to be able to display it along with the 1/24 model. Afterwards I will make a "full" stage two upwards which can go with the already made stage one and inter-stage. Regards Kevin
__________________
Normally the most advanced tech I use is a pencil.
|
|
#379
06-02-2018, 06:17 AM
|
|||
|
|||
|
1/48 "outer" update
Dear all
So I have been working on the 1/48 "outer" model. So first I made the "States" ring of stage 2 (as with the 1/24 model for the States ring you only need one panel with an umbilical outline and three panels without, see post 357 for details). Next the "backing plates" (from the updates parts which have no parts numbers)were cut out and then attached to the states ring.    The this was all attached to the already made aft skirt   Next up was the "United" ring. This is made of 4 panels each with the word "UNITED" on them. Two of the panels have "vertical sway markers (the 7 black vertical dashes) on them also (part 13) and the other two do not have these markings. Actually on all flight ready Saturn V's there was only one set of vertical sway markers on stage 2 (from what I can tell from all the pictures and information I can find). So I decided to do just one part 13 and three part 14's. After making the ring I attached it to the states ring (remembering just in time to get the sway markers in the correct orientation)    Next up was the forward skirt of stage two followed by the stage 2-3 interstage (cone). Then followed the aft skirt of stage 3. Now the next bit is the LOX/LH2 fuel tank of stage 3. This is part 9. In the original pdf the part has "USA" on this ring twice and on the updates part it has "USA" four times. I really like the look of the parts. However from what I can find out the flight ready Saturn V's never had "USA" on their third stages. But it is the case tested stage 3 did as well as flight Saturn 1B's. So I opted to have just plain white for this part of the rocket.    There was a "Dummy" Saturn V made for "practise" at KSC. This did have USA on stage 3. However I do not think Greelt intended to make this version of the Saturn V since it has a very distinctive black band just above the USA of stage one and this is not on the model. The "dummy" saturn V ( or SA-500F to give it its proper code) was the only Saturn V to have this black band. (Here is a picture from collectspace.com) 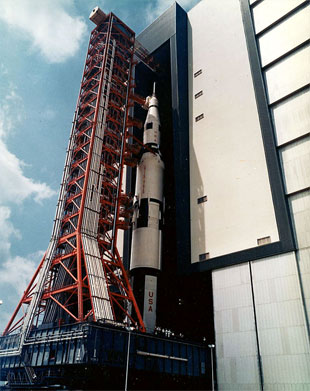 The black band was removed on subsequent Saturn V's since the black paint absorbed heat (more than white) and caused the LOX fuel to get dangerously warm. Does anyone know why the USA on stage 3 was removed (if I am right) on subsequent Saturn V's? Anyway I finished off by adding the forward skirt to stage 3   Hopefully more progress soon Kevin
__________________
Normally the most advanced tech I use is a pencil.
|
|
#380
06-02-2018, 09:13 AM
|
||||
|
||||
|
Apollo 7's S-IVB had the "USA" and the two black bands. It was, of course, launched atop a Saturn 1B, however.
No idea why the "USA" was later removed. Could be a good question for Rick Sternbach. (Yeah, the "Star Trek" guy....) I once asked him why different fonts were used on all three stages and he said it was because each was made by a different contractor. Not only were fonts different, but the shade of red (and even white) each contractor used was different.
|
| Google Adsense |
 |
| Tags |
| apollo, moon, rocket, saturn v |
|
|


 You should video the reactions of people when you tell them what it's made of!
 Linear Mode

