


|
|
|
#521
 11-23-2018, 07:41 PM
|
||||
|
||||
|
You sir, are my kind of crazy.
Build big, or go home. Kudos. I'll be watching this one.
__________________
"Squirrels are like cigarettes- they're only dangerous when put in the mouth and set on fire..." 
|
|
#522
11-25-2018, 12:27 PM
|
|||
|
|||
|
Thanks for the support Ekuth and glad you are enjoying the build
Regards Kevin
__________________
Normally the most advanced tech I use is a pencil.
|
|
#523
11-25-2018, 01:16 PM
|
|||
|
|||
|
1/24 stage 3 ullage rocket motors
Dear all
So I have finally got to make the ullage rocket motors. The first thing I found out for this bit is that I can find no photo that clearly shows one of these rocket motors on an Apollo Saturn V where the fairing is on. I did find this drawing of one on a Saturn 1B, from Uhádněte, co je na obrázku | forum.kosmonautix.cz which I think is the same as the Saturn V in terms of this part (except there are three of them rather than two). 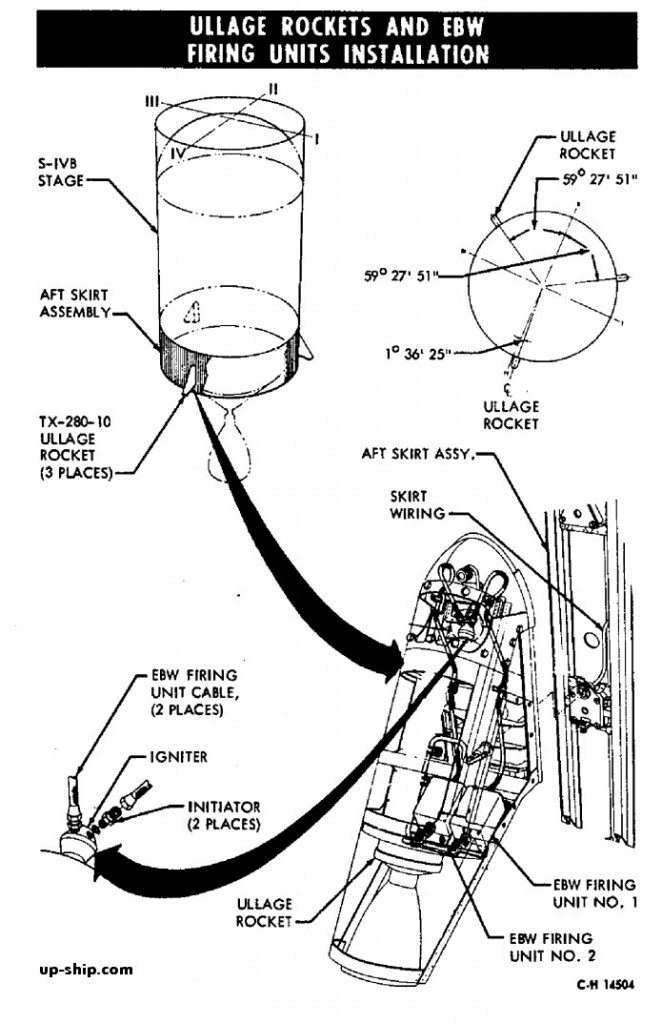 The best photo I could find was from The Project Apollo Image Gallery and was this one  I also looked at the MSFC poster  Away, after all that here is what I did. First up you need two copies of the parts supplied  I then cut them out as shown and glued them together as shown. Notice I cut the "circle" out and after they part was glued together I trimmed out the overlap of the tab with the semi-circular tab.    The I made "full tabs" for the part that will attach to the body of the rocket and then added magnetic paper to them . Finally glued them to the main part (as shown)    Now for the "extension" pipes. Actually the "hole" they feed into should be an ellipse rather than the semi circle and half an ellipse which is what the parts are as I have made them. I did not know how to do an ellipse on the computer so just went with it. Actually the tube looks to be a truncated cone in real life so this part is all "conic sections". However I was adapting the parts in the kit as much as possible. The "cylinder part" supplied is way to big for what I did so it had to be reduced as shown (easiest to just count the rivets if you are copying this way)  After forming into a tube I pencilled in some more rivets down the seam and then added it to the main part. Finally gave them the "fridge" test.    Regards Kevin
__________________
Normally the most advanced tech I use is a pencil.
|
|
#525
12-02-2018, 12:24 AM
|
|||
|
|||
|
Thanks rifleman. Much appreciated
Regards Kevin
__________________
Normally the most advanced tech I use is a pencil.
|
|
#526
12-02-2018, 12:49 AM
|
|||
|
|||
|
A bit more on 1/24 stage 3 and new astronauts
Dear all
Progress has been slow lately due to other things but a little bit more has been done on stage three. I have attached the ferrous paper to the rocket for the ullage motors shown below along with all the other bits attached whilst the stage rests in a "stand"   Next is to make the LH2 fuel pipe by adapting the stage two additional parts. Meanwhile 3 of the six astronauts have turned up  As you can see they are orange. Unfortunately my friend forgot to change the spool of the printing material to white. They are kindly redoing them for me. Anyway I thought I would log what it was like to release one of the astronauts from their "cocoon" of support material   As you can see the support material is a hexagonal based structure which is made of (so I am told) essentially a type of PVA glue. So the guidence was to "just" soak in warm water. Care must be taken as too hot and the model itself will deform. So into a "warm bath" they went  within a couple of minutes the support material went very soft and "gloopy". I decided to pull off the big bit with my hands (a sticky job). After a little experimentation I found it best to totally submerge the model with a weight and changed the water several times. I think you want the water not to get saturated. In the end the model was in for 1-2 hours. Here is the result  There are a couple of places where there is still some support material (between the helmet and backpack) but I think this would go with some more time in the water. However I did not continue with the project because the following arrived  So time to start on the real astronauts Regards Kevin
__________________
Normally the most advanced tech I use is a pencil.
|
|
#527
12-03-2018, 03:50 PM
|
|||
|
|||
|
Releasing the astonauts
Dear all
Just a quick update on how the removal of the support material from the astronauts is going So they were like this  I found that water about 45 to (at most) 50 degrees centigrade was the best to just leave the models in. As you can see to begin with the support material slowly falls off (like in some science fiction film)   I found changing the water about every 20 to 30 mins was best. Each bath removes more and more of this "sticky" stuff. After about 5 baths they looked like this  I found using a glass bowl was better than a plastic bowl since the "water" (particularly at the beginning) is really "glu-y", not surprisingly and it is easier to clean a glass bowl rather than a plastic bowl. Also with this amount of support I did not pour the "dirty water" down the sink. Finally I put a plate on top of the models to keep them fully submerged. So now I am going to leave all the models soaking overnight to hopefully dissolve away the last thin bits of support solution. Regards Kevin
__________________
Normally the most advanced tech I use is a pencil.
|
|
#528
12-05-2018, 02:56 PM
|
|||
|
|||
|
1/24 stage 3 finally finished
Dear all
So to finish off stage 3 I first needed to amend some of the pipe parts from stage 4 to made a LH2 feed on the thrust structure of stage 3. For this I used one long and one short pipe piece and joined them as shown (which gave quite a varied flexible joint).  I then glued the pipe "insitu" trimming the angle to match the inlet of the J-2 engine. Also added a couple of "holding brackets" also from the addition parts for stage 2.  This enabled me to attached the ferrous paper for the LH2 line feed on the body of the rocket  To finish things off I added a bit of pipe for the LOX feed entering the thrust structure  And that is it, stage 3 finished. So I took a few photos!        I feel the end is in sight now Regards Kevin
__________________
Normally the most advanced tech I use is a pencil.
|
|
#530
12-08-2018, 09:35 AM
|
|||
|
|||
|
Thanks rifleman. Yep, not long to go now I think
Regards Kevin
__________________
Normally the most advanced tech I use is a pencil.
|
 |
| Tags |
| apollo, moon, rocket, saturn v |
|
|


 Linear Mode

