


|
|
|
|||||||
 |
|
|
Thread Tools | Display Modes |
|
#91
 01-29-2020, 01:08 PM
|
|||
|
|||
|
Life-Size upper thigh former for Neil
Dear all
Whilst making the upper thigh former for Buzz (see previous post) I got a bit of a production line going and also made the former for Neil and well as the two mirror image formers for the (to be built) bottom of the torso of Buzz and Neil. So here is Neil's completed former for the upper thighs  This large model has the continual challenge of how to hold the parts together that you are trying to join. Sometimes it is more tricky than others. In the past (at times) I have used so little pegs to hold things in place before gluing  However these are just too small and weak for this model and the thigh former. It required bigger stronger bull dog clips  So here is the former being glued into place  I found this quite a handful. Here is the former fully glued in place  So now begins the (very) long task of reinforcing (in the same style as the shins and knees) the upper thighs of Buzz and Neil Regards Kevin
__________________
Normally the most advanced tech I use is a pencil. 
|
|
#92
01-30-2020, 06:07 PM
|
||||
|
||||
|
Rock. On. You are killing it!
__________________
My other life:http://rcorycollins.weebly.com/
|
|
#94
02-02-2020, 04:28 PM
|
|||
|
|||
|
Quote:
Regards Kevin
__________________
Normally the most advanced tech I use is a pencil.
|
|
#95
02-02-2020, 04:30 PM
|
|||
|
|||
|
Quote:
Regards Kevin
__________________
Normally the most advanced tech I use is a pencil.
|
| Google Adsense |
|
#96
02-02-2020, 04:52 PM
|
|||
|
|||
|
Life-Size upper legs reinforcement
Dear all
So the long haul of reinforcement of the upper legs has started. To begin with the main former needed the first layer of inner support   The unusual shape combined with the large size means I need to twist and hold the upper legs at all sorts of strange angles in order to access where I want to place the parts. It has turned out (totally by luck) that the strong cross bar of the former makes this manageable. I am not so sure I could do it without it. Anyway that bit has been completed   So just the rest of the reinforcing of Buzz's and then Neil's upper legs to go! Of course this is going to take a while and by and large there is not much to see of this process. However one thing I have learned (which might be of interest of some) is about glue sizes. This is as follows:- There are already several hundred parts of reinforcement in the model and many (probably) thousands to go. It takes a lot of glue to cover that area. I tend to uses Aleene's tacky glue for reinforcement parts and buy the glue in 8 fl oz size bottles. However due to the volume required, I bought some 16 fl oz bottles (as it is more economical).  So what I have found is the 16 fl oz bottles are a bit too wide do a lot of squeezing ( I can feel the strain on my fingers). However what I have discovered is that you can empty the contents of the 16 fl oz bottle into 2 8 fl oz bottles and the glue is just fine even when you get to the bottle of the second bottle. The brief few seconds exposed to the air when "decanting" does not seem to affect the glue. Regards Kevin
__________________
Normally the most advanced tech I use is a pencil.
|
|
#97
02-04-2020, 05:50 PM
|
|||
|
|||
|
First look at the torso
Dear all
So whilst the reinforcing of the upper legs is underway I starting thinking about the next stage which is the torso. I started looking at the parts for the 1/4 model and to be honest I just could not picture how this all went together. So I decided to make a very rough version using just ordinary photocopy paper and sellotape. As I started putting it together it suddenly made sense (to me) that it was made in a similar way as Japanese or Roman armour 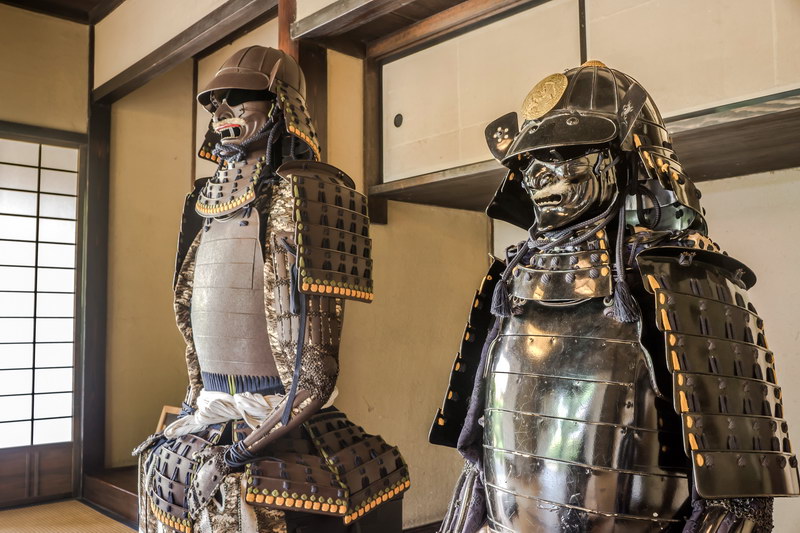 (from https://samuraiswords.store/samurai-armor/ )  (from https://costumes.lovetoknow.com/roman-soldier-uniform ) This is the rough version of the torso I made  This is the first part of the model which has a difference between Buzz and Neil and it is their right shoulder that is different. Whilst Neil's right shoulder is essentially a mirror image of his left shoulder, Buzz's right shoulder is completely different. So the rough torso also let me understand this shoulder too. The torso contains a number of undulating joins which move from "mountain" to "valley" joins and (I found) doing a rough model really helped understand what was going on. So will now tackle the real 1/4 torsos whilst still continuing with the reinforcing of the upper legs. Regards Kevin
__________________
Normally the most advanced tech I use is a pencil.
|
|
#98
02-06-2020, 03:32 PM
|
|||
|
|||
|
1/4 torso
Dear all
So the slow work on upper thigh reinforcement continues. As a break from this I started on making the torsos for 1/4 scale models. It might be useful to point out there is a slight discrepancy between the labelling of the parts and the instructions on the torso. In the actual parts, part 4a has "absorbed" what is labeled 4m and 4L on the instructions. Anyway, I started making both torsos at the same time  That is the "rough" torso in the background which I kept referring to so see how the parts angled as they joined. It is strange moving from the life-size to the 1/4 scale. Everything seems very small on the 1/4 (though they are not small in reality by any stretch of the imagination). The other unusual feeling is how quickly you can built something up. So here is the start of the torsos with Gene for scale  Prewrinkling the parts makes it so much easier to line the joins up. I am starting to wonder if it is going to be possible to do the life-size torso without doing this. So here are three of photos during the build of the torsos    Finally the arm and neck formers (called bulkheads in the instructions) added along with the "disks" to make flat where the mission patches and the umbilical connectors will go. Neil is on the left as we look at them.  I am starting to be very concerned about just how big a part the torso is going to be in the life-size model. Two concerns I already have is that I will not be able to reach everywhere as I try and build it (which means I will have the break it into at least two parts). The other is can it be made strong enough to support itself, arms, helmut and life support pack?   Gently squeezing the torso in various places (as if arms etc where being added) and looking at the view at the above two photos are helps me visualize where the forces are acting and the internal support is necessary. But there is plenty of time to think about this during the (still ongoing) upper leg reinforcement. Regards Kevin
__________________
Normally the most advanced tech I use is a pencil.
|
|
#99
03-29-2020, 08:40 AM
|
|||
|
|||
|
More on reinforcing life-size thighs
Dear all
So I have been working on the visually very unexciting task of reinforcing the thighs of Buzz and Neil. During this time the corona virus has risen up to grip the world. So progress on the model has taken a back seat somewhat lately, however I have now finished reinforcing the thighs of Buzz and Neil. This involved the same system as for the shins and knees, which was basically triple layered. It turned out to be quite a "patchwork" what with all the curves. Here are some (probably unenlightening) photos to give you a feel         An extra thing I did for the thighs was add an outside reinforcing "rim" around the "edges" of the part. One layer of paper just seemed a little bit frail (though this is probably overkill on my part). Here is some photos to help explain what I mean    So the next thing is to start the life-size torsos! Regards and take care Kevin
__________________
Normally the most advanced tech I use is a pencil. Last edited by Algebraist; 03-29-2020 at 08:47 AM. Reason: spelling corrections
|
|
| Tags |
| apollo, astronaut, buzz aldrin, moon, neil armstrong |
| Thread Tools | |
| Display Modes | |
|
|


 Linear Mode

