


|
|
|
#33
 12-30-2010, 03:52 PM
|
|||
|
|||
|
Quote:
Niebla de Fuego, su trabajo en este projecto es muy apreciado. Estoy prestando mucho attencion. Muchisimas gracias!! 
|
|
#34
12-30-2010, 06:14 PM
|
||||
|
||||
|
I believe this will be the last advance of the vector process in this year.
If you look at the first photo on page 2 of the original book you can see the seats from the back. Those are the ones that this model offers.  The seats are on page 4 of the parts. Wicker seats are ready. As clean as possible following closely the original design.  I know that there is at least another different design that was used in the tri-motors, and that can be found in plenty of photos of this airplane. 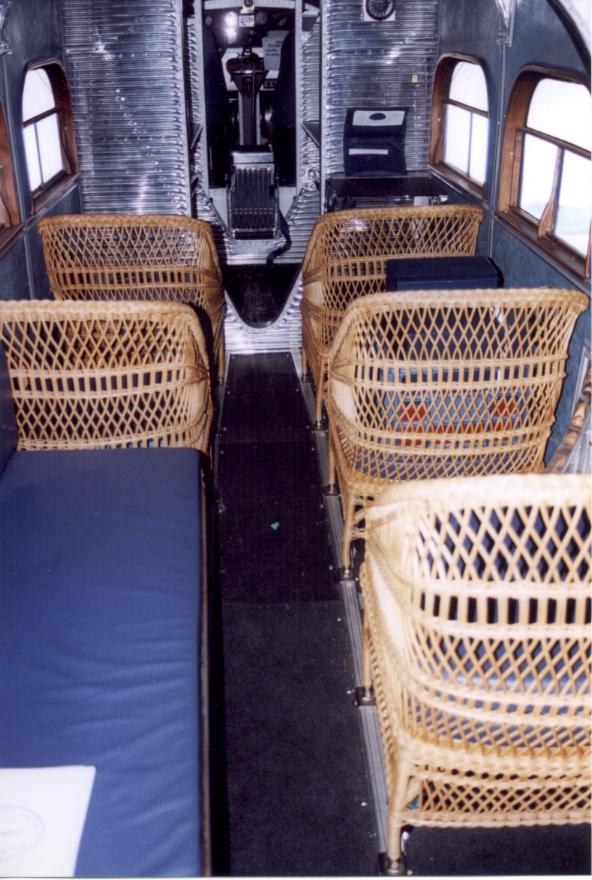 Inspired in this thread: (scroll down a little). Scratchbuilding a 1/32 1927 Ford AT-4 Trimotor - ARC Air Discussion Forums I will try to make my own attempt at designing the second set of seats so that you have another choice if you are planning on building this model with a different livery. -------------------------------------------------- I have to say... A big thank you to all the people who have commented and who are supporting this project. Your input is highly appreciated.  A couple of hours ago when considering the "problem" of the spark plug, and seeing how information and photos are shared by different people in so little time (and from different parts of the world) I realized a couple of things: - The model was originally published in 1982. 28 years ago. - 28 years ago there was no internet as we know it today. - Peter Zorn surely had to make a lengthy research for his model. - That research probably took him several months (or maybe more)... - not counting the time of the actual development of the model... - almost a decade before Corel Draw were born... - and even a few months before Autocad were released. All things considered, this model is a true gem. Each time I trace a different part, the more respect I have for Mr. Zorn. I hope that this vectorizing honors the original model properly. ------- See you next year!
__________________
Rubén Andrés Martínez A.
|
|
#35
12-30-2010, 06:31 PM
|
||||
|
||||
|
Great job Ruben. I like the additional cut lines you incorporated.
I noticed there are several cut areas on some of the model parts that need the scissors depicted. Are you going to recolor the seats with the wicker coloring? Also the interior sidewalls with wood grain or coloring shown in some of the photo's....Ron
|
| Google Adsense |
|
#36
12-30-2010, 08:40 PM
|
||||
|
||||
|
Quote:
Yes Ron. The idea is to have at least two options: - The original clean "only-lines" version. - The parts with the colours suggested in the instruction sheets. This means that there would be two coloured sets of the original seats: light green & tan. And also two different interiors: light green & wood. The coloured versions of the seats would use textures, similar to the one you already saw  Attachment 71659 And I think it is possible to replicate the wooden panels of the interior using also textures. I already used a wood texture in Corel when I draw the propeller of my Fokker Dr.1 And it looked fine. My own very simple Red Baron's Fokker Dr. 1 I would like to stick as much as possible to the original lines, and even though the temptation is high, I would prefer not to mark the cutouts of the black parts of the seats. Mainly, because marking them would take the option out of the modellist. If the modellist is skilled (and has the patience) he can cut them without problem, or leave them as they are to be closer to the original. Marking the cutouts would impose a step on all the modellists, and if the person is novice, it would require more of him than originally intended. The other reason is that the instructions show a very simple seat. By adding cuts, the seat would differ from the illustration in the instructions. Or maybe a marked seat could be also offered as an extra option? Now, as for the Spark plug that Leif mentioned... I'm very tempted to draw the plug in the part shown in the photos By looking at photos of the real N9683 that this model recreates, it is clear the spark is on the front: All sizes | Ford 5-AT-B Tri-Motor (N9683) | Flickr - Photo Sharing! Photos: Ford 5-AT-B Trimotor Aircraft Pictures | Airliners.net Unlike the seats dilemma, this little black dot offers little disruption on the original design, and anyways it will be a bit hidden once the engine is fully assembled. Should we go realistic? Or should we preserve the model as much as possible? (or do we make both options, to let the modellist choose?) I beg you to understand my position: it is not an easy question for me, who are just an unknown person in the paper-modelling world, re-drawing a famous model that is dear to many modellists. Aaaanddd.... in a very unrelated remark. (maybe not so unrelated) It also looks like the N9683 of the model had a very different livery to what is seen today hanging from the National Air & Space Museum as can be seen in the very first B/W photo of the book, and in this old pictures: Photos: Ford 5-AT-B Trimotor Aircraft Pictures | Airliners.net Photos: Ford 5-AT-B Trimotor Aircraft Pictures | Airliners.net The top of the cockpit is also different.
__________________
Rubén Andrés Martínez A.
|
|
#37
12-30-2010, 09:23 PM
|
||||
|
||||
|
Ruben,
It's my opinion we should stay as close to the original design as possible. On the exterior color scheme I would stay with what the model came with. The interior wood panels would look great with the texture of your wooden prop. The seats would look great with the wicker color you chose. On the question of the cockpit windshield If you will notice on Deckapes (Boats) final photo's on his build (page 11) you will see the windscreen is vertical whereas on several photo's shown of different planes show the front windscreen slanted. The early model Tri-Motors had the vertical windscreen and later versions upgraded to the tapered windscreen. I have seen photo's of both versions. I think with a little more research we can determine which version is easier for the modeler and has the best appearance. These are only my thoughts and maybe others can contribute their opinions. Ron
|
|
#38
12-30-2010, 09:54 PM
|
||||
|
||||
|
Ruben,
After looking more closely at the parts involved with the cockpit windscreen it would be best to stay with the original vertical windscreen. This is based on the fact that parts #19  would need to be modified as well as their attachment to other fuselage parts.....Ron
|
|
#39
12-31-2010, 07:37 AM
|
||||
|
||||
|
Ron:
the vertical/slanted windshield would indeed be a problem if I tried to re-design the cockpit. But I wish to pass this problem to the modellist hehehee we have wonderful people here that can attempt scratch-building some of the parts that are raising debate in this thread. Notice also how the paper model has clear windows on the roof of the cockpit while the original N9683 hasn't. Besides this question, I have a little announcement to make. I exported the complete page 1 of the vectorized version from Corel to PDF.... and the result is this:  People who are happy with this file size for page 1, raise your hands!! I am the first to raise it!!!! I expected something like this, but I confess it surprised me too. I thought page 1 would weight somewhere between 50-100 Kb But the result is far more satisfactory. That's another reason why I love vectors
__________________
Rubén Andrés Martínez A.
|
|
#40
12-31-2010, 07:56 AM
|
||||
|
||||
|
Ruben,
I'll surely raise my hand. The original problems of transporting these files were their size.At these sizes they would be down loadable directly from the forum. That is a major accomplishment as well as your hard work on this project. You deserve all the accolades we can bestow on you with this project completion.....Ron
|
| Google Adsense |
 |
|
|


 Linear Mode

