


|
|
|
#1
 10-03-2010, 08:23 AM
|
||||
|
||||
|
Titanic, from very small to very large..
Last week I got a papermodel from the attic wich had been laying there for several years.. wich I had started "back then". It's about time to finish it.. and some wanted to see it finished..
 So here are the first pics.. next to the model is a pen (left) and 1:1200 Titanic model from mr. Currell; 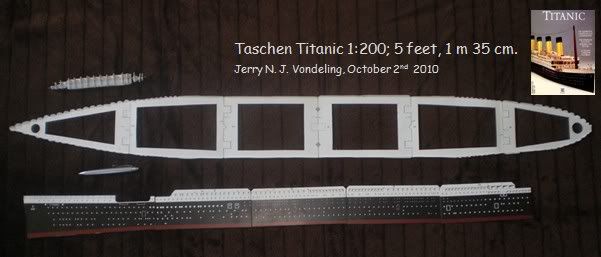 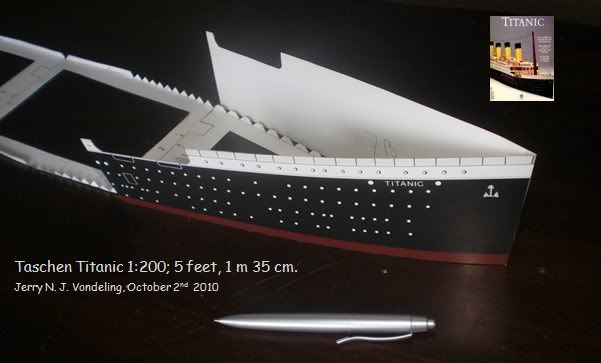

|
| Google Adsense |
|
#2
10-03-2010, 08:27 AM
|
||||
|
||||
|
Good luck with this project, I am a lover of the Titanic and I will follow your progress closely.
The texturing of the model is very good. Un saludo
__________________
Pardon by my English, I use the translator on line.
|
|
#3
10-03-2010, 12:54 PM
|
||||
|
||||
|
???????
Dear Jerry:
How Did you blowup the model from 1:1200 to 1:200? What programs printers ect?????:D Thanks, Miles
|
|
#4
10-03-2010, 02:20 PM
|
||||
|
||||
|
He didn't blow up the 1/1200 Currell model-the 1/200 scale model is in the upper right of the first photo. I found a copy of that one for a couple of dollars in the bargain bin of the local bookstore many years ago. I'll be watching to see how this comes out.
Wayne
|
|
#5
10-03-2010, 02:42 PM
|
||||
|
||||
|
Thanks for the comments so far. Indeed I didn't blow up the model from 1:1200 to 1:200 as Wag had written.
This is a model I had bought some 10 years ago. It is the "Taschen Titanic" released in 1997, wich allready is in the 1:200 scale* I was still living with my parents then.. I started cutting the pieces of the model, then I realised what size the model became I stopped building it, put it in my collection because I had no place to display then. I had only found mr. Currell's Titanic model somewhere last year. It is there for comparisson only.. *Titanic; The Complete Guide to Building the Titanic Published by Benedikt Taschen Verlag Publication date: June 1997 ISBN: 3822894451
|
| Google Adsense |
|
#6
10-04-2010, 06:04 PM
|
||||
|
||||
|
Quote:

|
|
#7
10-05-2010, 09:57 AM
|
||||
|
||||
|
You're very welcome Peter since you were the one to initiate this build.
Today I have made the next steps in building this large model. And allready found some mistakes.. So if any of you is planning on building this model, here are some tips; I had the bottom inside out. I had it with the numbers facing inwards.. then the numbers on the bottom do not correspond with the parts forming the hull, but using the numbering from the manual it came out fine. Only you have to cut the parts very accurate since it is a really tight fit. I had some small gaps between the parts forming the hull. Instead of using glue, I had taped the hull to the bottom using tape wich is normally used to tape bandages this worked fine up to now. I will not use tape for the entire model, but since the inside of the model is never to be seen again, I figured it didnt matter.. 
|
|
#8
10-05-2010, 11:59 AM
|
||||
|
||||
|
Jerry, keep up the brilliant work. I have just won this on e-bay for £5.99 and will be using your build as my guide
Best wishes Mick
__________________
A member of: The Ramblings of people who refuse to grow up thread by: GIXERGS
|
|
#9
10-05-2010, 07:27 PM
|
||||
|
||||
|
Great start Jerry... I am soooo pleased to see this being built, and especially by you - with all the great work you did on the repaints, it's about time you gave yourself a very large pat on the back.... and what better way than with a 1:200 scale version
Mick... You just got yourself a BARGAIN for sure, and i hope that Jerry's W.I.P spurs you on to give it a go. I am glad i didn't sell mine, i will build her when the BUFF is complete - and perhaps put some lights inside too
|
|
#10
10-06-2010, 01:49 PM
|
||||
|
||||
|
Thanks Smyfe, I will, I hope..
. I have seen this model popping up on the sites now and then. 5 pound 99 isn't a high price I think. I had bought mine for 10 euro's in the late nineties. Perhaps you both will build your models, and do a better job then me.. :D
|
| Google Adsense |
 |
|
|


 Linear Mode

